Sharp LC-45GD5U LC-45GD5U Operation Manual - Page 9
Tv Guide On Screen™ Quick Setup Sheet - settings
 |
View all Sharp LC-45GD5U manuals
Add to My Manuals
Save this manual to your list of manuals |
Page 9 highlights
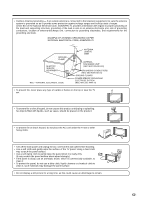
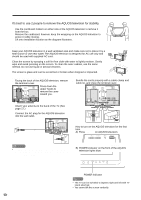
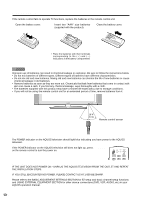
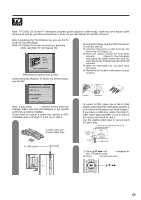
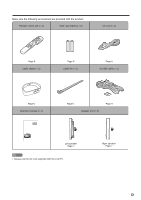
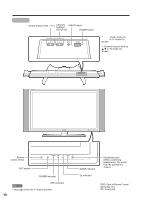
QUICK REFERENCE TV GUIDE ON SCREEN™ QUICK SETUP SHEET Once you set up the TV according to this operation manual, you are ready to set up TV Guide On Screen! Note: TV Guide On Screen™ interactive program guide supports cable-ready, cable box and digital cable services as well as over-the-air broadcast. It does not provide listings for satellite services. After completing the TV's initial set up, you see the TV Guide On Screen Setup Welcome Screen. Note: If TV Guide On Screen is not set up, pressing TV GUIDE while watching TV will display the Welcome Screen. Follow the on-screen instructions If you previously skipped TV Guide On Screen setup, you see the Reminder Screen. 2 Find the VCR and Cable Box IR Sensors. To control recording, find the VCR's IR sensor. 1 Turn the VCR off. 2 Hold the VCR remote so that it touches the front of the VCR (Figure 1). 3 Move the remote across the front while pressing POWER (Figure 2). (You must press and release the power button each time you move the remote; holding down the button will not work). 4 When the VCR powers on, you have found the sensor. 5 Remember the location of the sensor, and go to step 3. If you have a cable box, repeat this procedure using the cable box and its remote, and then go to step 3. Figure 1 Figure 2 Note: If you press ENTER and the screen does not change, make sure that the batteries in the remote control are properly installed. If you need to control a cable box and/or a VCR, complete steps 1 through 3. If not, go to step 4. 1 Find and Connect the included G-LINK cable into the G-LINK terminal. G-LINK cable with Double-Sided Tape G-LINK cable Correct Incorrect 3 Place the G-LINK cable(s) To control a VCR, place one of the G-LINK wands underneath the VCR approximately 1 inch in front of the sensor you found in step 2. If you have a cable box, place the other G- LINK wand approximately 1 inch in front of the sensor you found in step 2. Use the double-sided tape to secure each G-LINK cable. This end is connected to the TV as shown in step 1. G-LINK cable VCR or Cable Box 1 inch G-LINK wand 4 Use the TV remote for On-Screen Setup 1 Press a/b/c/d and ENTER to highlight an item in a Setup screen. 2 Press ENTER to select that item. a/b/c/d ENTER 9
-
 1
1 -
2
-
3
-
 4
4 -
 5
5 -
 6
6 -
 7
7 -
 8
8 -
 9
9 -
 10
10 -
 11
11 -
 12
12 -
 13
13 -
 14
14 -
15
-
16
-
17
-
18
-
19
-
20
-
21
-
22
-
23
-
24
-
25
-
26
-
27
-
28
-
29
-
30
-
31
-
32
-
33
-
34
-
35
-
36
-
37
-
38
-
39
-
40
-
41
-
42
-
43
-
44
-
45
-
46
-
47
-
48
-
49
-
50
-
51
-
52
-
53
-
54
-
55
-
56
-
57
-
58
-
59
-
60
-
61
-
62
-
63
-
64
-
65
-
66
-
67
-
68
-
69
-
70
-
71
-
72
-
73
-
74
-
75
-
76
-
77
-
78
-
79
-
80
-
81
-
82
-
83
-
84
-
85
-
86
-
87
-
88
-
89
 |
 |
