Sharp LL172AB Operation Manual - Page 21
Adjusting the screen display
 |
View all Sharp LL172AB manuals
Add to My Manuals
Save this manual to your list of manuals |
Page 21 highlights
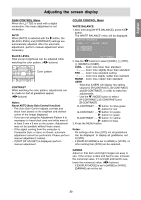
English Français Deutsch Italiano Adjusting the screen display Automatic screen adjustment (When using an analog signal) Adjusting the screen automatically Automatic adjustment can be performed using either the AUTO button or the MENU button. Options in the ADJUSTMENT Menu can be adjusted automatically (CLOCK, PHASE, H-POS, V-POS). Notes: - When setting up this monitor for the first time or after having changed an aspect of the current system, perform an automatic screen adjustment before use. - Automatic screen adjustment is unnecessary when the LL-172G is used with a digital connection. Perform manual screen adjustment when necessary. (p.22) AUTO button [LL-172A] 1. Press the AUTO button. 2. Press the AUTO button again. [ADJUSTING] will appear on the screen, and after a few seconds [ADJUSTING] will disappear. (The automatic adjustment is now complete.) MENU button 1. Press the MENU button. The ADJUSTMENT Menu will be displayed. (Example: Displayed screen of the LL-172G) Screen display for adjustment First display an image that makes the entire screen light. If you are using Windows, you can use the Adjustment Pattern on the accompanying CDROM. Opening the Adjustment Pattern (for Windows) This explanation is for Windows 95/98/2000/Me/ XP, and assumes that the CD-ROM drive is "D" drive. 1. Load the accessory CD-ROM into the CD-ROM drive of the computer. 2. Open [My Computer] and select CD-ROM. If using Windows 3.1, open [File Manager] and choose "D" drive. 3. Double click on [Adj_uty.exe] to run the Adjustment Program. The Adjustment Pattern will appear. Adjustment Pattern After completing the adjustments, press the computer's [Esc] key to exit the Adjustment Program. Note: - If your computer's display mode is set to 65K colors, you may see the different color levels in each color pattern or the gray scale may look colored. (This is due to the specification of the input signal and is not a malfunction.) 2. Press the button. The screen will become dark and [ADJUSTING] will be displayed. After a few seconds the ADJUSTMENT Menu will return. (The automatic adjustment is now complete.) 3. Press the MENU button 5 times to make the OSD (On Screen Display) Menu disappear. Notes: - In most cases automatic adjustment is sufficient. - It may not be possible to achieve correct adjustment with the first automatic adjustment. In such a case, try repeating the automatic adjustment 2 or 3 times. - If necessary due to any of the following, manual adjustments (p.22) can be performed after the automatic adjustment. - When further fine adjustment is needed. - When [OUT OF ADJUST] is displayed. (When the screen displays an entirely dark image, the automatic screen adjustment may be disabled. When making an automatic adjustment, be sure to either use the Adjustment Pattern or try displaying an image that makes the entire screen very bright.) - When the computer's video input signals are Composite Sync or Sync on Green. (Automatic adjustments may not be possible.) - Automatic adjustment may not be achieved correctly depending on what is displayed on the screen - moving pictures or the MS-DOS prompt etc. Español English 21
-
 1
1 -
2
-
3
-
4
-
5
-
6
-
7
-
8
-
9
-
10
-
11
-
12
-
13
-
14
-
15
-
 16
16 -
 17
17 -
 18
18 -
 19
19 -
 20
20 -
 21
21 -
 22
22 -
 23
23 -
 24
24 -
 25
25 -
 26
26 -
27
-
28
-
29
-
30
-
31
-
32
-
33
-
34
-
35
-
36
-
37
-
38
-
39
-
40
-
41
-
42
-
43
-
44
-
45
-
46
-
47
-
48
-
49
-
50
-
51
-
52
-
53
-
54
-
55
-
56
-
57
-
58
-
59
-
60
-
61
-
62
-
63
-
64
-
65
-
66
-
67
-
68
-
69
-
70
-
71
-
72
-
73
-
74
-
75
-
76
-
77
-
78
-
79
-
80
-
81
-
82
-
83
-
84
-
85
-
86
-
87
-
88
-
89
-
90
-
91
-
92
-
93
-
94
-
95
-
96
-
97
-
98
-
99
-
100
-
101
-
102
-
103
-
104
-
105
-
106
-
107
-
108
-
109
-
110
-
111
-
112
-
113
-
114
-
115
-
116
-
117
-
118
-
119
-
120
-
121
-
122
-
123
-
124
-
125
-
126
-
127
-
128
-
129
-
130
-
131
-
132
-
133
-
134
-
135
-
136
-
137
-
138
-
139
-
140
-
141
-
142
-
143
-
144
-
145
-
146
-
147
-
148
-
149
-
150
-
151
-
152
 |
 |
