Sharp MX-2651 User Manual Cloud Connect Guide - Color Advanced & Essential - Page 6
Enter your user account information, for the cloud service., Tap the [Print a document] key. - pdf
 |
View all Sharp MX-2651 manuals
Add to My Manuals
Save this manual to your list of manuals |
Page 6 highlights
Cloud Connect Guide 2 3 4 Execute printing. Enter your user account information for the cloud service. A screen for selecting tasks appears. Tap the [Print a document] key. The file selection screen appears. • Tap the [Narrow Down] key to filter files by file extension. Select the file extension you want to use to filter the files. • Select the file and tap the [Choose Print Settings] key to display the print settings screen. • File formats that can be printed are PDF*1, PS*1, PRN, PCL, TIFF, TIF, JFIF, JPE, JPEG, JPG, PNG, DOCX*2, PPTX*2, XLSX*2. *1 Depending on the model, the optional PS3 Expansion Kit may be required. *2 Depending on the model, the optional Direct Print Expansion Kit may be required. 6
-
 1
1 -
 2
2 -
 3
3 -
 4
4 -
 5
5 -
 6
6 -
 7
7 -
 8
8 -
 9
9 -
 10
10 -
 11
11 -
 12
12 -
13
-
14
-
15
-
16
 |
 |

6
Cloud Connect Guide
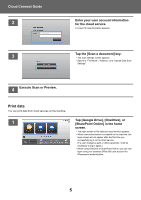
2
Enter your user account information
for the cloud service.
A screen for selecting tasks appears.
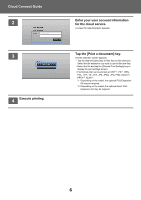
3
Tap the [Print a document] key.
The file selection screen appears.
• Tap the [Narrow Down] key to filter files by file extension.
Select the file extension you want to use to filter the files.
• Select the file and tap the [Choose Print Settings] key to
display the print settings screen.
• File formats that can be printed are PDF*
1
, PS*
1
, PRN,
PCL, TIFF, TIF, JFIF, JPE, JPEG, JPG, PNG, DOCX*
2
,
PPTX*
2
, XLSX*
2
.
*1
Depending on the model, the optional PS3 Expansion
Kit may be required.
*2
Depending on the model, the optional Direct Print
Expansion Kit may be required.
4
Execute printing.