Sharp MX-2651 User Manual Cloud Connect Guide - Color Advanced & Essential - Page 8
EXCHANGE CONNECT FUNCTION, Sending a scanned document by Exchange
 |
View all Sharp MX-2651 manuals
Add to My Manuals
Save this manual to your list of manuals |
Page 8 highlights
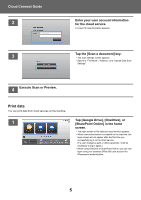
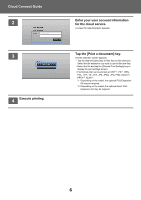
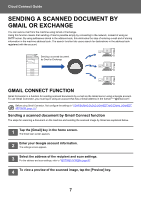
Cloud Connect Guide 5 Tap the [Start] key. The sent e-mail is managed in "Sent Mail" of Gmail. EXCHANGE CONNECT FUNCTION The Exchange Connect function uses Exchange Server and Exchange Online provided by Microsoft to send scanned files by e-mail. You can connect to "Microsoft Exchange Server 2010/2013" or "Exchange Online (Cloud Service)". Before using Exchange Connect function, first configure the settings in "CONFIGURING CLOUD CONNECT AND E-MAIL CONNECT SETTINGS (page 11)". Sending a scanned document by Exchange The steps for scanning a document on the machine and sending the scanned image by Exchange are explained below. 1 Tap the [Exchange (E-Mail)] key in the home screen. The Exchange login screen appears. 2 Enter the user name and password used to connect to the Exchange server or the Exchange Online. The settings screen appears. 3 Select the address of the recipient and scan settings. For the address and scan settings, refer to "SETTINGS SCREEN (page 9)". 4 To view a preview of the scanned image, tap the [Preview] key. 5 Tap the [Start] key. The sent e-mail is managed in "Sent Mail" of Exchange. 8
-
 1
1 -
2
-
 3
3 -
 4
4 -
 5
5 -
 6
6 -
 7
7 -
 8
8 -
 9
9 -
 10
10 -
 11
11 -
 12
12 -
 13
13 -
14
-
15
-
16
 |
 |
