Sharp MX-B450P MX-B350P MX-B450P Software Setup Guide - Page 11
Using the IPP function or SSL function to print - driver download
 |
View all Sharp MX-B450P manuals
Add to My Manuals
Save this manual to your list of manuals |
Page 11 highlights
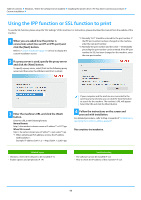
Table of contents Windows / Select the software to be installed Installing the printer driver / PC-Fax driver (common procedure) Custom installation Using the IPP function or SSL function to print To use the SSL function, please setup the "SSL Settings" of this machine. For instructions, please download the manual from the website of the machine. 1 When you are asked how the printer is connected, select [Use an IPP or IPPS port] and click the [Next] button. Refer to "Custom installation (page 7)" on how to display the custom installation screen. *2 Normally "631" should be entered for the port number. If the IPP port number has been changed on the machine, enter the new port number. *3 Normally the port number and the colon ":" immediately preceding the port number can be omitted. If the IPP port number for SSL has been changed on the machine, enter the new port number. 2 If a proxy server is used, specify the proxy server and click the [Next] button. To specify a proxy server, select [Print via the following proxy server] and then enter the [Address] and [Port number]. 3 Enter the machine's URL and click the [Next] button. Enter the URL in the following format: Normal format: http://:/ipp *1 When entering an IPv6 address, enclose the IP address with brackets [ ]. Example: IP address 2001:1::a → http://[2001:1::a]:631/ipp • If your computer and the machine are connected to the same local area network, you can click the [Search] button to search for the machine. The machine's URL will appear. Select the URL and click the [Next] button. 4 Follow the instructions on the screen and proceed with installation. For detailed procedures, refer to Step 3 onwards of "Installation by specifying the machine's address (page 8)". This completes the installation. Related topics • Windows / Select the software to be installed (P. 3) • Enable options and peripherals (P. 14) Troubleshooting • The software cannot be installed (P. 22) • How to check the IP address of this machine* (P. 22) 11
-
 1
1 -
2
-
3
-
4
-
5
-
 6
6 -
 7
7 -
 8
8 -
 9
9 -
 10
10 -
 11
11 -
 12
12 -
 13
13 -
 14
14 -
 15
15 -
 16
16 -
17
-
18
-
19
-
20
-
21
-
22
-
23
-
24
-
25
-
26
 |
 |