Sharp R-CD1800M R-CD1200M , R-CD1800 , R-CD-2200M Operation Manual - Page 13
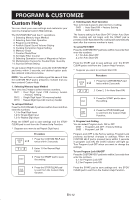
Program & Customize
 |
View all Sharp R-CD1800M manuals
Add to My Manuals
Save this manual to your list of manuals |
Page 13 highlights
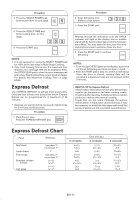
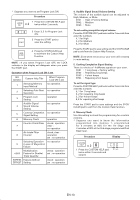
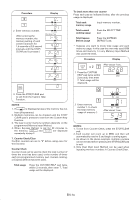
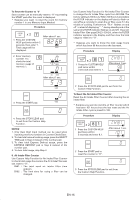
PROGRAM & CUSTOMIZE Custom Help You can check your oven settings and customize your oven by changing Custom Help settings. The CUSTOM HELP pad has 11 operations. 1. Selecting Memory Input Method 2. Selecting Auto Start Operation 3. Program Lock Setting 4. Audible Signal Sound Volume Setting 5. Cooking Completion Signal Setting 6. Memory Check 7. Counter Check/Clear 8. Air Intake Filter Counter 9. Selecting Operation in case of Magnetron Failure 10. Multiplication Factors for Double/Triple Quantity 11. Express Defrost Setting To use Custom Help Function, press the CUSTOM HELP pad twice within 2 seconds, and desired option pads. See detailed instructions below. NOTE : You will hear an audible signal the second time the CUSTOM HELP pad is pressed to indicate that you have entered Custom Help. 1. Selecting Memory Input Method Your oven has 3 ways to select memory numbers. CH11 : Dual Digit Input (100 memory banks) = Factory Setting CH12 : Single Digit Input (10 memory banks) CH13 : Repeat Digit Input (30 memory banks) To set Input Method Press the CUSTOM HELP pad twice within 2 seconds then enter the numbers 1,1 for Dual Digit Input 1,2 for Single Digit Input 1,3 for Repeat Digit Input Press the START pad to save settings and the STOP/ CLEAR pad to exit from the Custom Help Function. * Suppose you want to set Repeat Digit Input. Procedure CUSTOM HELP x 2 1 Press the CUSTOM HELP pad twice within 2 seconds. 1 3 2 Enter 1,3 for Repeat Digit Input. START 3 Press the START pad to save the setting. STOP CLEAR 4 Press the STOP/CLEAR pad to exit from the Custom Help function. 2. Selecting Auto Start Operation Your oven has 2 ways to start memory cooking. CH21 : Auto Start OFF = Factory Setting CH22 : Auto Start ON The factory setting is Auto Start OFF. Under Auto Start OFF, cooking will not begin until the START pad is pressed. Under Auto Start ON, cooking will automatically start after the memory number is input. To set AUTO START Press the CUSTOM HELP pad twice within 2 seconds then enter the numbers 2, 1 for Auto Start OFF 2, 2 for Auto Start ON Press the START pad to save settings and the STOP/ CLEAR pad to exit from the Custom Help Function. * Suppose you want to set Auto Start ON. Procedure 1 Press the CUSTOM HELP pad x 2 CUSTOM HELP twice within 2 seconds. 2 2 2 Enter 2, 2 for Auto Start ON. START 3 Press the START pad to save the setting. STOP CLEAR 4 Press the STOP/CLEAR pad to exit from the Custom Help Function. 3. Program Lock Setting You can select Program Lock ON or OFF CH31 : Program Lock OFF = Factory Setting CH32 : Program Lock ON Program Lock OFF is the Factory setting. Program Lock prevents accidental changes to settings. When the CUSTOM HELP pad is pressed twice within 2 seconds in program Lock ON, the LOCK indicator will light up. Turn Program Lock OFF when you want to change the settings. To turn Program Lock ON/OFF Press the CUSTOM HELP pad twice within 2 seconds then enter the numbers 3, 1 for Program Lock OFF 3, 2 for Program Lock ON Press the START pad to save settings and the STOP/ CLEAR pad to exit from the Custom Help Function. EN-12
-
 1
1 -
2
-
3
-
4
-
5
-
6
-
7
-
 8
8 -
 9
9 -
 10
10 -
 11
11 -
 12
12 -
 13
13 -
 14
14 -
 15
15 -
 16
16 -
 17
17 -
 18
18 -
19
-
20
-
21
-
22
-
23
-
24
-
25
-
26
-
27
-
28
-
29
-
30
-
31
-
32
-
33
-
34
-
35
-
36
-
37
-
38
-
39
-
40
-
41
-
42
-
43
-
44
-
45
-
46
-
47
-
48
-
49
-
50
-
51
-
52
-
53
-
54
-
55
-
56
-
57
-
58
-
59
-
60
-
61
-
62
-
63
-
64
-
65
-
66
-
67
-
68
-
69
-
70
-
71
-
72
-
73
-
74
-
75
-
76
-
77
-
78
-
79
-
80
-
81
-
82
-
83
-
84
-
85
-
86
-
87
-
88
-
89
-
90
-
91
-
92
 |
 |
