Sharp R-CD1800M R-CD1200M , R-CD1800 , R-CD-2200M Operation Manual - Page 24
Care And Cleaning, Other Convenient Features
 |
View all Sharp R-CD1800M manuals
Add to My Manuals
Save this manual to your list of manuals |
Page 24 highlights
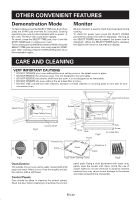
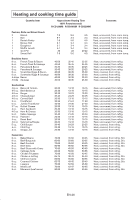
OTHER CONVENIENT FEATURES Demonstration Mode To demonstrate, press the SELECT TIME pad, 0 and then press the START pad and hold for 3 seconds. Cooking operations can now be demonstrated with no power in the oven. The timer will count down rapidly. To cancel, press the SELECT TIME pad, then 0 and the STOP/ CLEAR pad or unplug your oven. To set cooking during the Demonstration Mode, press the SELECT TIME pad and enter time and press the START pad. After cooking, press the STOP/CLEAR pad to show Demonstration again. Monitor Monitor function is used to check the power level during cooking. To check the power level, press the SELECT POWER pad and the power level will be displayed. As long as the SELECT POWER pad is pressed, the power level is displayed. When the SELECT POWER pad is released, the display will return to the previous display. CARE AND CLEANING VERY IMPORTANT CAUTIONS * DO NOT OPERATE your oven without the oven ceiling cover or the splash cover in place. * DO NOT REMOVE the antenna cover. It is not designed to be removable. * DO NOT REMOVE the ceramic shelf from the oven. It is not designed to be removable. * DO NOT OPERATE the oven without the air intake filter in place. * DO NOT USE commercial oven cleaners, abrasive or harsh cleaners or scouring pads on any part of your microwave oven. Splash Cover Tab Knob Tab Splash Cover Projection A Oven Ceiling Cover Oven Ceiling Cover Projection Hole Hole Antenna Cover Fig.1 Ceramic Shelf Projection B Catch Pin Knob Hole Frame Fig.2 Hole Screw Air intake filter Cover Projection A Catch Fig.3 Fig.4 Fig.5 Oven Ceiling Cover Fig.6 Oven Exterior The outside of your oven can be easily cleaned with mild soap and water. Make sure to rinse thoroughly and dry the exterior with a soft towel. Control Panels Care should be taken in cleaning the control panels. Open the door before cleaning to inactivate the control panel pads. Using a cloth dampened with water only, gently wipe the panels until clean. Avoid the use of excess water. Do not use chemical or abrasive cleaners because they may cause severe damage to the panels and make programming impossible. EN-23
-
 1
1 -
2
-
3
-
4
-
5
-
6
-
7
-
8
-
9
-
10
-
11
-
12
-
13
-
14
-
15
-
16
-
17
-
18
-
 19
19 -
 20
20 -
 21
21 -
 22
22 -
 23
23 -
 24
24 -
 25
25 -
 26
26 -
 27
27 -
 28
28 -
 29
29 -
30
-
31
-
32
-
33
-
34
-
35
-
36
-
37
-
38
-
39
-
40
-
41
-
42
-
43
-
44
-
45
-
46
-
47
-
48
-
49
-
50
-
51
-
52
-
53
-
54
-
55
-
56
-
57
-
58
-
59
-
60
-
61
-
62
-
63
-
64
-
65
-
66
-
67
-
68
-
69
-
70
-
71
-
72
-
73
-
74
-
75
-
76
-
77
-
78
-
79
-
80
-
81
-
82
-
83
-
84
-
85
-
86
-
87
-
88
-
89
-
90
-
91
-
92
 |
 |
