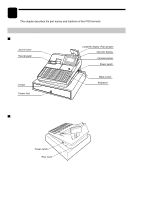
Sharp UP-700 UP-700 Operation Manual - Page 12
Keyboard, Inserting the keyboard sheet, Standard keyboard layout
 |
View all Sharp UP-700 manuals
Add to My Manuals
Save this manual to your list of manuals |
Page 12 highlights
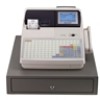
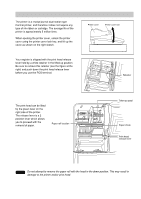
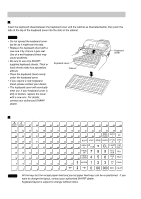
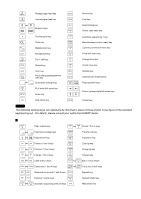
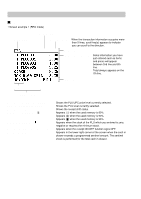
Keyboard Inserting the keyboard sheet Insert the keyboard sheet between the keyboard cover and the cabinet as illustrated below, then push the tabs at the top of the keyboard cover into the slots in the cabinet. NOTE • Do not spread the keyboard cover too far as it might tear the tabs. • Replace the keyboard sheet with a new one if by chance it gets wet. Use of a wet keyboard sheet may cause problems. • Be sure to use only SHARPsupplied keyboard sheets. Thick or hard sheets make key operations difficult. • Place the keyboard sheet evenly under the keyboard cover. • If you require a new keyboard sheet, please contact your dealer. • The keyboard cover will eventually wear out. If your keyboard cover is dirty or broken, replace the cover with a new one. For details, contact your authorized SHARP dealer. Keyboard cover Cabinet Keyboard sheet Standard keyboard layout RECEIPT JOURNAL 87 88 89 90 91 92 93 94 95 96 97 98 99 100 71 72 73 74 75 76 77 78 79 80 81 82 83 84 85 86 58 59 60 61 62 63 64 65 66 67 68 69 MISC AUTO 70 FUNC 1 NC 48 49 50 51 52 53 54 55 56 RCPT 57 VOID RFND CANCEL LEVEL CONV # # SERV @ 38 39 40 41 42 43 44 45 46 47 # FOR CL P-SHIFT TAX # SHIFT 28 29 30 31 32 33 34 35 36 7 PAGE 37 UP 8 9 PLU/ SUB GLU 18 19 20 21 22 23 24 25 26 4 PAGE 27 DOWN 5 6 CHK SRVC # 9 10 11 12 13 14 15 16 17 1 ENTER 2 3 CH # FINAL 1 2 3 4 5 6 7 8 0 00 000 SBTL CA/AT NOTE • All the keys but the receipt paper feed and journal paper feed keys can be re-positioned. If you want to change the layout, contact your authorized SHARP dealer. • Keyboard layout is subject to change without notice. 10
-
 1
1 -
2
-
3
-
4
-
5
-
6
-
 7
7 -
 8
8 -
 9
9 -
 10
10 -
 11
11 -
 12
12 -
 13
13 -
 14
14 -
 15
15 -
 16
16 -
 17
17 -
18
-
19
-
20
-
21
-
22
-
23
-
24
-
25
-
26
-
27
-
28
-
29
-
30
-
31
-
32
-
33
-
34
-
35
-
36
-
37
-
38
-
39
-
40
-
41
-
42
-
43
-
44
-
45
-
46
-
47
-
48
-
49
-
50
-
51
-
52
-
53
-
54
-
55
-
56
-
57
-
58
-
59
-
60
-
61
-
62
-
63
-
64
-
65
-
66
-
67
-
68
-
69
-
70
-
71
-
72
-
73
-
74
-
75
-
76
-
77
-
78
-
79
-
80
-
81
-
82
-
83
-
84
-
85
-
86
-
87
-
88
-
89
-
90
-
91
-
92
-
93
-
94
-
95
-
96
-
97
-
98
-
99
-
100
-
101
-
102
-
103
-
104
-
105
-
106
-
107
-
108
-
109
-
110
-
111
-
112
-
113
-
114
-
115
-
116
-
117
-
118
-
119
-
120
-
121
-
122
-
123
-
124
-
125
-
126
-
127
-
128
-
129
-
130
-
131
-
132
-
133
-
134
-
135
-
136
-
137
-
138
-
139
-
140
-
141
-
142
-
143
-
144
-
145
-
146
-
147
-
148
-
149
-
150
-
151
-
152
-
153
-
154
-
155
-
156
-
157
-
158
-
159
-
160
-
161
-
162
-
163
-
164
-
165
-
166
-
167
-
168
-
169
-
170
-
171
-
172
-
173
-
174
-
175
-
176
-
177
-
178
-
179
-
180
-
181
-
182
-
183
-
184
-
185
-
186
-
187
-
188
-
189
-
190
-
191
-
192
-
193
-
194
-
195
-
196
-
197
-
198
-
199
-
200
-
201
-
202
-
203
-
204
-
205
-
206
-
207
-
208
-
209
-
210
-
211
-
212
-
213
-
214
-
215
-
216
-
217
-
218
-
219
-
220
-
221
-
222
-
223
-
224
-
225
-
226
-
227
-
228
 |
 |
