Sharp VL-AH150 Operation Manual - Page 17
Charging the Battery Pack
 |
View all Sharp VL-AH150 manuals
Add to My Manuals
Save this manual to your list of manuals |
Page 17 highlights
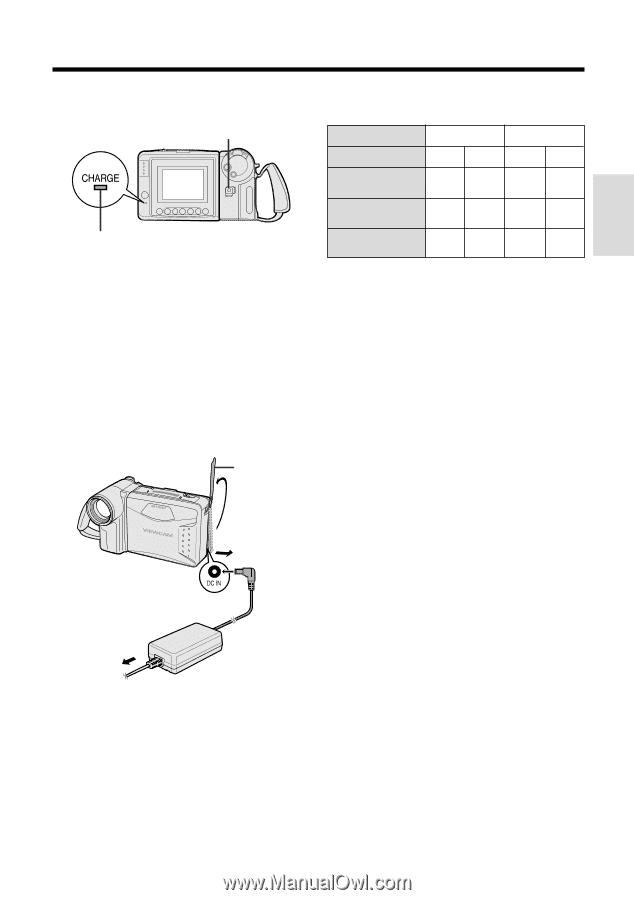
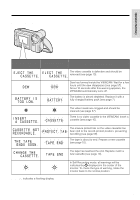
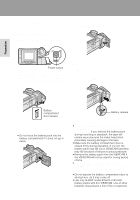
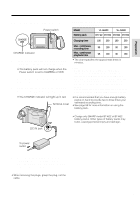
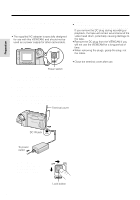
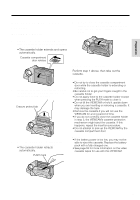
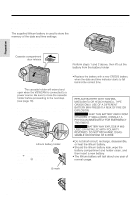
Preparation Charging the Battery Pack Power switch Charging time and maximum continuous recording and playback times Model Battery pack VL-AH150 VL-AH160 BT-H22 BT-H32 BT-H22 BT-H32 Charging time 180 360 180 360 CHARGE indicator 1 Insert the battery pack into the VIEWCAM (see page 7). Make sure that the Power switch is set to OFF. • The battery pack will not charge when the Power switch is set to CAMERA or VCR. 2 Insert the AC plug of the AC adapter into a power outlet. 3 Open the terminal cover on the VIEWCAM and insert the DC plug of the AC adapter into the DC IN jack on the VIEWCAM. • The CHARGE indicator will light up in red. Terminal cover Max. continuous recording time Max. continuous playback time 95 190 90 180 95 190 90 180 • The chart specifies the approximate times in minutes. Notes: • Using the zoom (see page 19) and other functions or turning the power on and off frequently will increase power consumption. This may result in a decrease of more than 50% in the actual recording time compared to the maximum continuous recording time listed above. • The charging time and recording time may vary depending on the ambient temperature and the condition of the battery pack. • It is recommended that you have enough battery packs on hand to provide two to three times your estimated recording time. • See page 58 for more information on using the battery pack. Caution: • Charge only SHARP model BT-H22 or BT-H32 battery packs. Other types of battery packs may burst, causing personal injury and damage. DC IN jack To power outlet 4 When the battery is fully charged, the CHARGE indicator will light up in green. Remove the DC plug from the VIEWCAM, and close the terminal cover. Caution: • When removing the plugs, grasp the plug, not the cable. 8
-
 1
1 -
2
-
3
-
4
-
5
-
6
-
7
-
8
-
9
-
10
-
11
-
 12
12 -
 13
13 -
 14
14 -
 15
15 -
 16
16 -
 17
17 -
 18
18 -
 19
19 -
 20
20 -
 21
21 -
 22
22 -
23
-
24
-
25
-
26
-
27
-
28
-
29
-
30
-
31
-
32
-
33
-
34
-
35
-
36
-
37
-
38
-
39
-
40
-
41
-
42
-
43
-
44
-
45
-
46
-
47
-
48
-
49
-
50
-
51
-
52
-
53
-
54
-
55
-
56
-
57
-
58
-
59
-
60
-
61
-
62
-
63
-
64
-
65
-
66
-
67
-
68
-
69
-
70
-
71
-
72
-
73
-
74
-
75
-
76
-
77
-
78
-
79
-
80
 |
 |