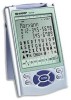
Sharp YOP20H Operation Manual - Page 25
Serial Port Setup, Synchronization Software
 |
View all Sharp YOP20H manuals
Add to My Manuals
Save this manual to your list of manuals |
Page 25 highlights
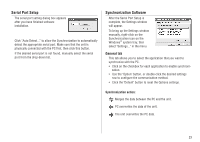
Serial Port Setup The serial port setting dialog box appears after you have finished software installation. Click "Auto Detect..." to allow the Synchronization to automatically detect the appropriate serial port. Make sure that the unit is physically connected with the PC first, then click this button. If the desired serial port is not found, manually select the serial port from the drop-down list. Synchronization Software After the Serial Port Setup is complete, the Settings window will appear. To bring up the Settings window manually, right-click on the Synchronization icon on the Windows® system tray, then select "Settings..." in the menu. General tab This tab allows you to select the application that you want to synchronize with the PC. • Click on the checkbox for each application to enable synchronization. • Use the "Option" button, or double-click the desired settings row to configure the communication method. • Click the "Default" button to reset the Options settings. Synchronization action: : Merges the data between the PC and the unit. : PC overwrites the data of the unit. : The unit overwrites the PC data. 23
-
 1
1 -
2
-
3
-
4
-
5
-
6
-
7
-
8
-
9
-
10
-
11
-
12
-
13
-
14
-
15
-
16
-
17
-
18
-
19
-
 20
20 -
 21
21 -
 22
22 -
 23
23 -
 24
24 -
 25
25 -
 26
26 -
 27
27 -
 28
28 -
 29
29 -
 30
30 -
31
-
32
 |
 |
