Sharp YOP20H Operation Manual - Page 28
When the LOW BATTERY Symbol Appears, When the Backlight Won't Function, Replacing the batteries
 |
View all Sharp YOP20H manuals
Add to My Manuals
Save this manual to your list of manuals |
Page 28 highlights
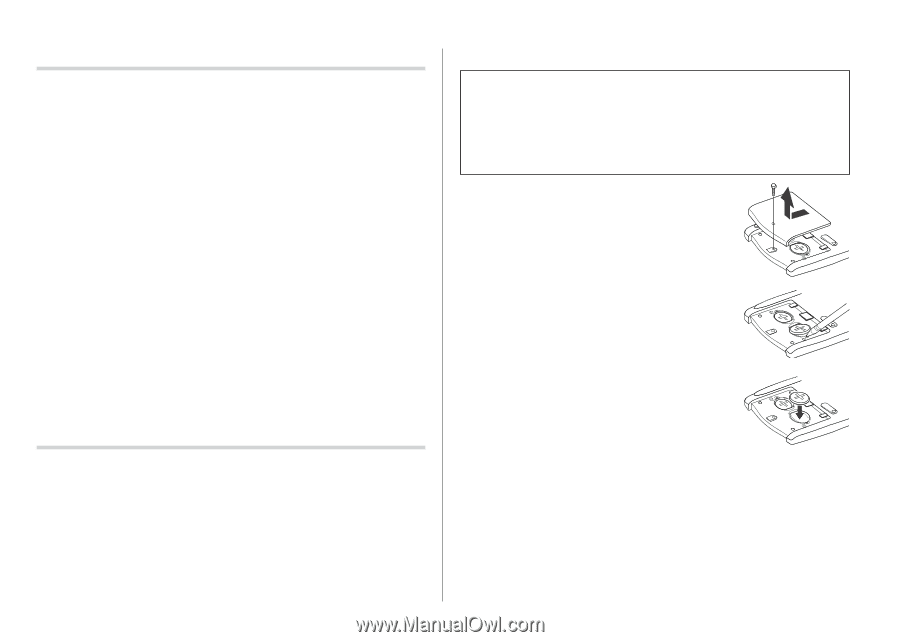
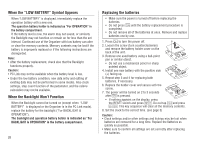
When the "LOW BATTERY" Symbol Appears When "LOW BATTERY" is displayed, immediately replace the operation battery with a new one. The operation battery holder is indicated as "For OPERATION" in the battery compartment. If the battery level is low, the alarm may not sound, or similarly the Backlight may not function or remain on for less than the set interval. Continued use of the Organizer with low battery can alter or clear the memory contents. Memory contents may be lost if the battery is improperly replaced or if the following instructions are disregarded. Note: • After the battery replacement, check also that the Backlight functions properly. Caution: • PC Link may not be available when the battery level is low. • Under the low battery condition, new data entry and editing of existing data may not be performed in some modes. Also clock settings, step count function of the pedometer, and the calorie calculation may not be available. When the Backlight Won't Function When the Backlight cannot be turned on (except when "LOW BATTERY" is displayed or the Organizer is in the PC Link mode), replace the battery for the backlight ("For BACKLIGHT & OPERATION"). The backlight and operation battery holder is indicated as "For BACKLIGHT & OPERATION" in the battery compartment. 26 Replacing the batteries • Make sure the power is turned off before replacing the batteries. • Do not press o until the battery replacement procedure is completed. • Do not remove all of the batteries at once. Remove and replace batteries one by one. 1. Press o to turn the power off. 2. Loosen the screw (turn counterclockwise) and remove the battery holder cover on the back of the unit. RESET 3. Remove one used battery using a ball-point pen or similar object. • Do not use a mechanical pencil or sharp pointed object. 4. Install one new battery with the positive side RESET (+) facing up. 5. Repeat step 3 and 4 for replacing both batteries, if necessary. 6. Replace the holder cover and secure with the screw. RESET 7. The power will be turned on 2 to 3 seconds after o is pressed. • If nothing appears on the display, press the RESET switch and press
-
 1
1 -
2
-
3
-
4
-
5
-
6
-
7
-
8
-
9
-
10
-
11
-
12
-
13
-
14
-
15
-
16
-
17
-
18
-
19
-
20
-
21
-
22
-
 23
23 -
 24
24 -
 25
25 -
 26
26 -
 27
27 -
 28
28 -
 29
29 -
 30
30 -
 31
31 -
 32
32
 |
 |