Singer 1 One Instruction Manual 39 - Page 8
Looper, Cover, Principal, Parts, Behind, Preparation, Prior, Sewing
 |
View all Singer 1 One manuals
Add to My Manuals
Save this manual to your list of manuals |
Page 8 highlights
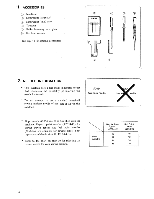
4. HOW TO OPEN LOOPER COVER * Push the cover to the right as far as it will go. 0 * Pull cover down toward you . Caution: Be sure looper cover is closed when sewing. 5. PRINCIPAL PARTS BEHIND LOOPER COVER 0 Upper looper O Movable upper knife 0 Presser foot N ® Stationary lower knife O Lower looper 6. PREPARATION PRIOR TO SEWING * Connect the controller/electric plug )t to the machine receptacle D. * Plug power line C) into electric outlet . * Power switch (used also for light switch) Push "I" mark side to turn "ON" Push "0" mark side to turn "OFF" * To run the machine and control the speed, press the controller. * The harder you press, the faster the machine will sew. * To stop the machine from sewing, remove your foot from the controller. 6 ON OFF gig Be sure to make reference to "Warning" on following page.
-
 1
1 -
2
-
 3
3 -
 4
4 -
 5
5 -
 6
6 -
 7
7 -
 8
8 -
 9
9 -
 10
10 -
 11
11 -
 12
12 -
 13
13 -
14
-
15
-
16
-
17
-
18
-
19
-
20
-
21
-
22
-
23
-
24
-
25
-
26
-
27
-
28
-
29
-
30
-
31
-
32
-
33
-
34
-
35
-
36
-
37
-
38
-
39
-
40
-
41
-
42
-
43
-
44
-
45
-
46
-
47
-
48
 |
 |
