Singer 7469Q Confidence Quilter Instruction Manual - Page 16
Winding The Bobbin - machine
 |
View all Singer 7469Q Confidence Quilter manuals
Add to My Manuals
Save this manual to your list of manuals |
Page 16 highlights
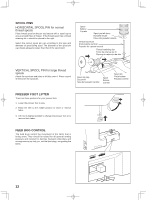
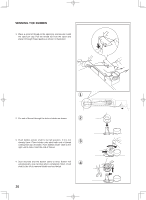
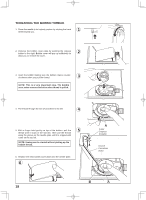
WINDING THE BOBBIN 1. Place a spool of thread on the spool pin, and secure it with the spool pin cap. Pull the thread out from the spool and place it through thread guides as shown in illustration. 1 2. Put end of thread through the hole in bobbin as shown. 2 3. Push bobbin winder shaft to far left position, if it is not already there. Place bobbin onto shaft with end of thread 3 coming from top of bobbin. Push bobbin winder shaft to the right until it clicks. Hold the end of thread. 4. Start machine and the bobbin starts to wind. Bobbin will automatically stop turning when completely filled. Push 4 shaft to the left to remove bobbin and cut thread. 16
-
 1
1 -
2
-
3
-
4
-
5
-
6
-
7
-
8
-
9
-
10
-
 11
11 -
 12
12 -
 13
13 -
 14
14 -
 15
15 -
 16
16 -
 17
17 -
 18
18 -
 19
19 -
 20
20 -
 21
21 -
22
-
23
-
24
-
25
-
26
-
27
-
28
-
29
-
30
-
31
-
32
-
33
-
34
-
35
-
36
-
37
-
38
-
39
-
40
-
41
-
42
-
43
-
44
-
45
-
46
-
47
-
48
-
49
-
50
-
51
-
52
-
53
-
54
-
55
-
56
-
57
-
58
-
59
-
60
-
61
-
62
-
63
-
64
-
65
-
66
-
67
-
68
-
69
-
70
-
71
-
72
-
73
-
74
-
75
-
76
-
77
-
78
-
79
-
80
-
81
-
82
 |
 |
±6
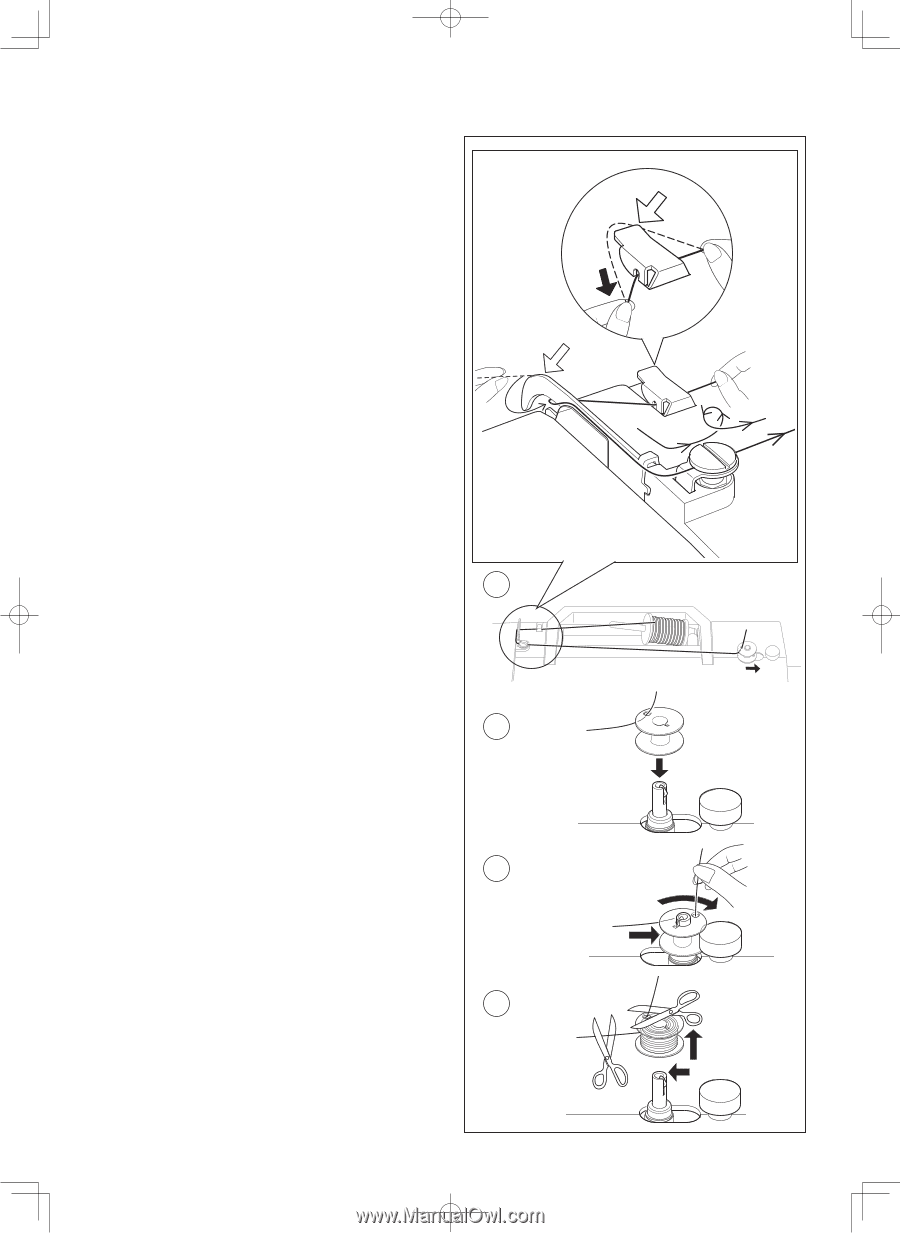
WINDING THE BOBBIN
1. Place a spool of thread on the spool pin, and secure it with
the spool pin cap. Pull the thread out from the spool and
place it through thread guides as shown in illustration.
2. Put end of thread through the hole in bobbin as shown.
3. Push bobbin winder shaft to far left position, if it is not
already there. Place bobbin onto shaft with end of thread
coming from top of bobbin. Push bobbin winder shaft to the
right until it clicks. Hold the end of thread.
4. Start machine and the bobbin starts to wind. Bobbin will
automatically stop turning when completely filled. Push
shaft to the left to remove bobbin and cut thread.
±
²
3
4