Singer 9100 Professional Instruction Manual - Page 38
Zigzag Stitches, Needle Position And Stitch Length
 |
View all Singer 9100 Professional manuals
Add to My Manuals
Save this manual to your list of manuals |
Page 38 highlights
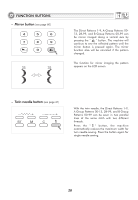
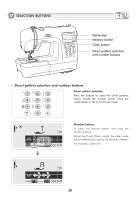
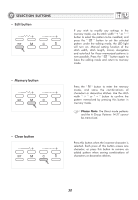
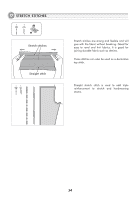
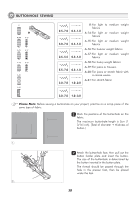
NEEDLE POSITION AND STITCH LENGTH A-00 0.0 2.0 3.5 5.0 7.0 0.5 1.0 2.0 3.0 4.5 ZIGZAG STITCHES Changing the needle position These setting apply only to Direct Patterns 1-4, or A Group Pattern 00. The pre-set position is "3.5", center position. When you press the " – " of stitch width adjustment button, the needle position will be moved to the left. When you press the " + " of stitch width adjustment button, the needle position will be moved to the right. On the LCD screen, the point illustration and the number indicate the needle position. Changing the stitch length To shorten the stitch length, press the " – " of stitch length adjustment button. For a longer stitch length, press the " + " of stitch length adjustment button. Generally speaking, the thicker the fabric, thread and needle, the longer the stitch should be. 0.0 1.0 3.0 5.0 7.0 0.5 1.0 2.0 3.0 4.5 Adjusting the stitch width The maximum zigzag stitch width for zigzag stitching is "7.0"; however, the width can be reduced on any patterns. The width increases as you press the " + " of stitch width adjustment button from "0.0-7.0". Adjusting the stitch length The density of zigzag stitches increase as the setting of stitch length approaches "0.3". Neat zigzag stitches are usually achieved at "1.0-2.5". Closed up zigzag stitches (close together) are referred to as a satin stitch. 33
-
 1
1 -
2
-
3
-
4
-
5
-
6
-
7
-
8
-
9
-
10
-
11
-
12
-
13
-
14
-
15
-
16
-
17
-
18
-
19
-
20
-
21
-
22
-
23
-
24
-
25
-
26
-
27
-
28
-
29
-
30
-
31
-
32
-
 33
33 -
 34
34 -
 35
35 -
 36
36 -
 37
37 -
 38
38 -
 39
39 -
 40
40 -
 41
41 -
 42
42 -
 43
43 -
44
-
45
-
46
-
47
-
48
-
49
-
50
-
51
-
52
-
53
-
54
-
55
-
56
-
57
-
58
-
59
-
60
-
61
-
62
-
63
-
64
-
65
-
66
-
67
-
68
-
69
-
70
-
71
-
72
-
73
-
74
-
75
-
76
-
77
-
78
-
79
-
80
-
81
-
82
-
83
-
84
 |
 |
