Singer 9100 Professional Instruction Manual - Page 6
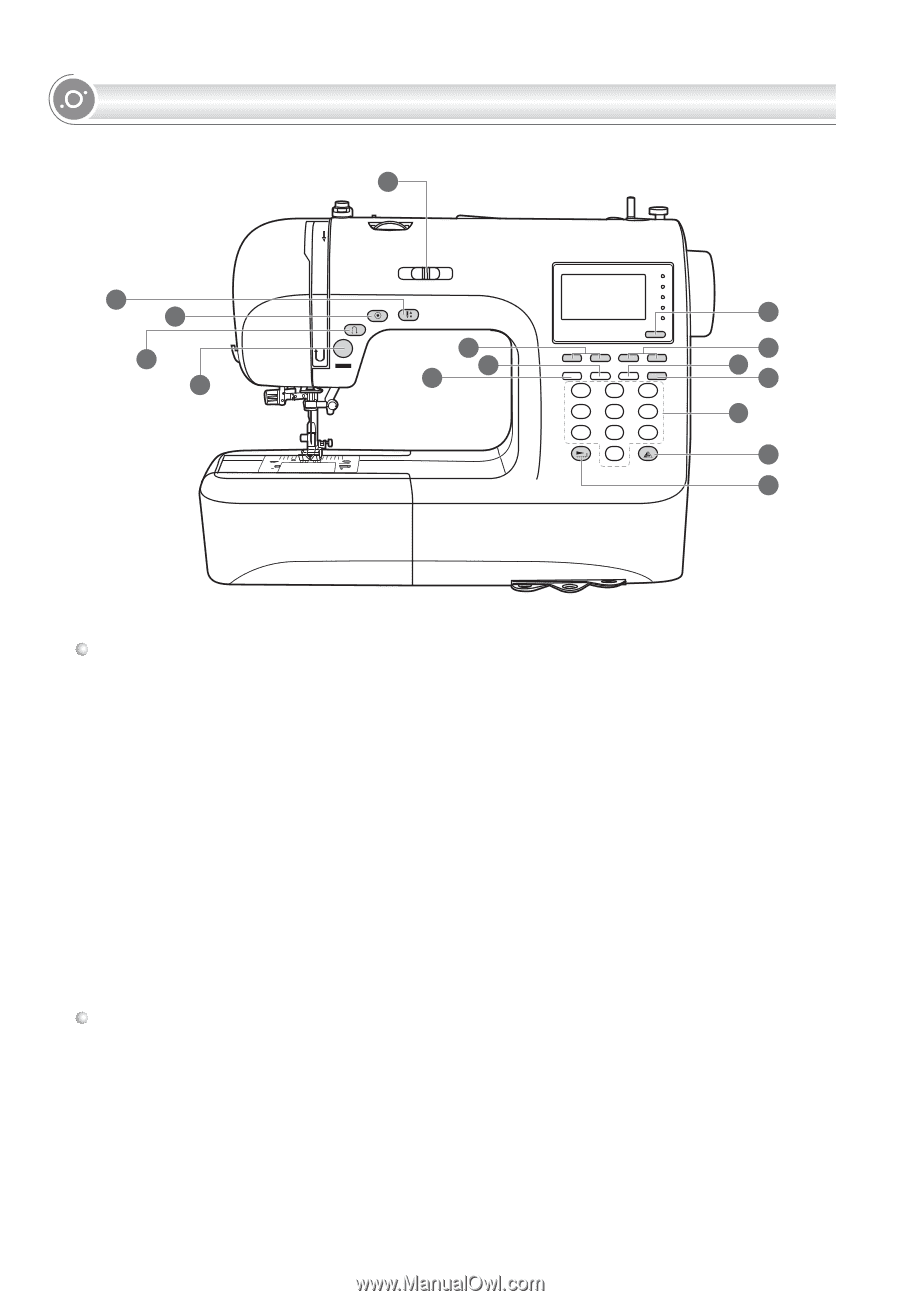
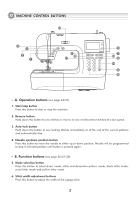
A. Operation buttons, B. Function buttons, MACHINE CONTROL BUTTONS
 |
View all Singer 9100 Professional manuals
Add to My Manuals
Save this manual to your list of manuals |
Page 6 highlights
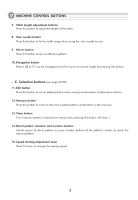
MACHINE CONTROL BUTTONS 15 4 3 2 1 6 START STOP 12 11 1 2 3 4 5 6 7 8 9 0 5 7 13 8 14 9 10 A. Operation buttons (see page 24/25) 1. Start/stop button Press this button to start or stop the machine. 2. Reverse button Hold down this button to sew stitches in reverse or sew reinforcement stitches at a low speed. 3. Auto-lock button Hold down this button to sew locking stitches immediately or at the end of the current patterns and automatically stop. 4. Needle up/down position button Press this button to move the needle to either up or down position. Needle will be programmed to stop in selected position until button is pressed again. B. Function buttons (see page 26/27/28) 5. Mode selection button Press this button to select direct mode, utility and decorative pattern mode, block letter mode, script letter mode and outline letter mode. 6. Stitch width adjustment buttons Press this button to adjust the width of the zigzag stitch. 2
-
 1
1 -
 2
2 -
 3
3 -
 4
4 -
 5
5 -
 6
6 -
 7
7 -
 8
8 -
 9
9 -
 10
10 -
 11
11 -
 12
12 -
13
-
14
-
15
-
16
-
17
-
18
-
19
-
20
-
21
-
22
-
23
-
24
-
25
-
26
-
27
-
28
-
29
-
30
-
31
-
32
-
33
-
34
-
35
-
36
-
37
-
38
-
39
-
40
-
41
-
42
-
43
-
44
-
45
-
46
-
47
-
48
-
49
-
50
-
51
-
52
-
53
-
54
-
55
-
56
-
57
-
58
-
59
-
60
-
61
-
62
-
63
-
64
-
65
-
66
-
67
-
68
-
69
-
70
-
71
-
72
-
73
-
74
-
75
-
76
-
77
-
78
-
79
-
80
-
81
-
82
-
83
-
84
 |
 |