Singer Futura Quartet Instruction Manual - Page 32
Attaching Embroidery Unit, Removing Embroidery Unit - hoops
 |
View all Singer Futura Quartet manuals
Add to My Manuals
Save this manual to your list of manuals |
Page 32 highlights
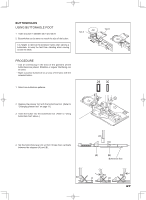
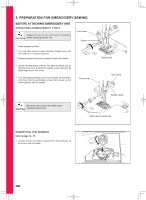
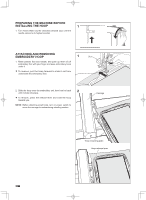
ATTACHING EMBROIDERY UNIT Always be sure to turn off power to machine CAUTION before installing embroidery unit. 1. Turn off the machine. Turn connector cap to the right to open. 2. Slide the embroidery unit onto machine fitting connectors on the machine and embroidery unit. Slide the embroidery unit as far as it will go until it clicks into place. 1 Connector cap 2 Carriage Connector 3. To make sure that the embroidery unit is fully engaged, hold the handle of the embroidery unit and pull it towards the left direction, checking that the embroidery unit does not detach. Note: If embroidery unit is not securely installed, the finished embroidery may be distorted. Make sure that the embroidery unit is pushed in as far as it will go. Don't push the carriage or put strong pressure on the embroidery unit while attaching or during the embroidering process. Doing so may cause CAUTION damage to the embroidery unit. REMOVING EMBROIDERY UNIT * Turn off the machine. * Remove embroidery hoop from machine. (Refer to pages 37.) 1. Holding handle of embroidery unit, carefully slide toward the left while pressing release lever. Note: Do not pull carriage when removing embroidery unit. 2. Turn the connector cap to the left to close for general sewing. 3 Handle 1 Release lever 2 Handle Release lever 32
-
 1
1 -
2
-
3
-
4
-
5
-
6
-
7
-
8
-
9
-
10
-
11
-
12
-
13
-
14
-
15
-
16
-
17
-
18
-
19
-
20
-
21
-
22
-
23
-
24
-
25
-
26
-
 27
27 -
 28
28 -
 29
29 -
 30
30 -
 31
31 -
 32
32 -
 33
33 -
 34
34 -
 35
35 -
 36
36 -
 37
37 -
38
-
39
-
40
-
41
-
42
-
43
-
44
-
45
-
46
-
47
-
48
-
49
-
50
-
51
-
52
-
53
-
54
-
55
-
56
-
57
-
58
-
59
-
60
 |
 |
