Singer Futura Quartet Instruction Manual - Page 40
Skipped Stitches And Thread, Breakages Occur, Embroidery Pattern Is Mis-aligned - troubleshooting
 |
View all Singer Futura Quartet manuals
Add to My Manuals
Save this manual to your list of manuals |
Page 40 highlights
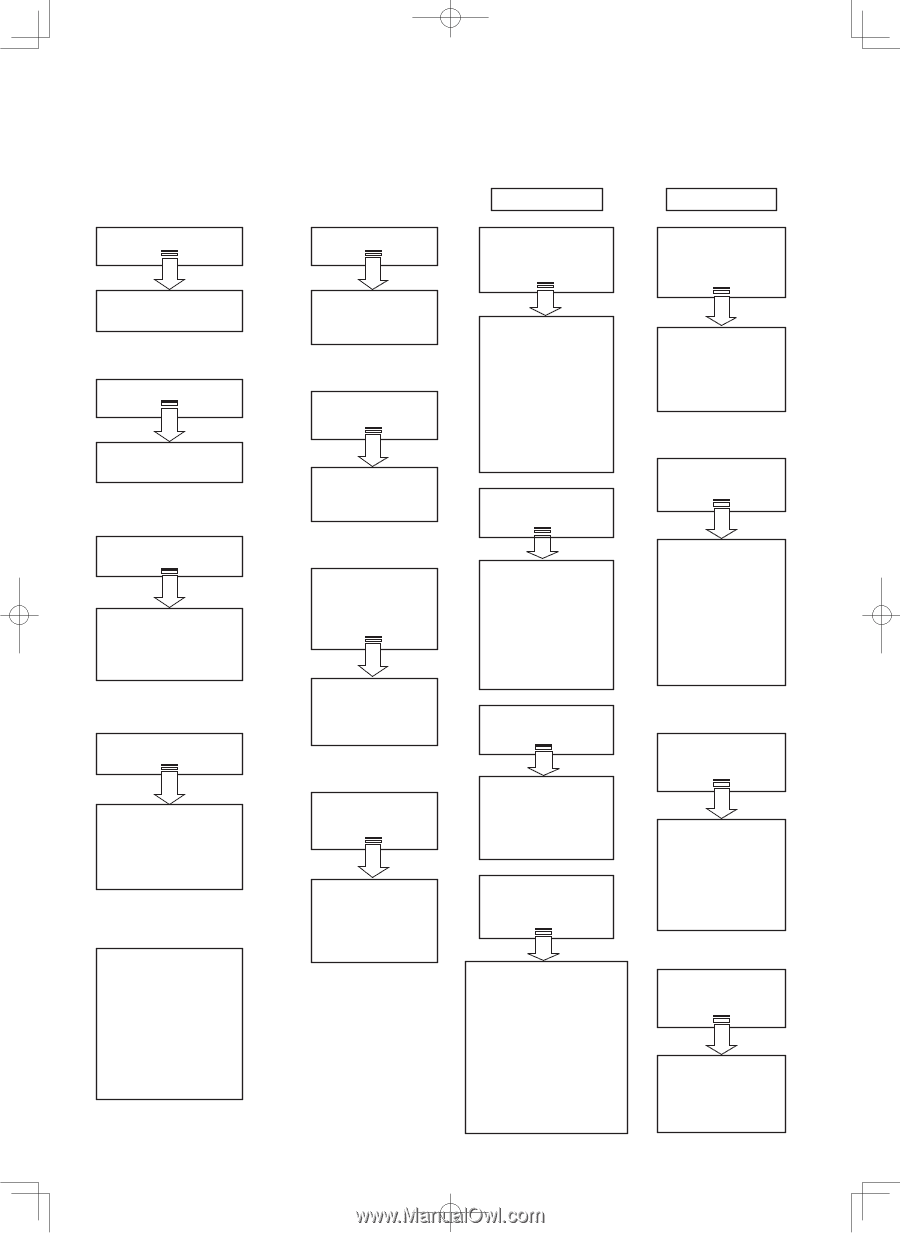
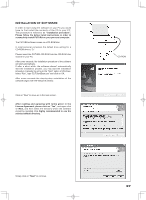
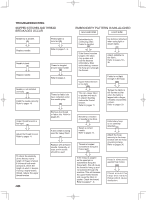
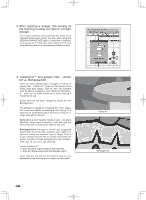
TROUBLESHOOTING SKIPPED STITCHES AND THREAD BREAKAGES OCCUR Needle tip is broken. Thread path is incorrect. Replace needle. Refer to pages 7 - 9. Needle is bent. Replace needle. Needle is not installed correctly. Install the needle correctly. Refer to pages 10. Thread is tangled around spool holder. Refer to pages 4. Thread or fabric bits have collected under the needle plate. EMBROIDERY PATTERN IS MIS-ALIGNED MACHINE SIDE HOOP SIDE Embroidering is continuing when thread is tangled. No stabilizer attached when using light or stretch fabric. If the thread remains tangled, the fabric may pucker and ruin the finished embroidery. Stop embroidering, remove the hoop and untangle the thread. Upper thread tension is too tight. This can cause fabric to pucker and result in uneven feeding, reduce the thread tension. Refer to pages 11. Attach stabilizer to the fabric. Refer to pages 34 35. Fabric is not tight enough in the hoop. Tighten the fabric in the frames so that when the fabric is tapped with a finger, it makes a sound like a drum. Refer to pages 33. Upper thread tension is too tight. Adjust the thread tension. Refer to pages 11. To check the elasticity of the thread, hold a length of thread of about 6 inches at both ends and pull it, check the length at which it breaks. If using a highly-elastic thread, reduce the upper thread tension. 40 Remove the thread or fabric bits. Refer to pages 53. A thin needle is being used for heavy fabric. Needle tip is broken or needle is too thick. Select a correct needle. Refer to pages 10. Replace with a thicker needle. Generally, at least a #14 needle should be used. Thread is tangled somewhere along the thread path. If the thread is tangled on the spool pin or somewhere along the thread path, this will cause the thread to hang up and not advance through the machine. This will increase the upper thread tension and cause the fabric to pucker. Check the thread. Refer to pages 7 - 9. Embroidery hoop is not correctly attached. Attach the hoop securely to the hoop bracket with the hoop mounting screws. Refer to pages 36. Hoop is obstructed against free motion. Check around the hoop and remove things which cause obstruction.
-
 1
1 -
2
-
3
-
4
-
5
-
6
-
7
-
8
-
9
-
10
-
11
-
12
-
13
-
14
-
15
-
16
-
17
-
18
-
19
-
20
-
21
-
22
-
23
-
24
-
25
-
26
-
27
-
28
-
29
-
30
-
31
-
32
-
33
-
34
-
 35
35 -
 36
36 -
 37
37 -
 38
38 -
 39
39 -
 40
40 -
 41
41 -
 42
42 -
 43
43 -
 44
44 -
 45
45 -
46
-
47
-
48
-
49
-
50
-
51
-
52
-
53
-
54
-
55
-
56
-
57
-
58
-
59
-
60
 |
 |