Sony BDP-CX960 Operating Instructions - Page 41
Video Equalizer elements, NR elements, Items, Details
 |
UPC - 027242754836
View all Sony BDP-CX960 manuals
Add to My Manuals
Save this manual to your list of manuals |
Page 41 highlights
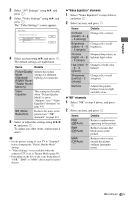
Playback 2 Select "A/V Settings" using V/v, and press . 3 Select "Video Settings" using V/v, and press . The "Video Settings" screen appears. 4 Select an item using V/v, and press . The default settings are underlined. Items Details Picture Quality Selects the picture Mode settings for different (Standard/ lighting environments. Brighter Room/ Theater Room/ Memory) Video Equalizer This setting is selectable when "Picture Quality Mode" is set to "Memory" (see ""Video Equalizer" elements" on page 41). NR (Noise Reduction) Reduces the noise in the picture (see ""NR" elements" on page 41). 5 Select or adjust the settings using B/V/v/ b, and press . To adjust any other items, repeat steps 4 and 5. b • Set the picture setting of your TV to "Standard" before changing the "Picture Quality Mode" settings. • "Video Settings" is not available when the connected TV is set to Theater Mode (page 54). • Depending on the disc or the scene being played, "FNR," "BNR" or "MNR" effects may be hard to discern. ◆"Video Equalizer" elements 1 Select "Video Equalizer" in step 4 above, and press . 2 Select an item, and press . Items Details Contrast Changes the contrast. ((weak) -3 ~ 0 ~ 3 (strong)) Brightness Changes the overall ((dark) -3 ~ 0 brightness. ~ 3 (bright)) Chroma Deepens deep colors, or ((light) -3 ~ 0 lightens light colors. ~ 3 (deep)) Hue ((red) -3 Changes overall color ~ 0 ~ 3 balance. (green)) Sharpness ((soft) 0 ~ 3 (sharp)) Changes the overall sharpness. Gamma Adjusts the picture balance between light and dark areas. ◆"NR" elements 1 Select "NR" in step 4 above, and press . 2 Select an item, and press . Items FNR (Off/Auto) BNR (Off/Auto) MNR (Off/Auto) Details Reduces random noise appearing in the picture. Reduces mosaic-like block noise in the picture. Reduces minor noise around the picture outlines (mosquito noise). ,continued 41US
-
 1
1 -
2
-
3
-
4
-
5
-
6
-
7
-
8
-
9
-
10
-
11
-
12
-
13
-
14
-
15
-
16
-
17
-
18
-
19
-
20
-
21
-
22
-
23
-
24
-
25
-
26
-
27
-
28
-
29
-
30
-
31
-
32
-
33
-
34
-
35
-
 36
36 -
 37
37 -
 38
38 -
 39
39 -
 40
40 -
 41
41 -
 42
42 -
 43
43 -
 44
44 -
 45
45 -
 46
46 -
47
-
48
-
49
-
50
-
51
-
52
-
53
-
54
-
55
-
56
-
57
-
58
-
59
-
60
-
61
-
62
-
63
-
64
-
65
-
66
-
67
-
68
-
69
-
70
-
71
-
72
-
73
-
74
-
75
-
76
-
77
-
78
-
79
-
80
-
81
-
82
-
83
-
84
-
85
-
86
-
87
-
88
-
89
-
90
-
91
-
92
-
93
-
94
-
95
-
96
-
97
-
98
-
99
-
100
-
101
-
102
-
103
-
104
-
105
-
106
-
107
-
108
-
109
-
110
-
111
-
112
-
113
-
114
-
115
-
116
-
117
-
118
-
119
-
120
-
121
-
122
-
123
-
124
-
125
-
126
-
127
-
128
-
129
-
130
-
131
-
132
-
133
-
134
-
135
-
136
-
137
-
138
-
139
-
140
-
141
-
142
-
143
-
144
-
145
-
146
-
147
-
148
-
149
-
150
-
151
-
152
-
153
-
154
-
155
-
156
-
157
-
158
-
159
-
160
-
161
-
162
-
163
-
164
-
165
-
166
-
167
-
168
-
169
-
170
-
171
-
172
-
173
-
174
-
175
-
176
-
177
-
178
-
179
-
180
-
181
-
182
-
183
-
184
-
185
-
186
-
187
-
188
-
189
-
190
-
191
-
192
-
193
-
194
-
195
-
196
-
197
-
198
-
199
-
200
-
201
-
202
-
203
-
204
-
205
-
206
-
207
 |
 |
