Sony BDV-E390 Operating Instructions - Page 23
Step 5: Selecting the Source
 |
View all Sony BDV-E390 manuals
Add to My Manuals
Save this manual to your list of manuals |
Page 23 highlights
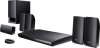
Getting Started 5 Perform [Easy Initial Settings]. Follow the on-screen instructions to make the basic settings using C/X/x/c and . C/X/x/c Depending on the connection method (page 18), perform the following setting. • HDMI cable connection: Follow the instructions that are displayed on the TV screen. • Video cord connection: Select [16:9] or [4:3] so that the picture is displayed correctly. 6 After completing of [Easy Initial Settings], perform [Easy Network Settings]. Press C/X/x/c to select [Easy Network Settings], then press . The Easy Network Settings display appears. 7 Follow the on-screen instructions to make the network settings using C/X/x/ c and . If the system cannot connect to the network, see "Network connection" (page 51) or "Wireless LAN connection" (page 51). To recall the Easy Initial Settings display/Easy Network Settings display 1 Press HOME. The home menu appears on the TV screen. 2 Press C/c to select [Setup]. 3 Press X/x to select [Easy Setup], then press . 4 Press X/x to select the setting, then press . • [Easy Initial Settings] • [Easy Network Settings] The Easy Initial Settings display/Easy Network Settings display appears. Step 5: Selecting the Source You can select the playback source. Press FUNCTION repeatedly until the desired function appears in the front panel display. When you press FUNCTION once, the current function appears in the front panel display, then each time you press FUNCTION, the function changes as follows. "BD/DVD" t "USB" t "FM" t "TV" t "AUDIO" t "BD/DVD" t ... Function "BD/DVD" "USB" "FM" "TV" "AUDIO" Source Disc or network device to be played by the system USB device or iPod/iPhone that is connected to the (USB) port (page 13) FM radio (page 34) Component (TV, etc.) that is connected to the TV (DIGITAL IN OPTICAL) jack on the rear panel, or a TV compatible with the Audio Return Channel function that is connected to the HDMI (OUT) jack on the rear panel (page 18) Component that is connected to the AUDIO (AUDIO IN L/R) jacks on the rear panel (page 19) Some functions may be changed via the TV screen by pressing FUNCTION, X/x, and . 23US
-
 1
1 -
2
-
3
-
4
-
5
-
6
-
7
-
8
-
9
-
10
-
11
-
12
-
13
-
14
-
15
-
16
-
17
-
 18
18 -
 19
19 -
 20
20 -
 21
21 -
 22
22 -
 23
23 -
 24
24 -
 25
25 -
 26
26 -
 27
27 -
 28
28 -
29
-
30
-
31
-
32
-
33
-
34
-
35
-
36
-
37
-
38
-
39
-
40
-
41
-
42
-
43
-
44
-
45
-
46
-
47
-
48
-
49
-
50
-
51
-
52
-
53
-
54
-
55
-
56
-
57
-
58
-
59
-
60
 |
 |