Sony CDP-CX260 Operating Instructions
Sony CDP-CX260 - 200 Disc Cd Changer Manual
 |
View all Sony CDP-CX260 manuals
Add to My Manuals
Save this manual to your list of manuals |
Sony CDP-CX260 manual content summary:
- Sony CDP-CX260 | Operating Instructions - Page 1
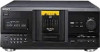
3-862-564-21 (1) Compact Disc Player Operating Instructions EN Mode d'emploi F Manual de instrucciones ES P CDP-CX260 © 1998 by Sony Corporation - Sony CDP-CX260 | Operating Instructions - Page 2
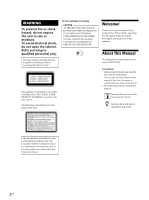
Thank you for purchasing the Sony Compact Disc Player. Before operating the unit, please read this manual thoroughly and retain it for future reference. About This Manual The instructions in this manual are for models CDP-CX260. Conventions • Instructions in this manual describe the controls on the - Sony CDP-CX260 | Operating Instructions - Page 3
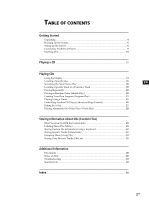
Started Unpacking ...4 Hooking Up the System ...5 Setting up the remote ...6 Connecting Another CD Player 9 Inserting CDs ...10 Playing a CD ...12 Playing CDs Using the Display ...14 Locating a Specific Disc ...16 Specifying the Next Disc to Play 18 EN Locating a Specific Track or a Point - Sony CDP-CX260 | Operating Instructions - Page 4
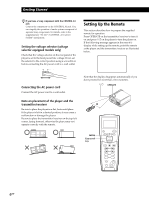
cord for the transmitter/receiver) (1) • Remote commander (remote) (1) • Sony LR6 batteries (3) • Transmitter/receiver (1) How to use the CD booklet holder The CD booklet holder helps you locate discs easily. After you have inserted discs into the player, you can put the CD booklet (which comes - Sony CDP-CX260 | Operating Instructions - Page 5
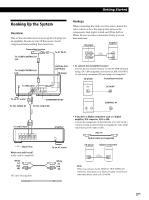
jack using a DC-cable (supplied) and via the S-LINK CONTROL A1 jack using a monaural (2P) mini-plug cord (supplied). CD player TO TMR - I A10 ( TRANSMITTER RECEIVER ) DC OUT 6V Transmitter/receiver DC IN 6V To an AC outlet To line output (L) COMMAND MODE To line output (R) S - L I NK CONTROL A1 - Sony CDP-CX260 | Operating Instructions - Page 6
operation. Press OPERATE on the transmitter/receiver to turn it on and press I/u on the player to turn the player on. If the following message appears in the remote's display while setting up the remote, point the remote at the player and the transmitter/receiver as illustrated below. Can ' t r ece - Sony CDP-CX260 | Operating Instructions - Page 7
. Storing disc data in the remote 1 Press Player check," then press the Easy scroll key. The display shows the disc data in the player after "Now player checking..." appears. CD1 Ma s t e r p l a y e r = CD1 / 2 0 0 d i s c s When you connect another CD player, the disc data in the second CD player - Sony CDP-CX260 | Operating Instructions - Page 8
all memo data. The loading time may take a few moments. Point the remote at the player while loading the data. * The second CD player's Disc Memo data must be loaded to the master player before you load the data to the remote. CD1 Ma s t e r p l a y e r memo LOAD I NG D I SC120 When you want to load - Sony CDP-CX260 | Operating Instructions - Page 9
data stored in the remote 1 Press MENU. CD1 Connecting Another CD Player If you have a Sony CD player in which 5, 50, or 200 discs can be inserted player before making this connection. COMMAND MODE To LINE OUT CDP-CX260 To an AC outlet To 2ND CD IN To S-LINK/CONTROL A1 To audio output CDP-CX200 - Sony CDP-CX260 | Operating Instructions - Page 10
"Hookups" on page 5). CDP-CX260 2ND CD LINE IN OUT L L R R CDP-CX200, etc. LINE OUT L R Inserting CDs You can insert up to 200 discs into this player. I/u § OPEN/CLOSE JOG 2 Connect the players with a monaural (2P) mini- plug cord. CDP-CX260 S-LINK CONTROL A1 CDP-CX200, etc. CONTROL A1 - Sony CDP-CX260 | Operating Instructions - Page 11
easily You can store up to 200 CD booklets. Insert a booklet and stick the number label on the pocket matching the number of the disc slot where you have inserted the disc. Notes • Do not insert an empty 8 cm (3-inch) CD adaptor (CSA-8). It may damage the player. • Do not attach anything such as - Sony CDP-CX260 | Operating Instructions - Page 12
Play). You can also play up to 200 discs consecutively. You can turn on the player by pressing I/u on the remote 1 Turn on the amplifier and select the CD player position. 2 Press I/u to turn on the player. 3 Press CONTINUE to select ALL DISCS or 1␣ DISC Continuous Play mode. Each time you press - Sony CDP-CX260 | Operating Instructions - Page 13
same play mode. 5 Push the JOG dial or press · to start playing. The selected disc is set to the playing position, and the player plays all the discs from the selected one (ALL DISCS) or all the tracks once (1␣ DISC). Adjust the volume on the amplifier. To stop playback Press p. ≠/± JOG STANDBY - Sony CDP-CX260 | Operating Instructions - Page 14
Playing CDs Using the Display You can check information about the disc using the display. TIME/TEXT INPUT JOG p PLAYER SELECT TRACK MENU BACK PUSH ENTER DISC GROUP HIGH-LIGHT &!? ABC DEF 1 2 3 MEMO INPUT GHI JKL MNO 4 5 6 CAPS HIT LIST PRS TUV WXY 7 8 9 SPACE X-FADE QZ - Sony CDP-CX260 | Operating Instructions - Page 15
characters appear in the display. To play disc highlights Z Some CD TEXT discs have a feature to play only the highlights of the discs. During stop mode, press HIGH-LIGHT on the remote to start playing disc highlights. "Hi LIGHT" flashes while playing disc highlights. If you press HIGH-LIGHT while - Sony CDP-CX260 | Operating Instructions - Page 16
Playing CDs Locating a Specific Disc MEMO SEARCH JOG ≠/± Locating a disc on the player Turn the JOG dial until the desired disc number or Disc Memo (see page 29) appears in the display. Push the JOG dial to start play. Locating a disc searching for a specific Disc Memo (Memo Search) You can - Sony CDP-CX260 | Operating Instructions - Page 17
CDs Locating a disc directly observing the remote's display 1 Move the cursor (") to the desired disc Disc Memos scroll in the display. 2 Press · when the Disc Memo of the desired disc appears. The disc is set to the playing position, and the player starts playing. In Program Play mode, the disc - Sony CDP-CX260 | Operating Instructions - Page 18
X Y Z 0 1 2 3 4 5 6 7 8 9 4 Press the Easy scroll key to input the character you want. The display shows the Disc Memos starting with the input character. The second CD player's disc numbers are displayed in reverse contrast. CD1 13 :Hi t echB l ues 06 :He l l o - end - If "not found" appears after - Sony CDP-CX260 | Operating Instructions - Page 19
PLAYER SELECT TRACK MENU BACK PUSH ENTER DISC GROUP HIGH-LIGHT &!? ABC DEF 1 2 3 MEMO INPUT GHI JKL MNO 4 5 6 CAPS HIT LIST PRS TUV WXY 7 8 9 SPACE X-FADE QZ ENTER DEL NO DELAY 10 10/0 CHECK DISC SKIP CLEAR PGleatytiinngg CSDtPalsartyeindg CDs track on the remote. When you - Sony CDP-CX260 | Operating Instructions - Page 20
Playing CDs Playing Repeatedly You can play discs or tracks repeatedly in any play mode. REPEAT Playing in Random Order (Shuffle Play) You can have the player "shuffle" the tracks and play in random order. The player shuffles all the tracks on all discs or on the disc you specify. SHUFFLE · JOG - Sony CDP-CX260 | Operating Instructions - Page 21
number appears in the display. When using the remote, first press DISC, then press the number button of the disc. 3 Push the JOG dial or press ·. When using the remote, press ENTER. 1 DISC Shuffle Play starts. " " appears in the display while the player is "shuffling" the tracks. To cancel Shuffle - Sony CDP-CX260 | Operating Instructions - Page 22
that are not found in the player or on the disc are deleted from the program, and the rest of the program is played in the programmed order. You can select the program number (PROGRAM 1,2 or 3) by using the remote Press PROGRAM on the remote repeatedly until the desired program number appears - Sony CDP-CX260 | Operating Instructions - Page 23
Creating a program using the remote Z MENU Easy scroll key · PLAYER SELECT TRACK MENU BACK PUSH ENTER PROGRAM CONTINUE PROGRAM SHUFFLE REPEAT MEMO SCAN DISC SKIP TIME/TEXT DISC Number buttons >10 PLAYER SELECT TRACK MENU BACK PUSH ENTER DISC GROUP HIGH-LIGHT &!? ABC DEF 1 2 3 - Sony CDP-CX260 | Operating Instructions - Page 24
. Input the character you want following the procedure in "Labeling discs observing the remote's display" on page 30. Note You cannot program the second player's tracks by using the remote. Playing the program you create observing the remote's display Z 1 Press MENU. CD1 Memo s ea r c h P r og r am - Sony CDP-CX260 | Operating Instructions - Page 25
a disc at any given time by connecting a timer (not supplied). Refer also to the instructions for the timer if you need help. TIMER Play mode buttons CD1 Di sc4 *D I SC4* Track1 ( TRACK1 ) Program Play starts when the player finishes loading the program data from the remote. If the player fails - Sony CDP-CX260 | Operating Instructions - Page 26
number or Disc Memo of the second player. ALL DISCS 4 CD1 2nd DISC *DISC-4* Current disc number or the Disc Memo 2 Select the desired play mode. To program tracks, use the controls on the second player. You cannot change the second CD player's ALL DISCS Play mode to 1 DISC Play mode, or vice - Sony CDP-CX260 | Operating Instructions - Page 27
MEMO" appears. 4 Push the JOG dial. 5 Input the new Disc Memo following the procedure in "Labeling Discs" on page 29. Note The new Disc Memos are stored on this player's memory, so you cannot display them on the second CD player. Fading In or Out You can manually fade the sound in or out to prevent - Sony CDP-CX260 | Operating Instructions - Page 28
player, you can play tracks in this player and those from the second player alternately from any play mode (see "Connecting Another CD Player" one player has played all the discs or tracks in the player ahead of the other player, the play stops. • Do not use the controls on the second player during - Sony CDP-CX260 | Operating Instructions - Page 29
When you replace a disc with a CD TEXT disc, the disc title of the CD TEXT disc is also stored automatically. Note that you cannot change the Disc Memo of the CD TEXT disc. You can label discs while the front cover is open Labeling discs on the player INPUT JOG If you replace discs you have filed - Sony CDP-CX260 | Operating Instructions - Page 30
to assign Disc Memos to other discs. Erasing the Disc Memo 1 Follow Steps 1 to 3 in "Labeling discs on the player" on page 29 to select the Disc Memo you want to erase. 2 Press CLEAR. The Disc Memo disappears. Press INPUT to show the disc number again. Labeling discs observing the remote's display - Sony CDP-CX260 | Operating Instructions - Page 31
CDs Press the Easy scroll key or ENTER to load the Disc Memo to the player. If you do not want to load the Disc Memo to the player, move the cursor to "no," then press the D i s c memo i npu t Di sc6: ( AB ) [ SONY B T ] 2 Press DEL to delete the incorrect character. CD1 D i s c memo i - Sony CDP-CX260 | Operating Instructions - Page 32
the cursor moves next to the point you want to insert, and enter the character. You can label discs of the second CD player using the remote Z Press PLAYER SELECT to select the second CD player, then repeat Steps 1 to 7. Notes • If the cursor keys do not work correctly and you cannot complete the - Sony CDP-CX260 | Operating Instructions - Page 33
About CDs (Custom Files) 4 Press CLEAR. "DELETE FILE" and "OFF" appear in the display. ALL DISCS DISC 20 DELETE discs make it hard to find the disc you want. This player has a feature that lets you classify discs into eight groups. Each disc can be put into only one group. Once you classify discs - Sony CDP-CX260 | Operating Instructions - Page 34
Information About CDs (Custom Files) 5 Repeat Steps 3 and 4 to input more characters. See also "Labeling discs on the player" on page display, no disc has been put into the selected group. Starting Group Play observing the remote's display Z Playing discs in a group on the player (Group Play - Sony CDP-CX260 | Operating Instructions - Page 35
the GROUP button. You can specify the disc by pressing the DISC SKIP +/- button Notes • When you select a disc which is not within the selected group, "NO DISC!!!" appears even if the disc is inserted. • When you control another CD player using the remote's display (see page 26), you may not - Sony CDP-CX260 | Operating Instructions - Page 36
track will be replaced. • You cannot store the tracks from a second CD player. Playing tracks in the Hit List 1 Press HIT LIST before you start playing the remote, press ENTER. The Hit List remains until erased Even if you replace discs, the Hit List you create remains. Therefore, the player will - Sony CDP-CX260 | Operating Instructions - Page 37
Information About CDs (Custom Files) 5 Repeat Steps 3 and 4 to input more characters. See also "Labeling discs on the player" on page "Labeling tracks while in play mode" to input the characters. You can store a CD TEXT disc's track titles in the Hit List Push the JOG dial twice (while in play mode - Sony CDP-CX260 | Operating Instructions - Page 38
open the front cover then remove all the discs from the player and turn the power off. If you have any questions or problems concerning your player, please consult your nearest Sony dealer. Notes on CDs On handling CDs • To keep the disc clean, handle the disc carefully. • Do not stick paper or tape - Sony CDP-CX260 | Operating Instructions - Page 39
troubleshooting guide to help you remedy the problem. Should any problem persist, consult your nearest Sony dealer. There is no sound. /Check that the player is connected securely. /Make sure you operate the amplifier correctly. The CD does not play. /There is no CD in a slot ("-NO DISC-" appears - Sony CDP-CX260 | Operating Instructions - Page 40
R Remote control 4, 6 Repeating 20 Rotary table 10 S Searching. See Locating Selecting a disc 16 Selecting the language 15 Shuffle Play on all discs 21 on one disc 21 Specifying the next disc 18 Storing information about CDs 29 specific tracks 32 T Timer Play 25 Total playing time 14 Troubleshooting - Sony CDP-CX260 | Operating Instructions - Page 41
Additional Information 41EN - Sony CDP-CX260 | Operating Instructions - Page 42
compacts Sony. Avant d'utiliser cet appareil, nous vous recommandons de lire attentivement ce manuel et de le conserver afin de pouvoir le consulter ultérieurement. A propos de ce mode d'emploi Les instructions contenues dans le présent mode d'emploi concernent le modèle CDP-CX260. Conventions - Sony CDP-CX260 | Operating Instructions - Page 43
Raccordement d'un autre lecteur CD 9 Introduction des disques compacts 10 Lecture d'un disque compact 12 Lecture de disques compacts Utilisation de la fenê programmée 21 P Lecture par programmateur 25 Commander un autre lecteur CD (Advanced Mega Control 26 Fondu enchaîné d'entrée ou de - Sony CDP-CX260 | Operating Instructions - Page 44
(1) • Piles Sony LR6 (3) • Transmetteur/récepteur (1) Comment utiliser le porte-livrets de CD Le porte-livrets de CD vous aide à retrouver facilement un disque. Lorsque vous avez introduit un disque dans le lecteur, vous pouvez placer le livret du CD (remis avec tous les CD) dans le support fourni - Sony CDP-CX260 | Operating Instructions - Page 45
sentation Cette section décrit le raccordement du lecteur de disques compacts à un amplificateur. Avant de réaliser la connexion, n' au moyen d'un câble à minifiche monaural (2 broches) (fourni). Lecteur CD TO TMR - I A10 ( TRANSMITTER RECEIVER ) DC OUT 6V Transmetteur/récepteur DC IN 6V S - L I - Sony CDP-CX260 | Operating Instructions - Page 46
composées d'appareils Sony séparés. Pour plus de détails, reportez-vous aux instructions complémentaires "S-LinkTM/CONTROL Can ' t r ece i ve Pl ease turn t h i s REMOT E t o a ma i n un i t Faites attention que la PLAYER SELECT TRACK MENU BACK PUSH ENTER CONTINUE PROGRAM SHUFFLE REPEAT MEMO - Sony CDP-CX260 | Operating Instructions - Page 47
ées de disque du lecteur après que "Now player checking..." est apparu. CD1 Ma s t e r p l a y e r = CD1 / 2 0 0 d i s c s Si vous raccordez un autre lecteur CD, les données de disque du second lecteur CD apparaissent également. CD1 Ma s t e r p l a y e r = CD1 / 2 0 0 d i s c s 2nd p l ayer = CD3 - Sony CDP-CX260 | Operating Instructions - Page 48
sur la touche de défilement rapide. CD1 Pl ayer check Memo l oad i ng Con t r as t ad j us t Memo r y c l ea r Si vous raccordez un autre lecteur CD, l'indication "2nd player" s'affiche également. 4 Si vous voulez charger tous les mémos de disque (du lecteur maître, du second lecteur - Sony CDP-CX260 | Operating Instructions - Page 49
effacées. Raccordement d'un autre lecteur CD Si vous disposez d'un lecteur CD Sony dans lequel vous pouvez introduire 5, 50 ou 200 disques et doté d'une prise CONTROL Vers LINE OUT CDP-CX260 Vers une prise murale Vers 2ND CD IN Vers S-LINK/ CONTROL A1 Vers la sortie audio CDP-CX200, etc. Vers - Sony CDP-CX260 | Operating Instructions - Page 50
jusqu'à 200 disques compacts dans ce lecteur. I/u § OPEN/CLOSE JOG 2 Raccordez les lecteurs au moyen d'un câble à minifiche monaural (2 broches). CDP-CX260 S-LINK CONTROL A1 CDP-CX200, etc. CONTROL A1 Pour plus de détails sur ce raccordement, reportezvous aux instructions complémentaires - Sony CDP-CX260 | Operating Instructions - Page 51
lorsque vous tournez le disque JOG. ALL DISCS CD1 20 DISC *DISC-20* Numéro de disque ou CD fourni vous aide à localiser rapidement les disques Vous pouvez y ranger jusqu'à 200 livrets de CD disques compacts Après avoir appliqué les étapes 1 à 3 de la procédure "Introduction des disques compacts" - Sony CDP-CX260 | Operating Instructions - Page 52
compact 2 3 5 4/5 STANDBY I / u TIMER OFF PLAY KEY BOARD KEYBOARD CONTINUE SHUFFLE PROGRAM REPEAT TIME/TEXT GROUP 1 GROUP 2 GROUP 3 GROUP 4 HIT LIST GROUP 5 GROUP 6 GROUP 7 GROUP 8 GROUP FILE DISC reproduire jusqu'à 200 disques consécutivement la position de lecteur CD. 2 Appuyez sur - Sony CDP-CX260 | Operating Instructions - Page 53
KEY BOARD KEYBOARD CONTINUE SHUFFLE PROGRAM REPEAT TIME/TEXT GROUP 1 GROUP 2 GROUP 3 GROUP 4 HIT LIST GROUP 5 GROUP 6 GROUP 7 GROUP 8 GROUP FILE DISC/CHARACTER MEGA CONTROL X-FADE INPUT FADER NO DELAY MEMO SEARCH OPEN/CLOSE PUSH ENTER AMS CHECK CLEAR § OPEN/CLOSE ·P p Pour Activer - Sony CDP-CX260 | Operating Instructions - Page 54
compacts Utilisation de la fenêtre d'affichage La fenêtre d'affichage vous permet de contrôler une série d'informations concernant le disque sélectionné. TIME/TEXT INPUT JOG p PLAYER SELECT TRACK MENU BACK PUSH ENTER DISC ) lorsque vous sélectionnez un disque CD TEXT (voir pages 15 et 29). - Sony CDP-CX260 | Operating Instructions - Page 55
Lecture de disques compacts Vérification des informations des disques CD TEXT Les disques CD TEXT comportent des La fenêtre d'affichage indique ensuite à nouveau le titre du disque. ALL DISCS CD TEXT CD1 DISC SONYHITS Informations affichées pendant la lecture d'un disque Chaque fois que vous - Sony CDP-CX260 | Operating Instructions - Page 56
Lecture de disques compacts Localisation d'un disque déterminé MEMO SEARCH JOG ≠/± Localisation d' affichage. 2 Appuyez plusieurs fois de suite sur ≠/± pour introduire le premier caractère. ALL DISCS S CD1 SONYHITS Caractère introduit Chaque fois que vous appuyez sur ≠/±, les caractères - Sony CDP-CX260 | Operating Instructions - Page 57
Lecture de disques compacts Localisation directe d'un disque avec la télécommande MENU Touche de défilement rapide · PLAYER SELECT TRACK MENU BACK PUSH ENTER MEMO SCAN CONTINUE PROGRAM SHUFFLE REPEAT MEMO SCAN DISC SKIP TIME/TEXT DISC Touches numériques PLAYER SELECT TRACK MENU BACK - Sony CDP-CX260 | Operating Instructions - Page 58
compacts le caractère que vous avez introduit. Les numéros des disques du second lecteur CD sont affichés en brillance inversée. CD1 13 :Hi t echB l ues 06 :He tre d'affichage, cessez de tourner le disque JOG. ALL DISCS CD1 3 8 NEXT DISC NEXT DISC *DISC-38* Numéro du disque suivant ou mémo de - Sony CDP-CX260 | Operating Instructions - Page 59
PLAYER SELECT TRACK MENU BACK PUSH ENTER DISC GROUP HIGH-LIGHT &!? ABC DEF 1 2 3 MEMO INPUT GHI JKL MNO 4 5 6 CAPS HIT LIST PRS TUV WXY 7 8 9 SPACE X-FADE QZ ENTER DEL NO DELAY 10 10/0 CHECK DISC SKIP CLEAR Lecture de disques compacts un disque CD TEXT, les titres des plages - Sony CDP-CX260 | Operating Instructions - Page 60
Lecture de disques compacts Lecture répétée Vous pouvez activer la lecture répétée de BACK PUSH ENTER CONTINUE PROGRAM SHUFFLE REPEAT MEMO SCAN DISC SKIP TIME/TEXT SHUFFLE PLAYER SELECT TRACK MENU BACK PUSH ENTER DISC Touches numériques DISC GROUP HIGH-LIGHT &!? ABC DEF 1 2 3 - Sony CDP-CX260 | Operating Instructions - Page 61
un ordre aléatoire 1 Appuyez deux fois sur SHUFFLE. Les indications "1 DISC" et "SHUFFLE" apparaissent dans la fenêtre d'affichage. 2 Tournez le de votre choix apparaisse dans la fenêtre d'affichage. PROGRAM1 CD1 20 DISC *DISC-20* 3 Pour programmer un disque en entier, passez cette étape. - Sony CDP-CX260 | Operating Instructions - Page 62
Lecture de disques compacts 22F 4 Poussez sur le disque JOG. Numéro de la plage en cours de programmation PROGRAM1 DISC 20 CD1 TRACK 3 disque du programme Ajouter des plages ou des disques à la fin du programme Changer complètement tout le programme Vous devez Appuyer sur CHECK jusqu'à ce que - Sony CDP-CX260 | Operating Instructions - Page 63
PROGRAM SHUFFLE REPEAT MEMO SCAN DISC SKIP TIME/TEXT PLAYER SELECT TRACK MENU BACK PUSH ENTER DISC Touches numériques >10 DISC GROUP HIGH-LIGHT &!? ABC numéro de plage de 1 à 9. Disque en cours de programmation PROGRAM1 DISC TRACK 20 3 20 STEP 1 Numéro de la plage en cours de - Sony CDP-CX260 | Operating Instructions - Page 64
Lecture de disques compacts Création d'un programme musical tout en observant la fen placez le curseur sur la phase que vous voulez effacer à l'étape 3 et appuyez ensuite sur CLEAR. Pour changer un disque ou une plage que vous avez programmé, déplacez le curseur sur la phase que vous voulez effacer - Sony CDP-CX260 | Operating Instructions - Page 65
LecturePGdleeatytdiininsggquCSeDtPsalsarctyoeimndgpaCcDts Lecture du programme que vous avez créé en observant la fenêtre d'affichage de la télécommande Z 1 Appuyez sur MENU. CD1 Memo s ea r c h P r og r am p l a y P r og r am i npu t Group se l ec t 2 Déplacez le curseur (") sur "Program play" à - Sony CDP-CX260 | Operating Instructions - Page 66
compacts Commander un autre lecteur CD (Advanced Mega Control) Cet appareil peut commander un second lecteur CD (voir "Raccordement d'un autre lecteur CD" à la page 9). Même lorsqu'un second lecteur CD ALL DISCS au mode de lecture 1 DISC sur le second lecteur CD, sur la touche PLAYER SELECT de la - Sony CDP-CX260 | Operating Instructions - Page 67
le second lecteur CD. 1 Appuyez sur MEGA CONTROL. La touche MEGA CONTROL s'allume. 2 Tournez le disque JOG pour sélectionner le disque auquel vous voulez assigner un mémo de disque. Si le logement de disque que vous avez sélectionné ne comporte pas de disque, l'indication "NO␣ DISC" apparaît dans la - Sony CDP-CX260 | Operating Instructions - Page 68
compacts 28F Lecture alternée (lecture alternée sans transition/ enchaînée) Si vous raccordez un second lecteur, vous pouvez reproduire alternativement des plages de ce lecteur et ceux du second lecteur dans n'importe quel mode de lecture (voir "Raccordement d'un autre lecteur CD pouvez changer la - Sony CDP-CX260 | Operating Instructions - Page 69
CD TEXT, le titre du disque CD TEXT est également mémorisé automatiquement. Faites attention que vous ne pouvez pas changer le mémo de disque pour un disque CD qui apparaît. 2 Appuyez sur INPUT. L'indication "DISC MEMO" se met à clignoter. 3 Poussez sur le disque JOG. Le curseur clignotant (") - Sony CDP-CX260 | Operating Instructions - Page 70
Mémorisation d'informations relatives aux CD (fichiers personnalisés) 30F 4 Tournez le disque d'affichage de la télécommande Z MENU Touche de défilement rapide Touches numériques PLAYER SELECT TRACK MENU BACK PUSH ENTER DISC GROUP HIGH-LIGHT &!? ABC DEF 1 2 3 MEMO INPUT GHI JKL MNO - Sony CDP-CX260 | Operating Instructions - Page 71
CD le symbole voulu apparaisse dans la fenêtre d'affichage. DISC GROUP HIGH-LIGHT &!? ABC DEF 1 2 3 MEMO éro, appuyez deux fois sur CAPS pour changer le type de caractère et appuyez ensuite c memo i npu t Di sc6: ( AB ) [ SONY B T ] 2 Appuyez sur DEL pour effacer le caractère incorrect. CD1 D - Sony CDP-CX260 | Operating Instructions - Page 72
re. Vous pouvez identifier des disques du second lecteur CD au moyen de la télécommande Z Appuyez sur PLAYER SELECT pour sélectionner le second lecteur CD et répétez ensuite les étapes 1 à 7. Mé ce que la plage à supprimer apparaisse dans la fenêtre d'affichage. ALL DISCS DISC 20 CD1 TRACK 1 20 ON - Sony CDP-CX260 | Operating Instructions - Page 73
Mémorisation d'informations relatives aux CD (fichiers personnalisés) 4 Appuyez sur CLEAR. Les indications "DELETE FILE" et "OFF" apparaissent dans la fenêtre d'affichage. ALL DISCS DISC 20 DELETE FILE 20 CD1 TRACK 1 OFF Pour restaurer la plage, appuyez à nouveau sur CLEAR. 5 Répétez les é - Sony CDP-CX260 | Operating Instructions - Page 74
relatives aux CD (fichiers personnalis tous les disques ALL DISCS du groupe dans un ordre aléatoire Lecture aléatoire Toutes les plages du disque spécifié 1 DISC dans le groupe dans Touche de défilement rapide · PLAYER SELECT TRACK MENU BACK PUSH ENTER BACK CONTINUE PROGRAM SHUFFLE - Sony CDP-CX260 | Operating Instructions - Page 75
d'informations relatives aux CD (fichiers personnalisés) GROUP PLAYER SELECT TRACK MENU BACK PUSH ENTER DISC GROUP HIGH-LIGHT &!? ABC DEF 1 2 3 MEMO INPUT GHI JKL MNO 4 5 6 CAPS HIT LIST PRS TUV WXY 7 8 9 SPACE X-FADE QZ ENTER DEL NO DELAY 10 10/0 CHECK DISC SKIP CLEAR - Sony CDP-CX260 | Operating Instructions - Page 76
informations relatives aux CD (fichiers personnalisés) 36F PLAYER SELECT TRACK MENU BACK PUSH ENTER DISC GROUP HIGH-LIGHT &!? ABC DEF 1 2 3 MEMO INPUT GHI JKL MNO 4 5 6 CAPS HIT LIST PRS TUV WXY 7 8 9 SPACE X-FADE QZ ENTER DEL NO DELAY 10 10/0 CHECK DISC SKIP CLEAR HIT - Sony CDP-CX260 | Operating Instructions - Page 77
Mémorisation d'informations relatives aux CD (fichiers personnalisés) 3 Tournez le disque JOG jusqu'à mode de lecture" pour introduire les caractères. Vous pouvez mémoriser les titres des plages d'un disque CD TEXT dans la liste des hits. Poussez deux fois sur le disque JOG (en mode de lecture) ou - Sony CDP-CX260 | Operating Instructions - Page 78
d'alimentation ne peut être remplacé que dans un centre de service après-vente agréé uniquement. Installation • Installez le lecteur dans un concernant votre lecteur, consultez votre revendeur Sony. Remarques sur les disques compacts Manipulation des disques compacts • Pour que les disques restent - Sony CDP-CX260 | Operating Instructions - Page 79
Sony. Il n'y a pas de son. /Vérifiez si le lecteur est correctement raccordé. /Assurez-vous que l'amplificateur fonctionne correctement. La lecture du disque ne démarre pas. /Aucun CD n'a été introduit dans l'un des logements (l'indication "-NO DISC-" apparaît). Introduisez un CD. /Introduisez le CD - Sony CDP-CX260 | Operating Instructions - Page 80
12, 21 X-FADE 28 DEL 31 DISC 17, 21, 23 DISC SKIP +/- 13 ENTER 17, 23, 36 PLAYER SELECT 10, 26 PROGRAM 21, 23 REPEAT 20 SHUFFLE 21 SPACE 31 TIME/TEXT 14 TRACK 19 ≠/± 13 · 13 P 13 p 13 =/+ 19 0/) 19 >10 19, 23 Commutateurs TIMER 25 I/u 6 Prises LINE OUT 9 S-LINK/CONTROL A1 5 TO TMR-IA10 5 2ND CD - Sony CDP-CX260 | Operating Instructions - Page 81
Informations complémentaires 41F - Sony CDP-CX260 | Operating Instructions - Page 82
Sony. Antes de utilizar la unidad, lea detenidamente el manual completo y consérvelo para futuras consultas. Acerca de este manual Las instrucciones de este manual son para el modelo CDP-CX260 emplea en entornos comerciales, por disc jockeys, por ejemplo, incluso dentro del periodo de garantía. 2ES - Sony CDP-CX260 | Operating Instructions - Page 83
Preparación del mando a distancia 6 Conexión de otro reproductor de CD 9 Inserción de discos compactos 10 Reproducción de discos compactos 12 21 ES Reproducción con temporizador 25 Control de otro reproductor de CD (Mega Control avanzado 26 Aparición y desaparición gradual del sonido - Sony CDP-CX260 | Operating Instructions - Page 84
(1) • Pilas Sony LR6 (3) • Transmisor/receptor (1) Cómo utilizar los catálogos de portadas de CD Los catálogos de portadas de CD permiten localizar discos ranura donde haya insertado el disco. Es posible colocar un máximo de 200 portadas de CD en los catálogos. Inserción de las pilas en el mando a - Sony CDP-CX260 | Operating Instructions - Page 85
el cable de CC (suministrado) y mediante la toma S-LINK CONTROL A1 con un cable con minienchufe monofónico (2P) (suministrado). Reproductor de CD TO TMR - I A10 ( TRANSMITTER RECEIVER ) DC OUT 6V Transmisor/receptor DC IN 6V A una toma de CA A salida de línea (L) COMMAND MODE A salida de línea - Sony CDP-CX260 | Operating Instructions - Page 86
de audio que se compongan de componentes Sony independientes. Para más información, consulte las a continuación. Can ' t r ece i ve Pl ease turn t h i s REMOT E t o a ma i n un i t Tenga en cuenta que la indicación Tecla de desplazamiento fácil PLAYER SELECT TRACK MENU BACK PUSH ENTER CONTINUE - Sony CDP-CX260 | Operating Instructions - Page 87
j us t Memo r y c l ea r 3 Desplace el cursor hasta "Player check" y, a continuación, pulse la tecla de desplazamiento fácil. El visor muestra los después de aparecer "Now player checking...". CD1 Ma s t e r p l a y e r = CD1 / 2 0 0 d i s c s Si conecta otro reproductor de CD, también aparecerán los - Sony CDP-CX260 | Operating Instructions - Page 88
continuación, pulse la tecla de desplazamiento fácil. CD1 A l l memo da t a Ma s t e r p l a y e r Gr oup memo Si conecta otro reproductor de CD, también aparecerá "2nd player". 4 Si desea cargar todos los memos de disco (los datos de memo de grupo del reproductor principal, del segundo* y de ambos - Sony CDP-CX260 | Operating Instructions - Page 89
. Conexión de otro reproductor de CD Si dispone de un reproductor de CD Sony en el que puedan insertarse 5, 50 o 200 discos y equipado con la toma CONTROL ón. COMMAND MODE A LINE OUT CDP-CX260 A una toma de CA A 2ND CD IN A S-LINK/CONTROL A1 A la salida de audio CDP-CX200, etc. A CONTROL A1 - Sony CDP-CX260 | Operating Instructions - Page 90
en la página 5). CDP-CX260 2ND CD LINE CDP-CX200, etc. LINE OUT CD 1 o CD 2, y el modo de mando del segundo reproductor en CD 3. COMMAND MODE CD 123 Inserción de discos compactos Es posible insertar un máximo de 200 CD con el mando a distancia, pulse PLAYER SELECT en éste para - Sony CDP-CX260 | Operating Instructions - Page 91
número o memo de disco cambia. ALL DISCS CD1 20 DISC *DISC-20* Número o memo de disco Es CD suministrados facilitan la localización de los discos Es posible almacenar un máximo de 200 portadas de CD y/o el CD no se introduce correctamente en la ranura, consulte con el proveedor Sony más pró - Sony CDP-CX260 | Operating Instructions - Page 92
GROUP 5 GROUP 6 GROUP 7 GROUP 8 GROUP FILE DISC/CHARACTER MEGA CONTROL X-FADE INPUT FADER NO DELAY MEMO continua). También es posible reproducir hasta 200 discos consecutivamente. Es posible encender el reproductor seleccione la posición del reproductor de CD. 2 Pulse I/u para encender el - Sony CDP-CX260 | Operating Instructions - Page 93
El disco seleccionado se sitúa en la posición de reproducción, y el reproductor reproduce todos los discos del seleccionado (ALL DISCS) o todos los temas una vez (1 DISC). Ajuste el volumen en el amplificador. Para detener la reproducción Pulse p. ≠/± JOG STANDBY I / u TIMER OFF PLAY KEY BOARD - Sony CDP-CX260 | Operating Instructions - Page 94
Es posible comprobar información sobre el disco mediante el visor. TIME/TEXT INPUT JOG p PLAYER SELECT TRACK MENU BACK PUSH ENTER DISC GROUP HIGH-LIGHT &!? ABC DEF 1 2 3 MEMO INPUT GHI JKL MNO 4 (hasta el carácter 13º) si selecciona un disco CD TEXT (consulte las páginas 15 y 29). - Sony CDP-CX260 | Operating Instructions - Page 95
número total de temas y el tiempo total de reproducción del disco. A continuación, el visor volverá a mostrar el título del disco. ALL DISCS CD TEXT CD1 DISC SONYHITS Información mostrada durante la reproducción de un disco Cada vez que pulse TIME/TEXT, el visor muestra la información como se - Sony CDP-CX260 | Operating Instructions - Page 96
de disco (consulte la página 29). 1 Pulse MEMO SEARCH. "MEMO SEARCH" aparece en el visor. 2 Pulse ≠/± varias veces para introducir el primer carácter. ALL DISCS S CD1 SONYHITS Carácter introducido Cada vez que pulse ≠/±, los caracteres aparecen en el siguiente orden - Sony CDP-CX260 | Operating Instructions - Page 97
BACK Tecla de desplazamiento fácil · PUSH ENTER MEMO SCAN CONTINUE PROGRAM SHUFFLE REPEAT MEMO SCAN DISC SKIP TIME/TEXT DISC Botones numéricos PLAYER SELECT TRACK MENU BACK PUSH ENTER DISC GROUP HIGH-LIGHT &!? ABC DEF 1 2 3 MEMO INPUT GHI JKL MNO 4 5 6 CAPS HIT LIST PRS TUV - Sony CDP-CX260 | Operating Instructions - Page 98
que comiencen con el carácter introducido. Los números de disco del segundo reproductor de CD aparecen en contraste inverso. CD1 13 :Hi t echB l ues 06 :He l l memo de disco, deje de girar el selector JOG. ALL DISCS CD1 3 8 NEXT DISC NEXT DISC *DISC-38* Número del disco siguiente o memo de disco - Sony CDP-CX260 | Operating Instructions - Page 99
SHUFFLE REPEAT MEMO SCAN DISC SKIP TIME/TEXT Botones numéricos >10 PLAYER SELECT TRACK MENU BACK PUSH ENTER DISC GROUP HIGH-LIGHT ) 3 Pulse la tecla de desplazamiento fácil o ·. Nota Si selecciona un disco CD TEXT, aparecen los títulos de tema en el paso 2 en lugar de los números de tema. - Sony CDP-CX260 | Operating Instructions - Page 100
TRACK MENU BACK PUSH ENTER CONTINUE PROGRAM SHUFFLE REPEAT MEMO SCAN DISC SKIP TIME/TEXT SHUFFLE DISC Botones numéricos PLAYER SELECT TRACK MENU BACK PUSH ENTER DISC GROUP HIGH-LIGHT &!? ABC DEF 1 2 3 MEMO INPUT GHI JKL MNO 4 5 6 CAPS HIT LIST PRS TUV WXY 7 8 9 SPACE - Sony CDP-CX260 | Operating Instructions - Page 101
el orden aleatorio de los discos o de los temas. Reproducción de todos los temas del disco especificado en orden aleatorio 1 Pulse SHUFFLE dos veces. "1 DISC" y "SHUFFLE" aparecen en el visor. 2 Gire el selector JOG hasta que el visor muestre el número del disco que desee. Si utiliza el mando - Sony CDP-CX260 | Operating Instructions - Page 102
Reproducción de discos compactos 22ES 4 Presione el selector JOG. Tema que está programándose PROGRAM1 DISC 20 CD1 TRACK 3 20 STEP 1 Disco que está programándose Orden de reproducción 5 Para programar otros discos o temas, realice lo siguiente: Para programar Todos los - Sony CDP-CX260 | Operating Instructions - Page 103
de desplazamiento fácil · TRACK MENU BACK PUSH ENTER PROGRAM CONTINUE PROGRAM SHUFFLE REPEAT MEMO SCAN DISC SKIP TIME/TEXT DISC Botones numéricos >10 PLAYER SELECT TRACK MENU BACK PUSH ENTER DISC GROUP HIGH-LIGHT &!? ABC DEF 1 2 3 MEMO INPUT GHI JKL MNO 4 5 6 CAPS HIT LIST - Sony CDP-CX260 | Operating Instructions - Page 104
Reproducción de discos compactos 24ES Creación de programas observando el visor del mando a distancia Z Es posible crear, observando el visor del mando a distancia, un máximo de ocho programas en la memoria de dicho mando, cada uno de ellos compuesto por un máximo de 32 pasos. 1 Pulse MENU. CD1 - Sony CDP-CX260 | Operating Instructions - Page 105
ReproducciónPGdleaetytdiinnisggcoCSsDtacsrotmedpactos 2 Desplace el cursor (") hasta "Program play" mediante la tecla de desplazamiento fácil y, a continuación, púlsela. CD1 A : P r og r am A B : P r og r am B C : P r og r am C D : P r og r am D 3 Seleccione el programa que desee pulsando la tecla - Sony CDP-CX260 | Operating Instructions - Page 106
no ser posible emplear todas las funciones del segundo reproductor de CD. Los controles indicados en la siguiente ilustración son efectivos ·P p 26ES PLAYER SELECT PLAYER SELECT TRACK MENU BACK · =/+ 0/) PUSH ENTER CONTINUE PROGRAM SHUFFLE REPEAT MEMO SCAN DISC SKIP TIME/TEXT P - Sony CDP-CX260 | Operating Instructions - Page 107
selector JOG hasta que "LOAD 2ND MEMO" aparezca en el visor. ALL DISCS CD1 LOAD 2ND MEMO 3 Presione el selector JOG. Este reproductor inicia la carga caracteres de dicho memo. Etiquetado de discos del segundo reproductor de CD Es posible etiquetar discos del segundo reproductor o cambiar los memos - Sony CDP-CX260 | Operating Instructions - Page 108
podrá reproducir los temas de este reproductor y los del segundo alternativamente en cualquier modo de reproducción (consulte "Conexión de otro reproductor de CD" en la página 9). Seleccione uno de los siguientes métodos: • Reproducción sin demora: El reproductor actual cambia en cada tema. Cada vez - Sony CDP-CX260 | Operating Instructions - Page 109
un título, el nombre del artista, categoría o fecha de adquisición. Si selecciona un disco CD TEXT El título del disco se almacena automáticamente como memo de disco. Si el tí carga. 2 Pulse INPUT. Parpadea "DISC MEMO". 3 Presione el selector JOG. Aparece el cursor parpadeante ("). (Continúa) 29ES - Sony CDP-CX260 | Operating Instructions - Page 110
de disco. Etiquetado de discos observando el visor del mando a distancia Z MENU Tecla de desplazamiento fácil Botones numéricos PLAYER SELECT TRACK MENU BACK PUSH ENTER DISC GROUP HIGH-LIGHT &!? ABC DEF 1 2 3 MEMO INPUT GHI JKL MNO 4 5 6 CAPS HIT LIST PRS TUV WXY 7 8 9 SPACE - Sony CDP-CX260 | Operating Instructions - Page 111
botón numérico 1 varias veces hasta que el visor muestre el símbolo que desee. DISC GROUP HIGH-LIGHT &!? ABC DEF 1 2 3 MEMO INPUT GHI JKL MNO 4 5 6 . CD1 D i s c memo i npu t Di sc6: ( AB ) [ SONY B T ] 2 Pulse DEL para eliminar el carácter incorrecto. CD1 D i s c memo i npu - Sony CDP-CX260 | Operating Instructions - Page 112
introduzca el carácter. Es posible etiquetar discos del segundo reproductor de CD con el mando a distancia Z Pulse PLAYER SELECT para seleccionar el segundo reproductor y, a continuación, repita los pasos hasta que el visor muestre el tema que desee eliminar. ALL DISCS DISC 20 CD1 TRACK 1 20 ON - Sony CDP-CX260 | Operating Instructions - Page 113
Almacenamiento de información acerca de los discos compactos (Archivos personalizados) 4 Pulse CLEAR. "DELETE FILE" y "OFF" aparecen en el visor. ALL DISCS DISC 20 DELETE FILE 20 CD1 TRACK 1 OFF Si desea recuperar el tema, vuelva a pulsar CLEAR. 5 Repita los pasos 3 y 4 para eliminar más - Sony CDP-CX260 | Operating Instructions - Page 114
SELECT TRACK MENU BACK PUSH ENTER CONTINUE PROGRAM SHUFFLE REPEAT MEMO SCAN DISC SKIP TIME/TEXT BACK GROUP PLAYER SELECT TRACK MENU BACK PUSH ENTER DISC GROUP HIGH-LIGHT &!? ABC DEF 1 2 3 MEMO INPUT GHI JKL MNO 4 5 6 CAPS HIT LIST PRS TUV WXY 7 8 9 SPACE X-FADE QZ - Sony CDP-CX260 | Operating Instructions - Page 115
el grupo seleccionado, aparecerá "NO DISC!!!" aunque el disco esté insertado. • Cuando controle otro reproductor de CD utilizando el visor del mando a ENTER. · CLEAR · =/+ PLAYER SELECT TRACK MENU BACK PUSH ENTER CONTINUE PROGRAM SHUFFLE REPEAT MEMO SCAN DISC SKIP TIME/TEXT (Continúa) - Sony CDP-CX260 | Operating Instructions - Page 116
de los discos compactos (Archivos personalizados) 36ES PLAYER SELECT TRACK MENU BACK PUSH ENTER DISC GROUP HIGH-LIGHT &!? ABC DEF 1 2 se sustituirá. • No es posible almacenar los temas de un segundo reproductor de CD. Reproducción de temas de la lista de éxitos 1 Pulse HIT LIST antes - Sony CDP-CX260 | Operating Instructions - Page 117
3 a 6 de "Etiquetado de temas durante el modo de reproducción" para introducir los caracteres. Es posible almacenar los títulos de los temas de un disco CD TEXT en la lista de éxitos Presione el selector JOG dos veces (durante el modo de reproducción) o pulse INPUT dos veces (durante el modo de - Sony CDP-CX260 | Operating Instructions - Page 118
los discos y desactive la alimentación. Si desea realizar alguna consulta o solucionar algún problema referentes al reproductor, póngase en contacto con el proveedor Sony más próximo. Notas sobre los discos compactos Manejo • Para mantener el disco limpio, manéjelo con cuidado. • No adhiera papel ni - Sony CDP-CX260 | Operating Instructions - Page 119
Sony más próximo. Ausencia de sonido. /Compruebe que el reproductor esté firmemente conectado. /Compruebe que emplee el amplificador correctamente. El CD no se reproduce. /No hay ningún CD en la ranura (aparece "-NO DISC-"). Inserte un CD. /Inserte el CD a una distancia de 200 mm de la superficie de - Sony CDP-CX260 | Operating Instructions - Page 120
de reproducción 14 Sony Corporation Printed in 31 DISC 17, 21, 23 DISC SKIP PLAYER SELECT 10, 26 PROGRAM 21, 23 REPEAT 20 SHUFFLE 21 SPACE 31 TIME/TEXT 14 TRACK 19 ≠/± 13 · 13 P 13 p 13 =/+ 19 0/) 19 >10 19, 23 Interruptores TIMER 25 I/u 6 Tomas LINE OUT 9 S-LINK/CONTROL A1 5 TO TMR-IA10 5 2ND CD
-
 1
1 -
 2
2 -
 3
3 -
 4
4 -
 5
5 -
 6
6 -
 7
7 -
8
-
9
-
10
-
11
-
12
-
13
-
14
-
15
-
16
-
17
-
18
-
19
-
20
-
21
-
22
-
23
-
24
-
25
-
26
-
27
-
28
-
29
-
30
-
31
-
32
-
33
-
34
-
35
-
36
-
37
-
38
-
39
-
40
-
41
-
42
-
43
-
44
-
45
-
46
-
47
-
48
-
49
-
50
-
51
-
52
-
53
-
54
-
55
-
56
-
57
-
58
-
59
-
60
-
61
-
62
-
63
-
64
-
65
-
66
-
67
-
68
-
69
-
70
-
71
-
72
-
73
-
74
-
75
-
76
-
77
-
78
-
79
-
80
-
81
-
82
-
83
-
84
-
85
-
86
-
87
-
88
-
89
-
90
-
91
-
92
-
93
-
94
-
95
-
96
-
97
-
98
-
99
-
100
-
101
-
102
-
103
-
104
-
105
-
106
-
107
-
108
-
109
-
110
-
111
-
112
-
113
-
114
-
115
-
116
-
117
-
118
-
119
-
120
 |
 |
3-862-564-
21
(1)
1998 by Sony Corporation
CDP-CX260
Compact Disc
Player
EN
F
ES
P
Operating Instructions
Mode d’emploi
Manual de instrucciones