Sony CDX-F50M Operating Instructions - Page 10
Labeling a station/disc, Adjusting setup items - SET
 |
View all Sony CDX-F50M manuals
Add to My Manuals
Save this manual to your list of manuals |
Page 10 highlights
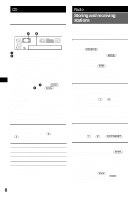
Repeat steps 2 and 3 to adjust the equalizer curve. To restore the factory-set equalizer curve, press and hold the select button before the setting is complete. After 3 seconds, the setting is complete and the display returns to normal play/reception mode. With the card remote commander In step 3, to adjust the selected item, press
-
 1
1 -
2
-
3
-
4
-
 5
5 -
 6
6 -
 7
7 -
 8
8 -
 9
9 -
 10
10 -
 11
11 -
 12
12 -
 13
13 -
 14
14 -
 15
15 -
16
-
17
-
18
-
19
-
20
-
21
-
22
-
23
-
24
-
25
-
26
-
27
-
28
-
29
-
30
-
31
-
32
-
33
-
34
-
35
-
36
-
37
-
38
-
39
-
40
 |
 |

10
Repeat steps 2 and 3 to adjust the equalizer
curve.
To restore the factory-set equalizer curve,
press and hold the select button before the
setting is complete.
After 3 seconds, the setting is complete and
the display returns to normal play/reception
mode.
With the card remote commander
In step 3, to adjust the selected item, press
<
,
M
,
,
or
m
.
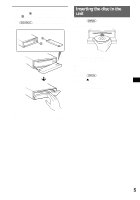
Labeling a station/disc
When you receive a station, or play a disc in a
CD changer with the CUSTOM FILE function,
you can label each station/disc with a custom
name up to 8 characters (Station Memo/Disc
Memo).
If you label a station/disc, the name appears on
the list (page 9 or 11).
1
While receiving a station or playing a
disc that you want to label, press and
hold
(LIST)
.
2
Rotate the volume control dial
repeatedly until the desired character
appears.
The character changes as follows:
A
y
B
y
C
...
y
0
y
1
y
2
...
y
+
y
–
y
...
y
(blank space)
y
A
To move the digital indication, press the
select button.
Repeat this operation until the entire name is
entered.
3
Press and hold
(LIST)
.
The labeling is complete and the display
returns to normal play/reception mode.
To display the name, press
(DSPL)
during
reception or playback.
Tips
•
To correct or erase a character, overwrite or enter
“
.”
•
The Disc Memo always takes priority over any
prerecorded title.
•
You can label a disc on the unit if a changer with the
CUSTOM FILE function is connected.
•
“REP-TRACK” and all shuffle play are suspended
until the labeling is complete.
With the card remote commander
In step 2, to select the character, press
M
or
m
.
Deleting the custom name
1
Select the radio, or the unit that has stored the
custom name you want to delete, then press
and hold
(LIST)
.
2
Press and hold
(DSPL)
.
The stored name will flash.
3
Rotate the volume control dial repeatedly to
select the name you want to delete.
4
Press and hold the select button.
The name is deleted. Repeat steps 3 and 4 to
delete other names.
5
Press and hold
(LIST)
.
The unit returns to normal play/reception
mode.
With the card remote commander
In step 3, to select the name, press
M
or
m
.
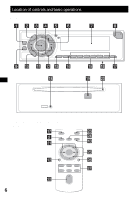
Adjusting setup items
— SET
1
Press and hold the select button.
The setup display appears.
2
Press the select button repeatedly
until the desired item appears.
3
Rotate the volume control dial to
select the setting (example “ON” or
“OFF”).
4
Press and hold the select button.
The setup is complete and the display returns
to normal play/reception mode.
Note
Displayed items will differ, depending on the source
and setting.
With the card remote commander
In step 3, to select the setting, press
<
or
,
.
The following items can be set (follow the page
reference for details):
“
z
” indicates the default settings.
CLOCK-ADJ
(Clock Adjust)
(page 4)
BEEP
To set “ON” (
z
) or “OFF.”
AUX-A
*
1
*
2
To turn the AUX source display
“ON” (
z
) or “OFF” (page 13).
SUB/REAR
*
1
To switch the audio output.
– “SUB” (
z
): to output to a
subwoofer.
– “REAR”: to output to a power
amplifier.