Sony CDX-FW570 Operating Instructions (primary manual) - Page 15
Locating a disc by name, — List-up (When connecting a CD unit with the CD TEXT/CUSTOM FILE function
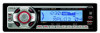 |
View all Sony CDX-FW570 manuals
Add to My Manuals
Save this manual to your list of manuals |
Page 15 highlights
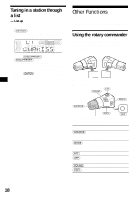
Locating a disc by name - List-up (When connecting a CD unit with the CD TEXT/CUSTOM FILE function, or an MD unit) You can use this function for discs that have been assigned custom names*1 or for CD TEXT discs*2. *1 Locating a disc by its custom name: when you assign a name for a CD (page 14) or an MD. *2 Locating discs by the CD TEXT information: when you play a CD TEXT disc on a CD unit with the CD TEXT function. 1 During playback, press (LIST/CAT). The name assigned to the current disc appears in the display. 2 Press (DISC/PRESET) (+) or (DISC/PRESET) (-) repeatedly until you find the desired disc. 3 Press (ENTER) to play the disc. Notes • If there are no discs in the magazine, "NO DISC" appears in the display. • If a disc has not been assigned a custom file, "NO NAME" appears in the display. • If the disc information has not been read by the unit, "NOT READ" appears in the display. To load the disc, first press the number button, then choose the disc that has not been loaded. • The information appears only in upper case. There are also some letters which cannot be displayed. Radio The unit can store up to 6 stations per band (FM1, FM2, FM3, AM1 and AM2). Caution When tuning in stations while driving, use Best Tuning Memory to prevent accidents. Storing stations automatically - Best Tuning Memory (BTM) The unit selects the stations with the strongest signals within the selected band, and stores them in the order of their frequency. 1 Press (SOURCE) repeatedly to select the radio. 2 Press (MODE) repeatedly to select the band. 3 Press (MENU), then press (DISC/PRESET) (+) or (DISC/PRESET) (-) repeatedly until "BTM" appears. 4 Press (ENTER). The unit stores stations in the order of their frequencies on the number buttons. A beep sounds when the setting is stored. Notes • If only a few stations can be received due to weak signals, some number buttons will retain their former settings. • When a number is indicated in the display, the unit starts storing stations from the one currently displayed. 15
-
 1
1 -
2
-
3
-
4
-
5
-
6
-
7
-
8
-
9
-
 10
10 -
 11
11 -
 12
12 -
 13
13 -
 14
14 -
 15
15 -
 16
16 -
 17
17 -
 18
18 -
 19
19 -
 20
20 -
21
-
22
-
23
-
24
-
25
-
26
-
27
-
28
-
29
-
30
-
31
-
32
-
33
-
34
-
35
-
36
-
37
-
38
-
39
-
40
-
41
-
42
-
43
-
44
-
45
-
46
-
47
-
48
-
49
-
50
-
51
-
52
-
53
-
54
-
55
-
56
-
57
-
58
-
59
-
60
-
61
-
62
-
63
-
64
 |
 |
