Sony CDX-GT705DX Operating Instructions - Page 14
Other functions, Changing the sound settings - aux
 |
View all Sony CDX-GT705DX manuals
Add to My Manuals
Save this manual to your list of manuals |
Page 14 highlights
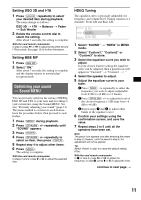
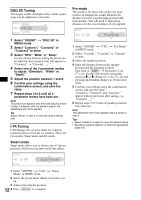
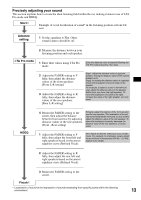
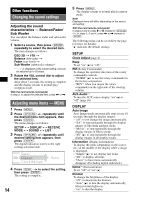
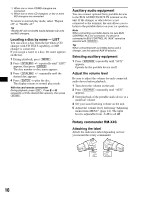
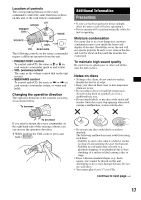
Other functions Changing the sound settings Adjusting the sound characteristics - Balance/Fader/ Sub Woofer You can adjust the balance, fader and subwoofer volume. 1 Select a source, then press (SOUND) repeatedly to select the desired item. The item changes as follows: DSO 3D t I-TA t Balance (left-right) t Fader (rear-front) t Sub Woofer (subwoofer volume)* is displayed at the lowest setting, and can be adjusted up to 20 steps. 2 Rotate the VOL control dial to adjust the selected item. After about 3 seconds, the setting is complete and the display returns to normal play/ reception mode. With the card remote commander In step 2, to adjust the selected item, press < or ,. Adjusting menu items - MENU 1 Press (MENU). 2 Press (GP/ALBM) +/- repeatedly until the desired menu item appears, then press (ENTER). The items changes as follows: SETUP y DISPLAY y RECEIVE MODE y SOUND y LIST 3 Press (GP/ALBM) +/- repeatedly until desired setting item appears, then press (ENTER). The digital indication moves to the right (setting selection) side. 4 Press (SEEK) -/+ to select the setting, then press (ENTER). The setting is complete. 14 5 Press (MENU). The display returns to normal play/reception mode. Note Displayed items will differ, depending on the source and setting. With the card remote commander In steps 2 and 3: press M or m instead of (GP/ALBM) +/-; in steps 2, 3 and 4, press < or , instead of (ENTER). The following items can be set (follow the page reference for details): "z" indicates the default settings. SETUP Clock Adjust (page 4) Beep To set "on" (z) or "off." RM (Rotary Commander) To change the operative direction of the rotary commander controls. - "NORM" (z): to use the rotary commander in the factory-set position. - "REV": when you mount the rotary commander on the right side of the steering column. AUX-Audio*1 To turn the AUX source display "on" (z) or "off" (page 16). DISPLAY Auto Image Auto Image mode automatically steps (every 10 seconds) through the display images. - "off": to not change the image automatically. - "SA": to step repeatedly through the display images of Spectrum analyzer mode. - "Movie": to step repeatedly through the display images of Movie mode. - "All" (z): to step repeatedly through the display images in all display modes. Information (Display Information) To display the items (depending on the source, etc.) at the middle of the display while a image is displayed. - "Simple"(z): to not display any items. - "All": to display all items. - "Clear": to have items automatically disappear. (Excluding digital indication.) Demo*1 (Demonstration) To set "off" or "on" (z). Dimmer To change the brightness of the display. - "off": to deactivate the dimmer. - "Auto" (z): to dim the display automatically when you turn lights on. - "on": to dim the display.
-
 1
1 -
2
-
3
-
4
-
5
-
6
-
7
-
8
-
 9
9 -
 10
10 -
 11
11 -
 12
12 -
 13
13 -
 14
14 -
 15
15 -
 16
16 -
 17
17 -
 18
18 -
 19
19 -
20
-
21
-
22
-
23
-
24
-
25
-
26
-
27
-
28
-
29
-
30
-
31
-
32
-
33
-
34
-
35
-
36
-
37
-
38
-
39
-
40
-
41
-
42
-
43
-
44
-
45
-
46
-
47
-
48
-
49
-
50
-
51
-
52
-
53
-
54
-
55
-
56
-
57
-
58
-
59
-
60
-
61
-
62
-
63
-
64
-
65
-
66
-
67
-
68
-
69
-
70
-
71
-
72
 |
 |