Sony CMT-M70 Primary User Manual - Page 7
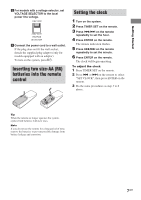
Inserting two size-AA (R6) batteries into the remote control, Setting the clock - set clock
 |
View all Sony CMT-M70 manuals
Add to My Manuals
Save this manual to your list of manuals |
Page 7 highlights
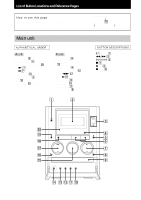
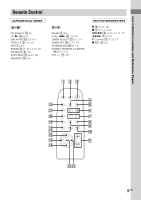
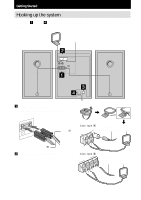
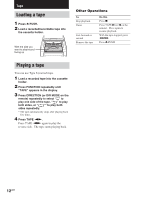
Getting Started 3 For models with a voltage selector, set VOLTAGE SELECTOR to the local power line voltage. 110V-120V 220V-240V VOLTAGE SELECTOR 4 Connect the power cord to a wall outlet. If the plug does not fit the wall socket, detach the supplied plug adaptor (only for models equipped with an adaptor). To turn on the system, press @/1. Inserting two size-AA (R6) batteries into the remote control e EE e Setting the clock 1 Turn on the system. 2 Press TIMER SET on the remote. 3 Press ./> on the remote repeatedly to set the hour. 4 Press ENTER on the remote. The minute indication flashes. 5 Press ./> on the remote repeatedly to set the minute. 6 Press ENTER on the remote. The clock will begin operating. To adjust the clock 1 Press TIMER SET on the remote. 2 Press . or > on the remote to select "SET CLOCK", then press ENTER on the remote. 3 Do the same procedures as step 3 to 6 above. Tip When the remote no longer operates the system, replace both batteries with new ones. Note If you do not use the remote for a long period of time, remove the batteries to prevent possible damage from battery leakage and corrosion. 7GB
-
 1
1 -
 2
2 -
 3
3 -
 4
4 -
 5
5 -
 6
6 -
 7
7 -
 8
8 -
 9
9 -
 10
10 -
 11
11 -
 12
12 -
13
-
14
-
15
-
16
-
17
-
18
-
19
-
20
-
21
-
22
-
23
-
24
 |
 |