Sony DAV-DX375 Operating Instructions - Page 70
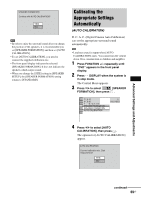
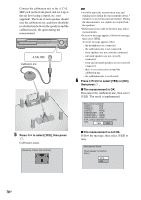
Press, to select [YES], then press, to select [YES] or [NO], The measurement is OK., A.CAL MIC - subwoofer
 |
View all Sony DAV-DX375 manuals
Add to My Manuals
Save this manual to your list of manuals |
Page 70 highlights
Connect the calibration mic to the A.CAL MIC jack on the front panel, and set it up at the ear level using a tripod, etc. (not supplied). The front of each speaker should face the calibration mic, and there should be no obstruction between the speakers and the calibration mic. Be quiet during the measurement. A.CAL MIC Calibration mic Note • Avoid being in the measurement area and making noise during the measurement (about 3 minutes), to avoid measurement failure. During the measurement, test signals are output from the speakers. • Reflections from walls or the floor may affect measurements. • If an error message appears, follow the message, then select [YES]. An error message appears when: - the headphones are connected. - the calibration mic is not connected. - front speakers are not correctly connected. - surround speakers are not correctly connected. - front and surround speakers are not correctly connected. - there is excessive noise around the calibration mic. - the calibration mic is overloaded. 6 Press C/X/x/c to select [YES] or [NO], then press . x The measurement is OK. Disconnect the calibration mic, then select [YES]. The result is implemented. Measurement complete. FRONT L : YES FRONT R : YES CENTER : NONE SUBWOOFER : YES SURROUND L : NONE SURROUND R : NONE If OK, unplug calibration mic and select YES. YES NO 5 Press X/x to select [YES], then press . Calibration starts. Measuring. Please wait a moment. x The measurement is not OK. Follow the message, then select [YES] to retry. Measurement failure. Check speaker connection. Retry? YES NO 70US
-
 1
1 -
2
-
3
-
4
-
5
-
6
-
7
-
8
-
9
-
10
-
11
-
12
-
13
-
14
-
15
-
16
-
17
-
18
-
19
-
20
-
21
-
22
-
23
-
24
-
25
-
26
-
27
-
28
-
29
-
30
-
31
-
32
-
33
-
34
-
35
-
36
-
37
-
38
-
39
-
40
-
41
-
42
-
43
-
44
-
45
-
46
-
47
-
48
-
49
-
50
-
51
-
52
-
53
-
54
-
55
-
56
-
57
-
58
-
59
-
60
-
61
-
62
-
63
-
64
-
 65
65 -
 66
66 -
 67
67 -
 68
68 -
 69
69 -
 70
70 -
 71
71 -
 72
72 -
 73
73 -
 74
74 -
 75
75 -
76
-
77
-
78
-
79
-
80
-
81
-
82
-
83
-
84
-
85
-
86
-
87
-
88
-
89
-
90
-
91
-
92
-
93
-
94
-
95
-
96
-
97
-
98
-
99
-
100
-
101
-
102
-
103
-
104
 |
 |
