Sony DAV-DX375 Operating Instructions - Page 72
Setup], Or [speaker Setup]. Then, [screen Setup], [custom
 |
View all Sony DAV-DX375 manuals
Add to My Manuals
Save this manual to your list of manuals |
Page 72 highlights
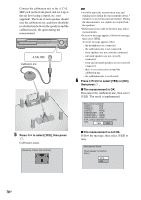
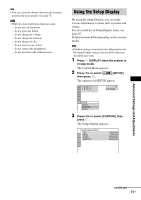
4 Press X/x to select the setup item from the displayed list: [LANGUAGE SETUP], [SCREEN SETUP], [CUSTOM SETUP], or [SPEAKER SETUP]. Then press . The Setup item is selected. Example: [SCREEN SETUP] Selected item SCREEN SETUP TV TYPE: 16:9 COLOR SYSTEM (VIDEO CD): AUTO SCREEN SAVER: ON BACKGROUND: JACKET PICTURE 4:3 OUTPUT: FULL Setup items 5 Select an item using X/x, then press . The options for the selected item appear. Example: [TV TYPE] SCREEN SETUP TV TYPE: 16:9 COLOR SYSTEM (VIDEO CD): 16:9 SCREEN SAVER: 4:3 LETTER BOX BACKGROUND: 4:3 PAN SCAN 4:3 OUTPUT: FULL To reset all of the [SETUP] settings 1 Select [RESET] in Step 3 and press . 2 Select [YES] using X/x. You can also quit the process and return to the Control Menu by selecting [NO] here. 3 Press . All the settings explained on pages 73 to 78 return to the default settings. Do not press [/ 1 while resetting the system as it takes a few seconds to complete. Note • When you turn the system on after resetting and no disc is in the system, the guide message appears on the TV screen. To perform the Quick Setup (page 19), press , to return to normal screen, press CLEAR. Options 6 Select a setting using X/x, then press . The setting is selected and setup is complete. SCREEN SETUP TV TYPE: 4:3 LETTER BOX COLOR SYSTEM (VIDEO CD): AUTO SCREEN SAVER: ON BACKGROUND: JACKET PICTURE 4:3 OUTPUT: FULL Selected setting 72US
-
 1
1 -
2
-
3
-
4
-
5
-
6
-
7
-
8
-
9
-
10
-
11
-
12
-
13
-
14
-
15
-
16
-
17
-
18
-
19
-
20
-
21
-
22
-
23
-
24
-
25
-
26
-
27
-
28
-
29
-
30
-
31
-
32
-
33
-
34
-
35
-
36
-
37
-
38
-
39
-
40
-
41
-
42
-
43
-
44
-
45
-
46
-
47
-
48
-
49
-
50
-
51
-
52
-
53
-
54
-
55
-
56
-
57
-
58
-
59
-
60
-
61
-
62
-
63
-
64
-
65
-
66
-
 67
67 -
 68
68 -
 69
69 -
 70
70 -
 71
71 -
 72
72 -
 73
73 -
 74
74 -
 75
75 -
 76
76 -
 77
77 -
78
-
79
-
80
-
81
-
82
-
83
-
84
-
85
-
86
-
87
-
88
-
89
-
90
-
91
-
92
-
93
-
94
-
95
-
96
-
97
-
98
-
99
-
100
-
101
-
102
-
103
-
104
 |
 |
