Sony DAV-FC9 Operating Instructions - Page 14
Step 1: Speaker System Hookup - speaker connector
 |
View all Sony DAV-FC9 manuals
Add to My Manuals
Save this manual to your list of manuals |
Page 14 highlights
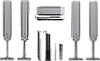
Step 1: Speaker System Hookup Connect the supplied speaker system using the supplied speaker cords by matching the colours of the jacks to those of the cords. Do not connect any speakers other than those supplied with this system. To obtain the best possible surround sound, specify the speaker parameters (distance, level, etc.) on page 23. Required cords Speaker cords The connector and the colour tube of the speaker cords are the same colour as the label of the jacks to be connected. (-) (-) (+) (+) colour tube Subwoofer cord Connect the cord to the SUB WOOFER AUDIO OUT jack on the rear panel of the system. 14US
-
 1
1 -
2
-
3
-
4
-
5
-
6
-
7
-
8
-
 9
9 -
 10
10 -
 11
11 -
 12
12 -
 13
13 -
 14
14 -
 15
15 -
 16
16 -
 17
17 -
 18
18 -
 19
19 -
20
-
21
-
22
-
23
-
24
-
25
-
26
-
27
-
28
-
29
-
30
-
31
-
32
-
33
-
34
-
35
-
36
-
37
-
38
-
39
-
40
-
41
-
42
-
43
-
44
-
45
-
46
-
47
-
48
-
49
-
50
-
51
-
52
-
53
-
54
-
55
-
56
-
57
-
58
-
59
-
60
-
61
-
62
-
63
-
64
-
65
-
66
-
67
-
68
-
69
-
70
-
71
-
72
-
73
-
74
-
75
-
76
-
77
-
78
-
79
-
80
-
81
-
82
-
83
-
84
-
85
-
86
-
87
-
88
-
89
-
90
-
91
-
92
 |
 |

14
US
Connect the supplied speaker system using the supplied speaker cords by matching the colours of the
jacks to those of the cords. Do not connect any speakers other than those supplied with this system.
To obtain the best possible surround sound, specify the speaker parameters (distance, level, etc.) on
page 23.
Required cords
Speaker cords
The connector and the colour tube of the speaker cords are the same colour as the label of the jacks to
be connected.
Subwoofer cord
Connect the cord to the SUB WOOFER AUDIO OUT jack on the rear panel of the system.
Step 1: Speaker System Hookup
(–)
(+)
colour tube
(+)
(–)