Sony DCR-HC36 Operating Guide - Page 15
For DCR-HC46/HC96, For DCR-HC36
 |
UPC - 027242688667
View all Sony DCR-HC36 manuals
Add to My Manuals
Save this manual to your list of manuals |
Page 15 highlights
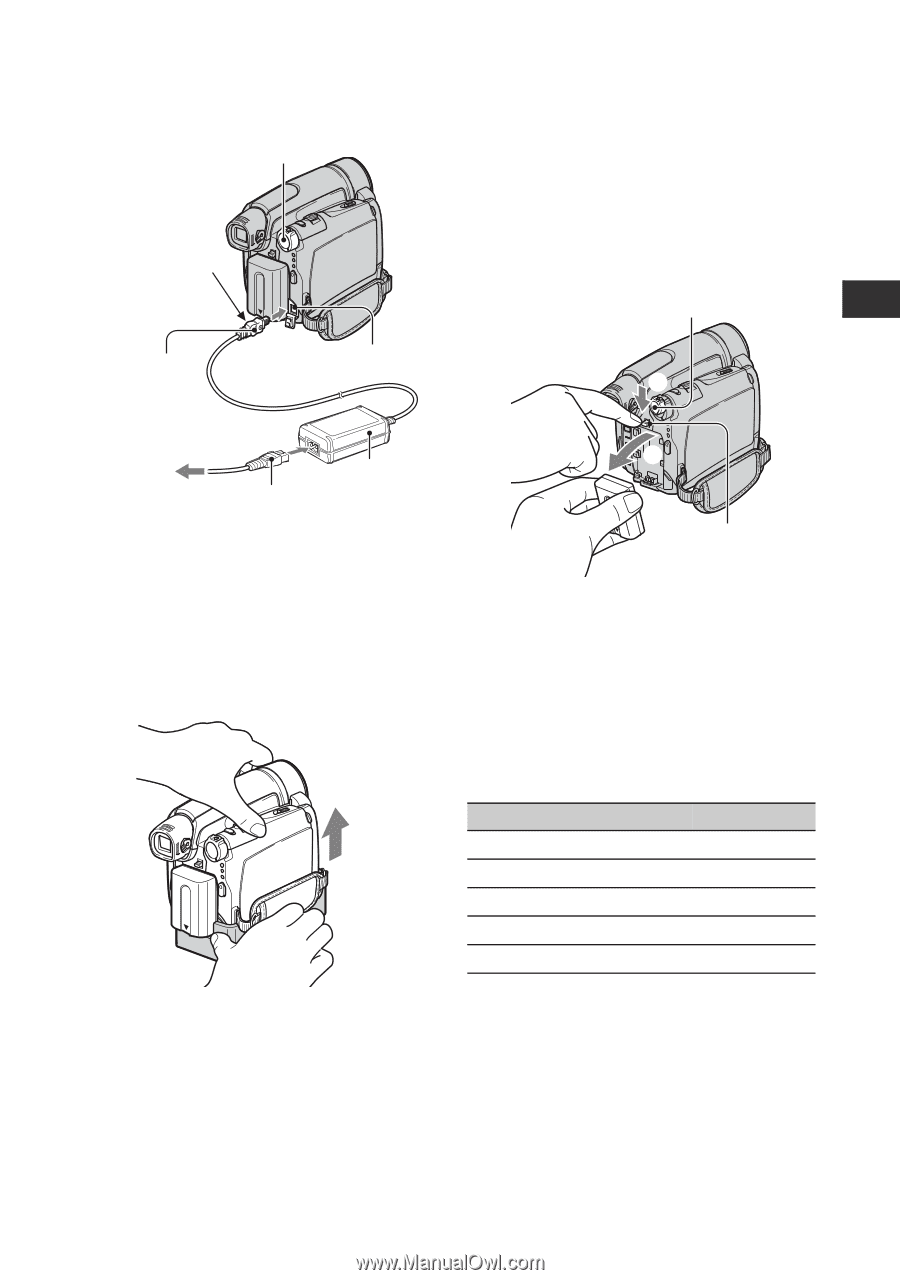
POWER switch With the v mark facing to the LCD screen DC plug DC IN jack To remove the battery pack 1 Slide the POWER switch to OFF (CHG). Hold down the V BATT (battery) release lever with one hand. 2 Remove the battery in the direction of the arrow with the other hand. POWER switch 1 Getting Started To the wall outlet AC Adaptor Power cord For DCR-HC46/HC96: To remove your camcorder from the Handycam Station Turn off the power, then remove the camcorder from the Handycam Station holding both your camcorder and the Handycam Station. For DCR-HC36: To use an outside power source You can operate your camcorder using the power from the wall outlet by making the same connections as you do when charging the battery pack. The battery pack will not lose its charge in this case. 2 V BATT (battery) release lever When storing the battery pack Fully discharge the battery before storing it for an extended period (p. 126). Charging time Approximate time (min.) required when you fully charge a fully discharged battery pack. Battery pack NP-FP30*1 NP-FP50*2 NP-FP70 NP-FP71 NP-FP90 Charging time 115 125 155 170 220 *1 supplied with DCR-HC36 *2 supplied with DCR-HC46/HC96 Recording time Approximate time (min.) available when you use a fully charged battery pack. Continued , 15
-
 1
1 -
2
-
3
-
4
-
5
-
6
-
7
-
8
-
9
-
 10
10 -
 11
11 -
 12
12 -
 13
13 -
 14
14 -
 15
15 -
 16
16 -
 17
17 -
 18
18 -
 19
19 -
 20
20 -
21
-
22
-
23
-
24
-
25
-
26
-
27
-
28
-
29
-
30
-
31
-
32
-
33
-
34
-
35
-
36
-
37
-
38
-
39
-
40
-
41
-
42
-
43
-
44
-
45
-
46
-
47
-
48
-
49
-
50
-
51
-
52
-
53
-
54
-
55
-
56
-
57
-
58
-
59
-
60
-
61
-
62
-
63
-
64
-
65
-
66
-
67
-
68
-
69
-
70
-
71
-
72
-
73
-
74
-
75
-
76
-
77
-
78
-
79
-
80
-
81
-
82
-
83
-
84
-
85
-
86
-
87
-
88
-
89
-
90
-
91
-
92
-
93
-
94
-
95
-
96
-
97
-
98
-
99
-
100
-
101
-
102
-
103
-
104
-
105
-
106
-
107
-
108
-
109
-
110
-
111
-
112
-
113
-
114
-
115
-
116
-
117
-
118
-
119
-
120
-
121
-
122
-
123
-
124
-
125
-
126
-
127
-
128
-
129
-
130
-
131
-
132
-
133
-
134
-
135
-
136
-
137
-
138
-
139
-
140
 |
 |