Sony DCR-HC36 Operating Guide - Page 18
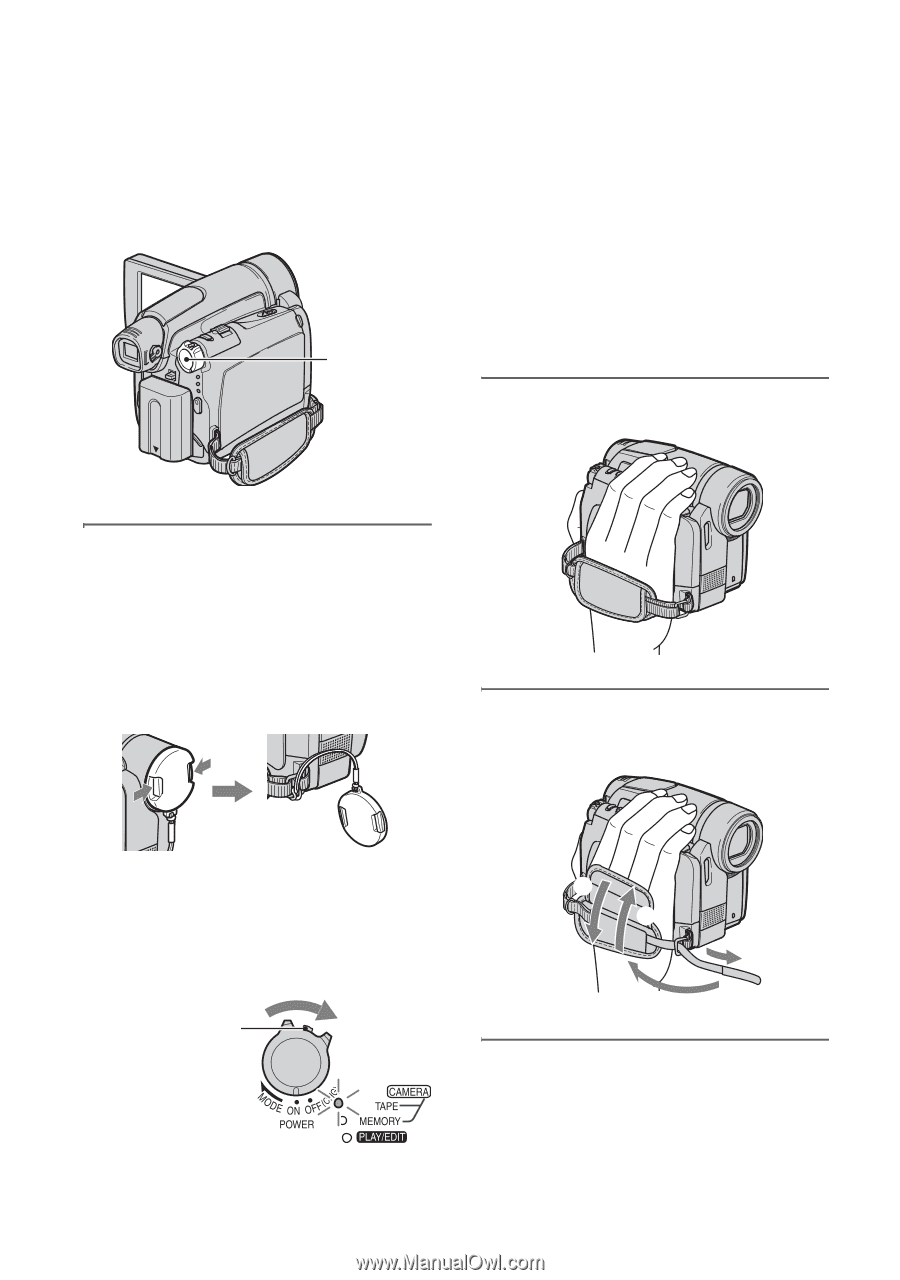
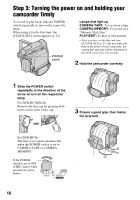
Step 3: Turning the power on and holding your camcorder firmly - lens
 |
UPC - 027242688667
View all Sony DCR-HC36 manuals
Add to My Manuals
Save this manual to your list of manuals |
Page 18 highlights
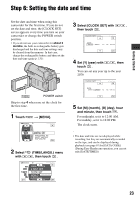
Step 3: Turning the power on and holding your camcorder firmly To record or play back, slide the POWER switch repeatedly to turn on the respective lamp. When using it for the first time, the [CLOCK SET] screen appears (p. 23). POWER switch Lamps that light up CAMERA-TAPE: To record on a tape. CAMERA-MEMORY: To record on a "Memory Stick Duo." PLAY/EDIT: To play or edit pictures. • After you have set the date and time ([CLOCK SET], p. 23), the next time you turn on the power of your camcorder, the current date and time will be displayed on the LCD screen for a few seconds. 2 Hold the camcorder correctly. 1 Slide the POWER switch repeatedly in the direction of the arrow to turn on the respective lamp. For DCR-HC36/HC46: Remove the lens cap by pressing both knobs on the sides of the cap. 3 Ensure a good grip, then fasten the Grip belt. For DCR-HC96: The lens cover opens automatically when the POWER switch is set to CAMERA-TAPE or CAMERAMEMORY. If the POWER switch is set to OFF (CHG), slide it while pressing the green button. 18 4 1 2 3
-
 1
1 -
2
-
3
-
4
-
5
-
6
-
7
-
8
-
9
-
10
-
11
-
12
-
 13
13 -
 14
14 -
 15
15 -
 16
16 -
 17
17 -
 18
18 -
 19
19 -
 20
20 -
 21
21 -
 22
22 -
 23
23 -
24
-
25
-
26
-
27
-
28
-
29
-
30
-
31
-
32
-
33
-
34
-
35
-
36
-
37
-
38
-
39
-
40
-
41
-
42
-
43
-
44
-
45
-
46
-
47
-
48
-
49
-
50
-
51
-
52
-
53
-
54
-
55
-
56
-
57
-
58
-
59
-
60
-
61
-
62
-
63
-
64
-
65
-
66
-
67
-
68
-
69
-
70
-
71
-
72
-
73
-
74
-
75
-
76
-
77
-
78
-
79
-
80
-
81
-
82
-
83
-
84
-
85
-
86
-
87
-
88
-
89
-
90
-
91
-
92
-
93
-
94
-
95
-
96
-
97
-
98
-
99
-
100
-
101
-
102
-
103
-
104
-
105
-
106
-
107
-
108
-
109
-
110
-
111
-
112
-
113
-
114
-
115
-
116
-
117
-
118
-
119
-
120
-
121
-
122
-
123
-
124
-
125
-
126
-
127
-
128
-
129
-
130
-
131
-
132
-
133
-
134
-
135
-
136
-
137
-
138
-
139
-
140
 |
 |