Sony DCR-PC9 Operating Instructions - Page 87
Dubbing only desired scenes - Digital program editing, Operation 2, Performing a Digital program
 |
View all Sony DCR-PC9 manuals
Add to My Manuals
Save this manual to your list of manuals |
Page 87 highlights
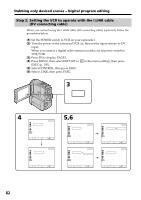
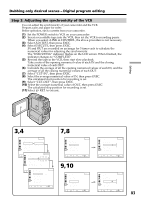
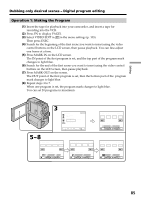
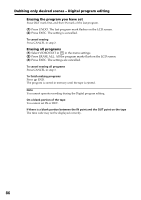
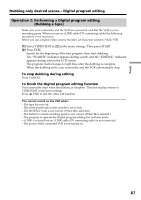
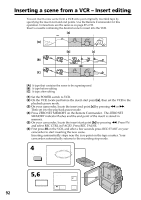
Editing Dubbing only desired scenes - Digital program editing Operation 2: Performing a Digital program editing (Dubbing a tape) Make sure your camcorder and the VCR are connected, and that the VCR is set to recording pause. When you use an i.LINK cable (DV connecting cable) the following procedure is not necessary. When you use a digital video camera recorder, set its power switch to VCR/VTR. (1) Select VIDEO EDIT in in the menu settings. Then press START. (2) Press EXEC. Search for the beginning of the first program, then start dubbing. The "SEARCH" indicator appears during search, and the "EDITING" indicator appears during edit on the LCD screen. The program mark changes to light blue after the dubbing is complete. When the dubbing ends, your camcorder and the VCR automatically stop. To stop dubbing during editing Press CANCEL. To finish the Digital program editing function Your camcorder stops when the dubbing is complete. Then the display returns to VIDEO EDIT in the menu settings. Press END to end the video edit function. You cannot record on the VCR when: - The tape has run out. - The write-protect tab on the cassette is set to lock. - The IR SETUP code is not correct. (When IR is selected.) - The button to cancel recording pause is not correct. (When IR is selected.) - The program to operate the Digital program editing has not been made. - i.LINK is selected but an i.LINK cable (DV connecting cable) is not connected. - The power of the connected VCR is not turned on. 87
-
 1
1 -
2
-
3
-
4
-
5
-
6
-
7
-
8
-
9
-
10
-
11
-
12
-
13
-
14
-
15
-
16
-
17
-
18
-
19
-
20
-
21
-
22
-
23
-
24
-
25
-
26
-
27
-
28
-
29
-
30
-
31
-
32
-
33
-
34
-
35
-
36
-
37
-
38
-
39
-
40
-
41
-
42
-
43
-
44
-
45
-
46
-
47
-
48
-
49
-
50
-
51
-
52
-
53
-
54
-
55
-
56
-
57
-
58
-
59
-
60
-
61
-
62
-
63
-
64
-
65
-
66
-
67
-
68
-
69
-
70
-
71
-
72
-
73
-
74
-
75
-
76
-
77
-
78
-
79
-
80
-
81
-
 82
82 -
 83
83 -
 84
84 -
 85
85 -
 86
86 -
 87
87 -
 88
88 -
 89
89 -
 90
90 -
 91
91 -
 92
92 -
93
-
94
-
95
-
96
-
97
-
98
-
99
-
100
-
101
-
102
-
103
-
104
-
105
-
106
-
107
-
108
-
109
-
110
-
111
-
112
-
113
-
114
-
115
-
116
-
117
-
118
-
119
-
120
-
121
-
122
-
123
-
124
-
125
-
126
-
127
-
128
-
129
-
130
-
131
-
132
-
133
-
134
-
135
-
136
-
137
-
138
-
139
-
140
-
141
-
142
-
143
-
144
-
145
-
146
-
147
-
148
-
149
-
150
-
151
-
152
-
153
-
154
-
155
-
156
-
157
-
158
-
159
-
160
-
161
-
162
-
163
-
164
-
165
-
166
-
167
-
168
-
169
-
170
-
171
-
172
-
173
-
174
-
175
-
176
-
177
-
178
-
179
-
180
-
181
-
182
-
183
-
184
-
185
-
186
-
187
-
188
-
189
-
190
-
191
-
192
 |
 |
