Sony DCR-TRV260 Camera Operations Guide - Page 17
Step 5: Setting the date and time - usb streaming
 |
View all Sony DCR-TRV260 manuals
Add to My Manuals
Save this manual to your list of manuals |
Page 17 highlights
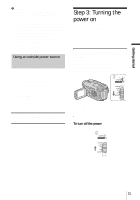
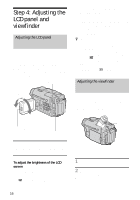
Getting started Step 5: Setting the date and time Set the date and time when using this camcorder for the first time. If you do not set the date and time, the [CLOCK SET] screen appears every time you turn on your camcorder. b Note • If you do not use your camcorder for about 3 months, the built-in rechargeable button-type battery gets discharged and the date and time settings may be cleared from the memory. In that case, charge the rechargeable button-type battery (p. 87) and then set the date and time again. MENU 3 Press MENU. MANUAL SET PROGRAM AE P EFFECT AUTO SHTR STBY [MENU] : END 4 Turn the SEL/PUSH EXEC dial to select (SETUP MENU), then press the dial. SETUP MENU CLOCK SET USB STREAM LTR SIZE LANGUAGE DEMO MODE RETURN STBY --:--:-- [MENU] : END 5 Turn the SEL/PUSH EXEC dial to select [CLOCK SET], then press the dial. CLOCK SET STBY Y MD HM 2004 JAN 1 12 : 0 0 AM [MENU] : CANCEL OPEN SEL/PUSH EXEC dial POWER switch 1 Turn on your camcorder (p. 15). 2 Press OPEN and open the LCD panel. Proceed to step 6 when you set the clock for the first time. 6 Turn the SEL/PUSH EXEC dial to set [Y] (year), then press the dial. CLOCK SET STBY Y MD HM 2004 JAN 1 12 : 0 0 AM [MENU] : CANCEL You can set any year up to the year 2079. 7 Set [M] (month), [D] (day), [H] (hour) and [M] (minute) in the same way as was done in step 6, then press the dial. For midnight, set it to 12:00 AM. For midday, set it to 12:00 PM. ,continued Getting started 17
-
 1
1 -
2
-
3
-
4
-
5
-
6
-
7
-
8
-
9
-
10
-
11
-
 12
12 -
 13
13 -
 14
14 -
 15
15 -
 16
16 -
 17
17 -
 18
18 -
 19
19 -
 20
20 -
 21
21 -
 22
22 -
23
-
24
-
25
-
26
-
27
-
28
-
29
-
30
-
31
-
32
-
33
-
34
-
35
-
36
-
37
-
38
-
39
-
40
-
41
-
42
-
43
-
44
-
45
-
46
-
47
-
48
-
49
-
50
-
51
-
52
-
53
-
54
-
55
-
56
-
57
-
58
-
59
-
60
-
61
-
62
-
63
-
64
-
65
-
66
-
67
-
68
-
69
-
70
-
71
-
72
-
73
-
74
-
75
-
76
-
77
-
78
-
79
-
80
-
81
-
82
-
83
-
84
-
85
-
86
-
87
-
88
-
89
-
90
-
91
-
92
-
93
-
94
-
95
-
96
-
97
-
98
-
99
-
100
 |
 |
