Sony DCR-TRV33 Operating Instructions (primary manual) - Page 153
Installing the USB driver, Connecting your camcorder to a computer using the USB cable - driver drivers
 |
View all Sony DCR-TRV33 manuals
Add to My Manuals
Save this manual to your list of manuals |
Page 153 highlights
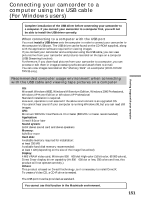
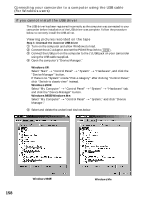
Viewing images with your computer Connecting your camcorder to a computer using the USB cable (For Windows users) Installing the USB driver Start the following operation without connecting the USB cable to the computer. Connect the USB cable according to "Making the computer recognize your camcorder" on page 156. If you are using Windows 2000, log in with permission of administrators. If you are using Windows XP, log in with permission of computer administrators. (1) Turn on a computer and allow Windows to load. If you have been using the computer, close all softwares. (2) Insert the supplied CD-ROM in the CD-ROM drive of the computer. The application software starts up. If the screen does not appear, double-click "My Computer" and then "ImageMixer" (CD-ROM Drive). (3) Select "Handycam" on the screen. Click The title screen appears. (4) Move the cursor to "USB Driver" and click. This starts USB driver installation. Click (5) Follow the on-screen messages to install the USB driver. (6) Remove the CD-ROM, then restart the computer and follow the on-screen messages. 153
-
 1
1 -
2
-
3
-
4
-
5
-
6
-
7
-
8
-
9
-
10
-
11
-
12
-
13
-
14
-
15
-
16
-
17
-
18
-
19
-
20
-
21
-
22
-
23
-
24
-
25
-
26
-
27
-
28
-
29
-
30
-
31
-
32
-
33
-
34
-
35
-
36
-
37
-
38
-
39
-
40
-
41
-
42
-
43
-
44
-
45
-
46
-
47
-
48
-
49
-
50
-
51
-
52
-
53
-
54
-
55
-
56
-
57
-
58
-
59
-
60
-
61
-
62
-
63
-
64
-
65
-
66
-
67
-
68
-
69
-
70
-
71
-
72
-
73
-
74
-
75
-
76
-
77
-
78
-
79
-
80
-
81
-
82
-
83
-
84
-
85
-
86
-
87
-
88
-
89
-
90
-
91
-
92
-
93
-
94
-
95
-
96
-
97
-
98
-
99
-
100
-
101
-
102
-
103
-
104
-
105
-
106
-
107
-
108
-
109
-
110
-
111
-
112
-
113
-
114
-
115
-
116
-
117
-
118
-
119
-
120
-
121
-
122
-
123
-
124
-
125
-
126
-
127
-
128
-
129
-
130
-
131
-
132
-
133
-
134
-
135
-
136
-
137
-
138
-
139
-
140
-
141
-
142
-
143
-
144
-
145
-
146
-
147
-
 148
148 -
 149
149 -
 150
150 -
 151
151 -
 152
152 -
 153
153 -
 154
154 -
 155
155 -
 156
156 -
 157
157 -
 158
158 -
159
-
160
-
161
-
162
-
163
-
164
-
165
-
166
-
167
-
168
-
169
-
170
-
171
-
172
-
173
-
174
-
175
-
176
-
177
-
178
-
179
-
180
-
181
-
182
-
183
-
184
-
185
-
186
-
187
-
188
-
189
-
190
-
191
-
192
-
193
-
194
-
195
-
196
-
197
-
198
-
199
-
200
-
201
-
202
-
203
-
204
-
205
-
206
-
207
-
208
-
209
-
210
-
211
-
212
-
213
-
214
-
215
-
216
-
217
-
218
-
219
-
220
 |
 |
