Sony DCR TRV33E Operating Instructions - Page 210
pour les utilisateurs de Windows, computer using the USB cable
 |
UPC - 072874309039
View all Sony DCR TRV33E manuals
Add to My Manuals
Save this manual to your list of manuals |
Page 210 highlights
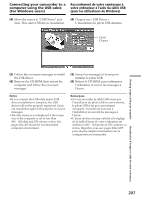
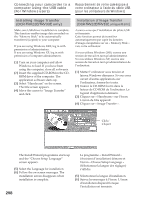
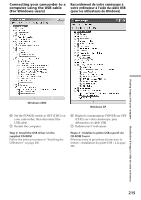
Connecting your camcorder to a Raccordement de votre caméscope à computer using the USB cable votre ordinateur à l'aide du câble USB (For Windows users) (pour les utilisateurs de Windows) (5) Select the language for installation. (6) Follow the on-screen messages. The installation screen disappears when installation is complete. (7) Install the WinASPI following the onscreen message (Windows 2000 and Windows XP users only). (8) If DirectX 8.0a or later is not installed on the computer, continue installation after installing ImageMixer. Follow the on-screen messages to install DirectX 8.0a. After installation is complete, restart the computer. MEMORY MIX Album (DCR-TRV22E/TRV33E only) Once "ImageMixer" is installed, the MEMORY MIX album is created in "Album" of "ImageMixer" and sample images are stored in there. Those sample images can be transferred from the MEMORY MIX album to a "Memory Stick" so that they can be used in MEMORY MIX (p. 158). For details on the operation procedure, refer to the on-line help. Replacing WinASPI To use the ImageMixer CD writing function, you need to install WinASPI. If a different writing application has been already installed, its writing function may not work correctly. If that happens, reinstall the original application and replace WinASPI. Note that the ImageMixer CD writing function may not work properly. (5) Sélectionnez la langue d'installation. (6) Suivez les messages à l'écran. L'écran d'installation disparaît lorsque l'installation est terminée. (7) Installez le WinASPI en suivant les messages à l'écran (utilisateurs de Windows 2000 et Windows XP uniquement). (8) Si DirectX 8.0a ou plus récent n'est pas installé sur votre ordinateur, continuez l'installation une fois que ImageMixer est installé. Suivez les messages à l'écran pour installer DirectX 8.0a. Lorsque l'installation est terminée, redémarrez votre ordinateur. Album MEMORY MIX (DCR-TRV22E/TRV33E uniquement) Une fois que « ImageMixer » est installé, l'album de MEMORY MIX est créé dans « Album » sous « ImageMixer » et des échantillons d'images y sont enregistrés. Ces échantillons d'images peuvent être transférés de l'album MEMORY MIX vers un « Memory Stick », ce qui permet de les utiliser dans MEMORY MIX (p. 158). Pour plus de détails sur la procédure à suivre, reportez-vous à l'aide en ligne. Remplacement de WinASPI Pour utiliser la fonction de gravure de CD ImageMixer, vous devez installer WinASPI. Si une autre application de gravure a déjà été installée, sa fonction d'écriture risque de ne pas fonctionner correctement. Si tel est le cas, réinstallez l'application d'origine et remplacez WinASPI. Notez que la fonction de gravure de CD ImageMixer risque de ne pas fonctionner correctement. 210
-
 1
1 -
2
-
3
-
4
-
5
-
6
-
7
-
8
-
9
-
10
-
11
-
12
-
13
-
14
-
15
-
16
-
17
-
18
-
19
-
20
-
21
-
22
-
23
-
24
-
25
-
26
-
27
-
28
-
29
-
30
-
31
-
32
-
33
-
34
-
35
-
36
-
37
-
38
-
39
-
40
-
41
-
42
-
43
-
44
-
45
-
46
-
47
-
48
-
49
-
50
-
51
-
52
-
53
-
54
-
55
-
56
-
57
-
58
-
59
-
60
-
61
-
62
-
63
-
64
-
65
-
66
-
67
-
68
-
69
-
70
-
71
-
72
-
73
-
74
-
75
-
76
-
77
-
78
-
79
-
80
-
81
-
82
-
83
-
84
-
85
-
86
-
87
-
88
-
89
-
90
-
91
-
92
-
93
-
94
-
95
-
96
-
97
-
98
-
99
-
100
-
101
-
102
-
103
-
104
-
105
-
106
-
107
-
108
-
109
-
110
-
111
-
112
-
113
-
114
-
115
-
116
-
117
-
118
-
119
-
120
-
121
-
122
-
123
-
124
-
125
-
126
-
127
-
128
-
129
-
130
-
131
-
132
-
133
-
134
-
135
-
136
-
137
-
138
-
139
-
140
-
141
-
142
-
143
-
144
-
145
-
146
-
147
-
148
-
149
-
150
-
151
-
152
-
153
-
154
-
155
-
156
-
157
-
158
-
159
-
160
-
161
-
162
-
163
-
164
-
165
-
166
-
167
-
168
-
169
-
170
-
171
-
172
-
173
-
174
-
175
-
176
-
177
-
178
-
179
-
180
-
181
-
182
-
183
-
184
-
185
-
186
-
187
-
188
-
189
-
190
-
191
-
192
-
193
-
194
-
195
-
196
-
197
-
198
-
199
-
200
-
201
-
202
-
203
-
204
-
 205
205 -
 206
206 -
 207
207 -
 208
208 -
 209
209 -
 210
210 -
 211
211 -
 212
212 -
 213
213 -
 214
214 -
 215
215 -
216
-
217
-
218
-
219
-
220
-
221
-
222
-
223
-
224
-
225
-
226
-
227
-
228
-
229
-
230
-
231
-
232
-
233
-
234
-
235
-
236
-
237
-
238
-
239
-
240
-
241
-
242
-
243
-
244
-
245
-
246
-
247
-
248
-
249
-
250
-
251
-
252
-
253
-
254
-
255
-
256
-
257
-
258
-
259
-
260
-
261
-
262
-
263
-
264
-
265
-
266
-
267
-
268
-
269
-
270
-
271
-
272
-
273
-
274
-
275
-
276
-
277
-
278
-
279
-
280
-
281
-
282
-
283
-
284
-
285
-
286
-
287
-
288
-
289
-
290
-
291
-
292
-
293
-
294
-
295
-
296
-
297
-
298
-
299
-
300
-
301
-
302
-
303
-
304
-
305
-
306
-
307
-
308
-
309
-
310
-
311
-
312
-
313
-
314
-
315
-
316
-
317
-
318
-
319
-
320
 |
 |