Sony DCR TRV33E Operating Instructions - Page 213
If you cannot install the USB, le pilote USB - driver windows 7
 |
UPC - 072874309039
View all Sony DCR TRV33E manuals
Add to My Manuals
Save this manual to your list of manuals |
Page 213 highlights
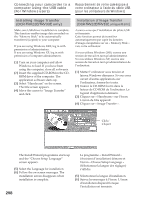
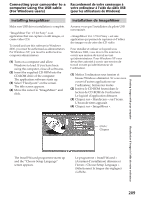
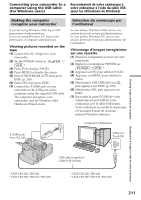
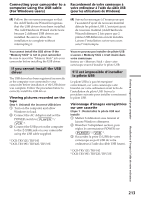
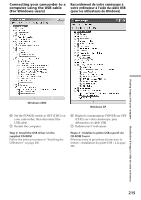
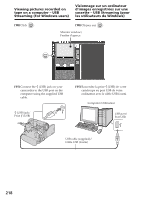
Viewing images with your computer Connecting your camcorder to a Raccordement de votre caméscope à computer using the USB cable votre ordinateur à l'aide du câble USB (For Windows users) (pour les utilisateurs de Windows) (4) Follow the on-screen messages so that the Add Hardware Wizard recognises that the USB drivers have been installed. The Add Hardware Wizard starts twice because 2 different USB drivers are installed. Be sure to allow the installation to complete without interrupting it. (4) Suivez les messages à l'écran pour que l'assistant d'ajout de nouveau matériel détecte les pilotes USB. L'assistant ajout de nouveau matériel (Add Hardware Wizard) démarre 2 fois parce que 2 pilotes USB différents ont été installés. Laissez l'installation suivre son cours sans l'interrompre. You cannot install the USB driver if the "Memory Stick" is not in your camcorder Be sure to insert the "Memory Stick" into your camcorder before installing the USB driver. If you cannot install the USB driver The USB driver has been registered incorrectly as the computer was connected to your camcorder before installation of the USB driver was complete. Follow the procedure below to correctly install the USB driver. Viewing pictures recorded on the tape Step 1: Uninstall the incorrect USB driver 1 Turn on the computer and allow Windows to load. 2 Connect the AC Adaptor and set the POWER switch to 1)/ 2). 3 Connect the USB port on the computer to the (USB) jack on your camcorder using the USB cable supplied. 1) DCR-TRV12E/TRV14E 2) DCR-TRV19E/TRV22E/TRV33E Vous ne pouvez pas installer de pilote USB si aucun « Memory Stick » n'est inséré dans votre caméscope Insérez un « Memory Stick » dans votre caméscope avant d'installer le pilote USB. S'il est impossible d'installer le pilote USB Le pilote USB n'a pas été enregistré correctement, car votre caméscope a été branché sur votre ordinateur avant la fin de l'installation du pilote USB. Suivez la procédure suivante pour installer correctement le pilote USB. Visionnage d'images enregistrées sur une cassette Etape 1 : Désinstallez le pilote USB mal installé 1 Mettez l'ordinateur sous tension et laissez Windows démarrer. 2 Branchez l'adaptateur secteur, puis réglez le commutateur POWER sur 1)/ 2). 3 Raccordez la prise (USB) de votre caméscope au port USB de votre ordinateur à l'aide du câble USB fourni. 1) DCR-TRV12E/TRV14E 2) DCR-TRV19E/TRV22E/TRV33E Visualisation d'images à l'aide de votre ordinateur 213
-
 1
1 -
2
-
3
-
4
-
5
-
6
-
7
-
8
-
9
-
10
-
11
-
12
-
13
-
14
-
15
-
16
-
17
-
18
-
19
-
20
-
21
-
22
-
23
-
24
-
25
-
26
-
27
-
28
-
29
-
30
-
31
-
32
-
33
-
34
-
35
-
36
-
37
-
38
-
39
-
40
-
41
-
42
-
43
-
44
-
45
-
46
-
47
-
48
-
49
-
50
-
51
-
52
-
53
-
54
-
55
-
56
-
57
-
58
-
59
-
60
-
61
-
62
-
63
-
64
-
65
-
66
-
67
-
68
-
69
-
70
-
71
-
72
-
73
-
74
-
75
-
76
-
77
-
78
-
79
-
80
-
81
-
82
-
83
-
84
-
85
-
86
-
87
-
88
-
89
-
90
-
91
-
92
-
93
-
94
-
95
-
96
-
97
-
98
-
99
-
100
-
101
-
102
-
103
-
104
-
105
-
106
-
107
-
108
-
109
-
110
-
111
-
112
-
113
-
114
-
115
-
116
-
117
-
118
-
119
-
120
-
121
-
122
-
123
-
124
-
125
-
126
-
127
-
128
-
129
-
130
-
131
-
132
-
133
-
134
-
135
-
136
-
137
-
138
-
139
-
140
-
141
-
142
-
143
-
144
-
145
-
146
-
147
-
148
-
149
-
150
-
151
-
152
-
153
-
154
-
155
-
156
-
157
-
158
-
159
-
160
-
161
-
162
-
163
-
164
-
165
-
166
-
167
-
168
-
169
-
170
-
171
-
172
-
173
-
174
-
175
-
176
-
177
-
178
-
179
-
180
-
181
-
182
-
183
-
184
-
185
-
186
-
187
-
188
-
189
-
190
-
191
-
192
-
193
-
194
-
195
-
196
-
197
-
198
-
199
-
200
-
201
-
202
-
203
-
204
-
205
-
206
-
207
-
 208
208 -
 209
209 -
 210
210 -
 211
211 -
 212
212 -
 213
213 -
 214
214 -
 215
215 -
 216
216 -
 217
217 -
 218
218 -
219
-
220
-
221
-
222
-
223
-
224
-
225
-
226
-
227
-
228
-
229
-
230
-
231
-
232
-
233
-
234
-
235
-
236
-
237
-
238
-
239
-
240
-
241
-
242
-
243
-
244
-
245
-
246
-
247
-
248
-
249
-
250
-
251
-
252
-
253
-
254
-
255
-
256
-
257
-
258
-
259
-
260
-
261
-
262
-
263
-
264
-
265
-
266
-
267
-
268
-
269
-
270
-
271
-
272
-
273
-
274
-
275
-
276
-
277
-
278
-
279
-
280
-
281
-
282
-
283
-
284
-
285
-
286
-
287
-
288
-
289
-
290
-
291
-
292
-
293
-
294
-
295
-
296
-
297
-
298
-
299
-
300
-
301
-
302
-
303
-
304
-
305
-
306
-
307
-
308
-
309
-
310
-
311
-
312
-
313
-
314
-
315
-
316
-
317
-
318
-
319
-
320
 |
 |
