Sony DCR TRV33E Operating Instructions - Page 31
Step 2 Setting the date and time - memory stick
 |
UPC - 072874309039
View all Sony DCR TRV33E manuals
Add to My Manuals
Save this manual to your list of manuals |
Page 31 highlights
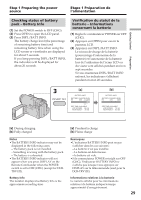
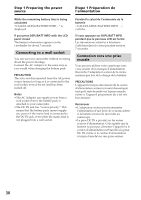
Getting Started Préparation Step 2 Setting the date and time Etape 2 Réglage de la date et de l'heure Set the date and time when you use your camcorder for the first time. The "CLOCK SET" indicator will appear each time you set the POWER switch to CAMERA or MEMORY (DCR-TRV22E/TRV33E only) unless you set the date and time settings. If you do not set the date and time and "--:--:--" are recorded on the tape or the "Memory Stick" (DCR-TRV22E/TRV33E only) as the data code. If you do not use your camcorder for about 4 months, the date and time settings may be released (bars may appear) because the built-in rechargeable battery installed in your camcorder will have been discharged (p. 299). In this case, charge the built-in rechargeable battery, then set the year, the month, the day, the hour and the minute. (1) Set the POWER switch to CAMERA or MEMORY (DCR-TRV22E/TRV33E only). (2) Press OPEN to open the LCD panel. (3) Press FN (Function) to display PAGE1 (p. 33). (4) Press MENU to display the menu. (5) Press r/R to select , then press EXEC. (6) Press r/R to select CLOCK SET, then press EXEC. (7) Press r/R to select a desired year, then press EXEC. (8) Set the month, day and hour with the same procedure as step 7. (9) Press r/R to set the minute, then press EXEC by the time signal. The clock starts to move. La première fois que vous utilisez le caméscope, réglez la date et l'heure. Sinon, l'indicateur « CLOCK SET » s'affiche chaque fois que vous mettez le commutateur POWER sur CAMERA ou MEMORY (DCR-TRV22E/ TRV33E uniquement), à moins que vous ne régliez la date et l'heure. Si vous ne réglez pas la date et l'heure et sont enregistrés sur la cassette ou le « Memory Stick » (DCRTRV22E/TRV33E uniquement) en tant que code de données. Si vous n'utilisez pas le caméscope pendant 4 mois environ, la date et l'heure peuvent s'effacer (des barres peuvent apparaître) parce que la batterie rechargeable intégrée de votre caméscope s'est déchargée (p. 299). Dans ce cas, chargez la batterie rechargeable intégrée, puis réglez l'année, le mois, le jour, l'heure et les minutes. (1) Réglez le commutateur POWER sur CAMERA ou MEMORY (DCRTRV22E/TRV33E uniquement). (2) Appuyez sur OPEN pour ouvrir le panneau LCD. (3) Appuyez sur FN (fonction) pour afficher PAGE1 (p. 33). (4) Appuyez sur MENU pour afficher le menu. (5) Appuyez sur r/R pour sélectionner , puis appuyez sur EXEC. (6) Appuyez sur r/R pour sélectionner CLOCK SET, puis appuyez sur EXEC. (7) Appuyez sur r/R pour sélectionner l'année souhaitée, puis appuyez sur EXEC. (8) Réglez le mois, le jour et l'heure en suivant la même procédure qu'à l'étape 7. (9) Appuyez sur r/R pour régler les minutes, puis appuyez sur EXEC lorsque l'heure souhaitée s'affiche. L'horloge commence à fonctionner. 31
-
 1
1 -
2
-
3
-
4
-
5
-
6
-
7
-
8
-
9
-
10
-
11
-
12
-
13
-
14
-
15
-
16
-
17
-
18
-
19
-
20
-
21
-
22
-
23
-
24
-
25
-
 26
26 -
 27
27 -
 28
28 -
 29
29 -
 30
30 -
 31
31 -
 32
32 -
 33
33 -
 34
34 -
 35
35 -
 36
36 -
37
-
38
-
39
-
40
-
41
-
42
-
43
-
44
-
45
-
46
-
47
-
48
-
49
-
50
-
51
-
52
-
53
-
54
-
55
-
56
-
57
-
58
-
59
-
60
-
61
-
62
-
63
-
64
-
65
-
66
-
67
-
68
-
69
-
70
-
71
-
72
-
73
-
74
-
75
-
76
-
77
-
78
-
79
-
80
-
81
-
82
-
83
-
84
-
85
-
86
-
87
-
88
-
89
-
90
-
91
-
92
-
93
-
94
-
95
-
96
-
97
-
98
-
99
-
100
-
101
-
102
-
103
-
104
-
105
-
106
-
107
-
108
-
109
-
110
-
111
-
112
-
113
-
114
-
115
-
116
-
117
-
118
-
119
-
120
-
121
-
122
-
123
-
124
-
125
-
126
-
127
-
128
-
129
-
130
-
131
-
132
-
133
-
134
-
135
-
136
-
137
-
138
-
139
-
140
-
141
-
142
-
143
-
144
-
145
-
146
-
147
-
148
-
149
-
150
-
151
-
152
-
153
-
154
-
155
-
156
-
157
-
158
-
159
-
160
-
161
-
162
-
163
-
164
-
165
-
166
-
167
-
168
-
169
-
170
-
171
-
172
-
173
-
174
-
175
-
176
-
177
-
178
-
179
-
180
-
181
-
182
-
183
-
184
-
185
-
186
-
187
-
188
-
189
-
190
-
191
-
192
-
193
-
194
-
195
-
196
-
197
-
198
-
199
-
200
-
201
-
202
-
203
-
204
-
205
-
206
-
207
-
208
-
209
-
210
-
211
-
212
-
213
-
214
-
215
-
216
-
217
-
218
-
219
-
220
-
221
-
222
-
223
-
224
-
225
-
226
-
227
-
228
-
229
-
230
-
231
-
232
-
233
-
234
-
235
-
236
-
237
-
238
-
239
-
240
-
241
-
242
-
243
-
244
-
245
-
246
-
247
-
248
-
249
-
250
-
251
-
252
-
253
-
254
-
255
-
256
-
257
-
258
-
259
-
260
-
261
-
262
-
263
-
264
-
265
-
266
-
267
-
268
-
269
-
270
-
271
-
272
-
273
-
274
-
275
-
276
-
277
-
278
-
279
-
280
-
281
-
282
-
283
-
284
-
285
-
286
-
287
-
288
-
289
-
290
-
291
-
292
-
293
-
294
-
295
-
296
-
297
-
298
-
299
-
300
-
301
-
302
-
303
-
304
-
305
-
306
-
307
-
308
-
309
-
310
-
311
-
312
-
313
-
314
-
315
-
316
-
317
-
318
-
319
-
320
 |
 |
