Sony DCRPC1000 Operating Guide - Page 25
To record sound with more presence (4CH MIC recording), To use the flash
 |
UPC - 027242670051
View all Sony DCRPC1000 manuals
Add to My Manuals
Save this manual to your list of manuals |
Page 25 highlights
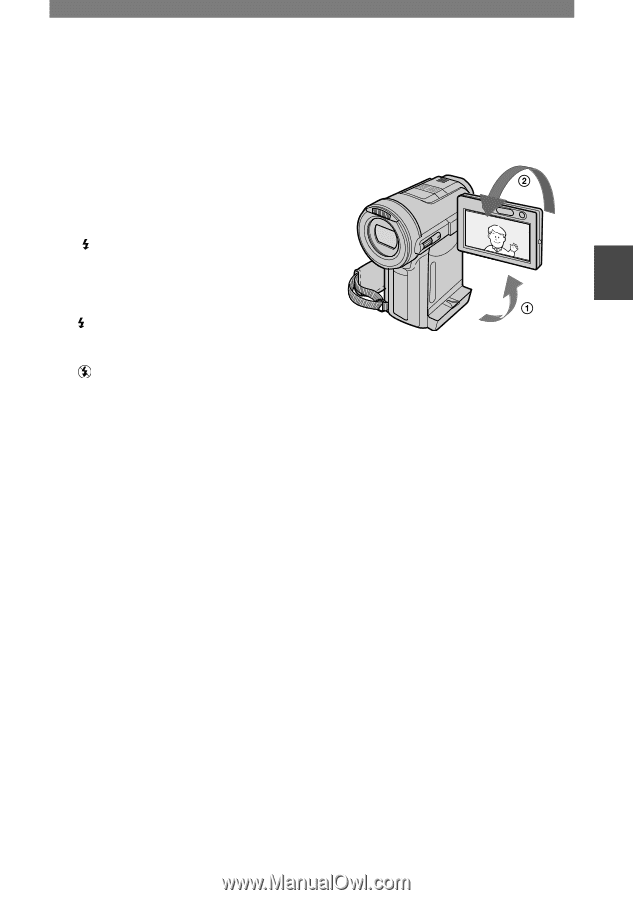
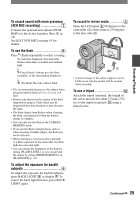
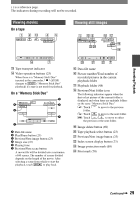
To record sound with more presence (4CH MIC recording Connect the optional microphone (ECMHQP1) to the Active Interface Shoe (p. 72). See [EXT SUR MIC] on page 55 for details. To use the flash Press (flash) repeatedly to select a setting. No indicator displayed: Automatically flashes when there is insufficient ambient light. (Forced flash): Always uses the flash regardless of the surrounding brightness. (No flash): Records without flash. • The recommended distance to the subject when using the built-in flash is 0.3 to 2.5 m (1 to 8 feet). • Remove any dust from the surface of the flash lamp before using it. Flash effect may be impaired if heat discoloration or dust obscures the lamp. • The flash charge lamp flickers when charging the flash, and remains lit when the battery charge is complete. • You can only use the flash in the CAMERAMEMORY mode. • If you use the flash in bright places such as when shooting a backlit subject, the flash may not be effective. • When attaching a conversion lens (optional) or a filter (optional) to the camcorder, the flash light does not emit light. • You can change the brightness of the flash by setting [FLASH LEVEL], or you can prevent the redeye by setting [REDEYE REDUC], in [FLASH SET] (p. 43). To adjust the exposure for backlit subjects To adjust the exposure for backlit subjects, press BACK LIGHT to display . To cancel the back light function, press BACK LIGHT again. To record in mirror mode Open the LCD panel 90 degrees to the camcorder (), then rotate it 270 degrees to the lens side (). • A mirror-image of the subject appears on the LCD screen, but the picture will be normal when recorded. To use a tripod Attach the tripod (optional: the length of the screw must be less than 5.5 mm (7/32 in.) to the tripod receptacle using a tripod screw. Continued 25 Recording/Playback
-
 1
1 -
2
-
3
-
4
-
5
-
6
-
7
-
8
-
9
-
10
-
11
-
12
-
13
-
14
-
15
-
16
-
17
-
18
-
19
-
 20
20 -
 21
21 -
 22
22 -
 23
23 -
 24
24 -
 25
25 -
 26
26 -
 27
27 -
 28
28 -
 29
29 -
 30
30 -
31
-
32
-
33
-
34
-
35
-
36
-
37
-
38
-
39
-
40
-
41
-
42
-
43
-
44
-
45
-
46
-
47
-
48
-
49
-
50
-
51
-
52
-
53
-
54
-
55
-
56
-
57
-
58
-
59
-
60
-
61
-
62
-
63
-
64
-
65
-
66
-
67
-
68
-
69
-
70
-
71
-
72
-
73
-
74
-
75
-
76
-
77
-
78
-
79
-
80
-
81
-
82
-
83
-
84
-
85
-
86
-
87
-
88
-
89
-
90
-
91
-
92
-
93
-
94
-
95
-
96
-
97
-
98
-
99
-
100
-
101
-
102
-
103
-
104
-
105
-
106
-
107
-
108
-
109
-
110
-
111
-
112
-
113
-
114
-
115
-
116
-
117
-
118
-
119
-
120
-
121
-
122
-
123
 |
 |