Sony DSC-HX50V Cyber-shot® User Guide (Printable PDF) - Page 62
Picture Effect, Manual Exposure Shooting. - camera manual
 |
View all Sony DSC-HX50V manuals
Add to My Manuals
Save this manual to your list of manuals |
Page 62 highlights
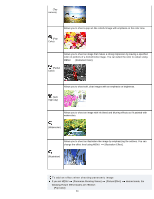
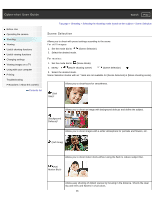
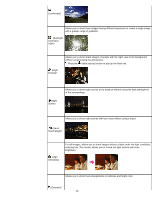
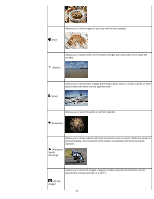
Cyber-shot User Guide Search Print Before Use Operating the camera Shooting Viewing Useful shooting functions Useful viewing functions Changing settings Viewing images on a TV Using with your computer Printing Troubleshooting Precautions / About this camera Contents list Top page > Shooting > Selecting the shooting mode based on the subject > Picture Effect Picture Effect Allows you to shoot a still image with an original texture according to the desired effect. 1. Set the mode dial to (Program Auto), (Shutter Speed Priority Shooting), (Aperture Priority Shooting) or (Manual Exposure Shooting). 2. MENU (Picture Effect) desired mode If you want to select other Picture Effect mode, select from MENU. If you want to add an effect to a movie, press the MOVIE (Movie) button after selecting the desired effect. (Off) Does not use the Picture Effect. Allows you to shoot multiple images with different exposures to create a single image that looks like an oil painting. You can change the effect level using MENU [HDR Painting effect]. (HDR Painting) Allows you to shoot multiple images with different exposures to create a single, sharp monochrome image. (Rich tone Monochrome) Allows an image to be processed so that it looks as though you were shooting dioramas. The image is blurred except one part, for a high-contrast image. You can select a part to be not blurred by using MENU [Area of emphasis]. (Miniature) Allows you to shoot images with effects such as tunnel effect, high contrast, or color cast as if they were shot with a toy camera. You can change the color hue using MENU [Color hue]. 62
-
 1
1 -
2
-
3
-
4
-
5
-
6
-
7
-
8
-
9
-
10
-
11
-
12
-
13
-
14
-
15
-
16
-
17
-
18
-
19
-
20
-
21
-
22
-
23
-
24
-
25
-
26
-
27
-
28
-
29
-
30
-
31
-
32
-
33
-
34
-
35
-
36
-
37
-
38
-
39
-
40
-
41
-
42
-
43
-
44
-
45
-
46
-
47
-
48
-
49
-
50
-
51
-
52
-
53
-
54
-
55
-
56
-
 57
57 -
 58
58 -
 59
59 -
 60
60 -
 61
61 -
 62
62 -
 63
63 -
 64
64 -
 65
65 -
 66
66 -
 67
67 -
68
-
69
-
70
-
71
-
72
-
73
-
74
-
75
-
76
-
77
-
78
-
79
-
80
-
81
-
82
-
83
-
84
-
85
-
86
-
87
-
88
-
89
-
90
-
91
-
92
-
93
-
94
-
95
-
96
-
97
-
98
-
99
-
100
-
101
-
102
-
103
-
104
-
105
-
106
-
107
-
108
-
109
-
110
-
111
-
112
-
113
-
114
-
115
-
116
-
117
-
118
-
119
-
120
-
121
-
122
-
123
-
124
-
125
-
126
-
127
-
128
-
129
-
130
-
131
-
132
-
133
-
134
-
135
-
136
-
137
-
138
-
139
-
140
-
141
-
142
-
143
-
144
-
145
-
146
-
147
-
148
-
149
-
150
-
151
-
152
-
153
-
154
-
155
-
156
-
157
-
158
-
159
-
160
-
161
-
162
-
163
-
164
-
165
-
166
-
167
-
168
-
169
-
170
-
171
-
172
-
173
-
174
-
175
-
176
-
177
-
178
-
179
-
180
-
181
-
182
-
183
-
184
-
185
-
186
-
187
-
188
-
189
-
190
-
191
-
192
-
193
-
194
-
195
-
196
-
197
-
198
-
199
-
200
-
201
-
202
-
203
-
204
-
205
-
206
-
207
-
208
-
209
-
210
-
211
-
212
-
213
-
214
-
215
-
216
-
217
-
218
-
219
-
220
-
221
-
222
-
223
-
224
-
225
-
226
-
227
-
228
-
229
-
230
-
231
-
232
-
233
-
234
-
235
-
236
-
237
-
238
-
239
-
240
-
241
-
242
-
243
-
244
-
245
-
246
-
247
-
248
-
249
-
250
-
251
-
252
-
253
-
254
-
255
-
256
-
257
-
258
-
259
-
260
-
261
-
262
-
263
-
264
-
265
-
266
-
267
-
268
-
269
-
270
-
271
-
272
-
273
-
274
-
275
-
276
-
277
-
278
-
279
-
280
-
281
-
282
-
283
-
284
-
285
-
286
-
287
 |
 |