Sony DSC S500 Instruction Manual - Page 14
Change the language setting, Select the image size for still images, Press, Image Size - date set
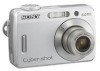 |
UPC - 027242692541
View all Sony DSC S500 manuals
Add to My Manuals
Save this manual to your list of manuals |
Page 14 highlights
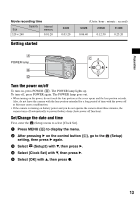
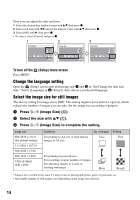
Now you can adjust the date and time. 1 Select the desired date display format with v/V, then press z. 2 Select each item with b/B and set the numeric value with v/V, then press z. 3 Select [OK] with B, then press z. • To cancel, select [Cancel] and press z. 1 2 3 Clock Set Y/M/D M/D/Y D/M/Y 2006 / 1 / 1 12 : 00 OK AM Cancel Clock Set Y/M/D M/D/Y D/M/Y 2006 / 1 / 1 12 : 00 OK AM Cancel Clock Set Y/M/D M/D/Y D/M/Y 2006 / 1 / 1 10 : 30 OK AM Cancel To turn off the (Setup) menu screen Press MENU. Change the language setting Open the (Setup) screen after performing step 1 and 2 in "Set/Change the date and time." Select [Language] in (Setup1), then choose your desired language. 1 Select the image size for still images The factory setting for image size is [6M]. This setting requires more memory capacity, which reduces the number of images you can take. Set the image size according to purpose. 1 Press (Image Size) (D). 2 Select the size with v/V (C). 3 Press (Image Size) to complete the setting. Image size 6M (2816 × 2112) (the default setting) 3:2 (2816 × 1872)* 3M (2048 × 1536) 2M (1632 × 1224) VGA (E-Mail) (640 × 480) Guidelines For printing in A4 size or high density images in A5 size No. of images Printing Less Fine For printing in postcard size For recording a larger number of images For attaching images to e-mail or creating web pages More Rough * Images are recorded in the same 3:2 aspect ratio as photograph printer paper or postcards, etc. • Recordable number of still images vary depending on the image size selected. 14
-
 1
1 -
2
-
3
-
4
-
5
-
6
-
7
-
8
-
 9
9 -
 10
10 -
 11
11 -
 12
12 -
 13
13 -
 14
14 -
 15
15 -
 16
16 -
 17
17 -
 18
18 -
 19
19 -
20
-
21
-
22
-
23
-
24
-
25
-
26
-
27
-
28
 |
 |
