Sony DSC-TX7 Cyber-shot® Handbook - Page 140
Printing still images
 |
UPC - 027242779143
View all Sony DSC-TX7 manuals
Add to My Manuals
Save this manual to your list of manuals |
Page 140 highlights
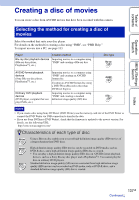
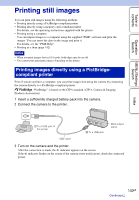
Table of contents Operation Search MENU/Settings Search Printing still images You can print still images using the following methods. • Printing directly using a PictBridge-compliant printer • Printing directly using a memory card-compliant printer For details, see the operating instructions supplied with the printer. • Printing using a computer You can import images to a computer using the supplied "PMB" software and print the images. You can insert the date on the image and print it. For details, see the "PMB Help". • Printing at a shop (page 142) Notes • When you print images shot in 16:9 mode, both edges may be cut off. • You cannot print panoramic images depending on the printer. Printing images directly using a PictBridgecompliant printer Even if you do not have a computer, you can print images shot using the camera by connecting the camera directly to a PictBridge-compliant printer. "PictBridge" is based on the CIPA standard. (CIPA: Camera & Imaging Products Association) 1 Insert a sufficiently charged battery pack into the camera. 2 Connect the camera to the printer. 1 To a USB jack of the printer 2 To a USB jack Multi-output stand USB cable 3 Turn on the camera and the printer. After the connection is made, the indicator appears on the screen. If the indicator flashes on the screen of the camera (error notification), check the connected printer. Index 140GB Continued r
-
 1
1 -
2
-
3
-
4
-
5
-
6
-
7
-
8
-
9
-
10
-
11
-
12
-
13
-
14
-
15
-
16
-
17
-
18
-
19
-
20
-
21
-
22
-
23
-
24
-
25
-
26
-
27
-
28
-
29
-
30
-
31
-
32
-
33
-
34
-
35
-
36
-
37
-
38
-
39
-
40
-
41
-
42
-
43
-
44
-
45
-
46
-
47
-
48
-
49
-
50
-
51
-
52
-
53
-
54
-
55
-
56
-
57
-
58
-
59
-
60
-
61
-
62
-
63
-
64
-
65
-
66
-
67
-
68
-
69
-
70
-
71
-
72
-
73
-
74
-
75
-
76
-
77
-
78
-
79
-
80
-
81
-
82
-
83
-
84
-
85
-
86
-
87
-
88
-
89
-
90
-
91
-
92
-
93
-
94
-
95
-
96
-
97
-
98
-
99
-
100
-
101
-
102
-
103
-
104
-
105
-
106
-
107
-
108
-
109
-
110
-
111
-
112
-
113
-
114
-
115
-
116
-
117
-
118
-
119
-
120
-
121
-
122
-
123
-
124
-
125
-
126
-
127
-
128
-
129
-
130
-
131
-
132
-
133
-
134
-
 135
135 -
 136
136 -
 137
137 -
 138
138 -
 139
139 -
 140
140 -
 141
141 -
 142
142 -
 143
143 -
 144
144 -
 145
145 -
146
-
147
-
148
-
149
-
150
-
151
-
152
-
153
-
154
-
155
-
156
-
157
-
158
-
159
-
160
-
161
-
162
-
163
-
164
-
165
-
166
-
167
-
168
 |
 |