Sony DSC-W100 User Guide - Page 17
step 4 in Read This First, Selecting the image size for use
 |
View all Sony DSC-W100 manuals
Add to My Manuals
Save this manual to your list of manuals |
Page 17 highlights
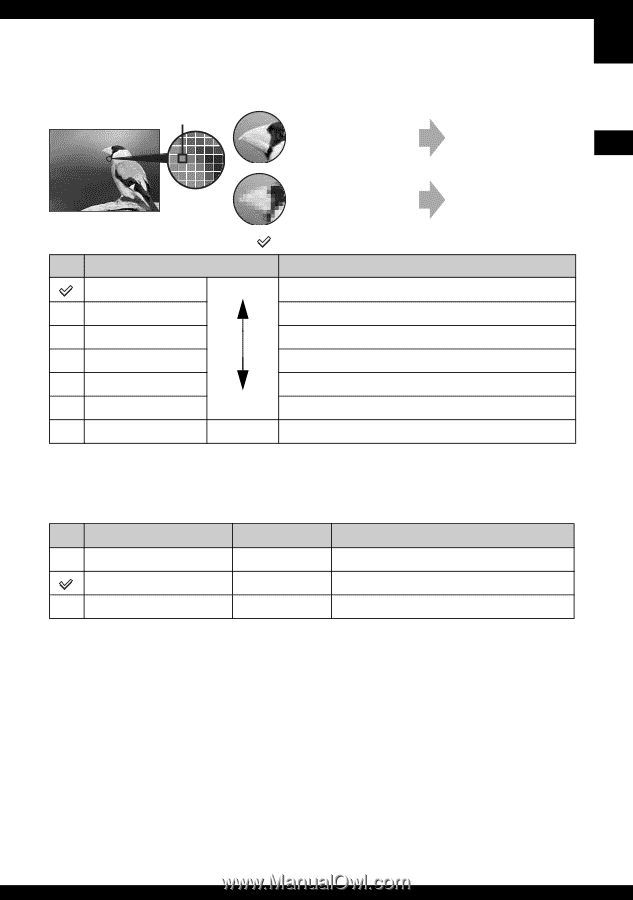
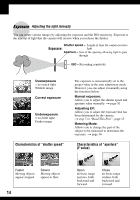
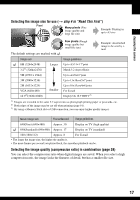
Enjoying the camera Selecting the image size for use (t step 4 in "Read This First") Pixel Many pixels (Fine image quality and large file size) Example: Printing in up to A3 size Few pixels (Rough image quality but small file size) The default settings are marked with . Example: An attached image to be sent by email Image size Usage guidelines 8M (3264×2448) 3:21) (3264×2176) Larger Up to A3/11× 17"print Match 3:2 Aspect Ratio 5M (2592 × 1944) Up to A4/8×10"print 3M (2048×1536) Up to 13×18cm/5×7"print 2M (1632×1224) VGA (640×480) 16:92)(1920×1080) Smaller Up to 10×15cm/4×6"print For E-mail Display On 16:9 HDTV3) 1) Images are recorded in the same 3:2 aspect ratio as photograph printing paper or postcards, etc. 2) Both edges of the image may be cut off when printing (page 91). 3) By using a Memory Stick slot or USB connection, you can enjoy higher quality images. Movie image size Frame/Second Usage guidelines 640(Fine) (640×480) Approx. 30 Display on TV (high quality) 640(Standard) (640×480) Approx. 17 Display on TV (standard) 160 (160×112) Approx. 8 For E-mail • The larger the image size, the higher the quality is. • The more frames per second you played back, the smoother playback can be. Selecting the image quality (compression ratio) in combination (page 38) You can select the compression ratio when digital images are saved. When you select a high compression ratio, the image lacks the fineness of detail, but has a smaller file size. 17
-
 1
1 -
2
-
3
-
4
-
5
-
6
-
7
-
8
-
9
-
10
-
11
-
 12
12 -
 13
13 -
 14
14 -
 15
15 -
 16
16 -
 17
17 -
 18
18 -
 19
19 -
 20
20 -
 21
21 -
 22
22 -
23
-
24
-
25
-
26
-
27
-
28
-
29
-
30
-
31
-
32
-
33
-
34
-
35
-
36
-
37
-
38
-
39
-
40
-
41
-
42
-
43
-
44
-
45
-
46
-
47
-
48
-
49
-
50
-
51
-
52
-
53
-
54
-
55
-
56
-
57
-
58
-
59
-
60
-
61
-
62
-
63
-
64
-
65
-
66
-
67
-
68
-
69
-
70
-
71
-
72
-
73
-
74
-
75
-
76
-
77
-
78
-
79
-
80
-
81
-
82
-
83
-
84
-
85
-
86
-
87
-
88
-
89
-
90
-
91
-
92
-
93
-
94
-
95
-
96
-
97
-
98
-
99
-
100
-
101
-
102
-
103
-
104
-
105
-
106
-
107
 |
 |