Sony DSC-W310 Cyber-shot® Handbook - Page 78
Uploading images to a media service
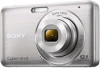 |
UPC - 027242776791
View all Sony DSC-W310 manuals
Add to My Manuals
Save this manual to your list of manuals |
Page 78 highlights
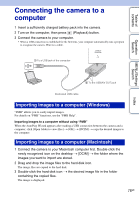
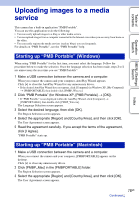
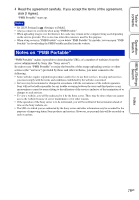
Table of contents Operation Search MENU/Settings Search Index Uploading images to a media service This camera has a built-in application "PMB Portable". You can use this application to do the following: • You can easily upload images to a blog or other media service. • You can upload images from a computer connected to the Internet even when you are away from home or the office. • You can easily register the media services (such as blogs) you use frequently. For details on "PMB Portable", see the "PMB Portable" help. Starting up "PMB Portable" (Windows) When using "PMB Portable" for the first time, you must select the language. Follow the procedure below to make the selection. Once the language selection has been made, steps 3 to 5 are unnecessary the next time you use "PMB Portable". 1 Make a USB connection between the camera and a computer. When you connect the camera and your computer, AutoPlay Wizard appears. Click [×] to close the AutoPlay Wizard for any unnecessary drives. • If the desired AutoPlay Wizard does not appear, click [Computer] (in Windows XP, [My Computer]) t [PMBPORTABLE], then double-click [PMBP_Win.exe]. 2 Click "PMB Portable" (for Windows XP, [PMB Portable] t [OK]). • If "PMB Portable" is not displayed within the AutoPlay Wizard, click [Computer] t [PMBPORTABLE], then double-click [PMBP_Win.exe]. The Language Selection screen appears. 3 Select the desired language, then click [OK]. The Region Selection screen appears. 4 Select the appropriate [Region] and [Country/Area], and then click [OK]. The User Agreement screen appears. 5 Read the agreement carefully. If you accept the terms of the agreement, click [I Agree]. "PMB Portable" starts up. Starting up "PMB Portable" (Macintosh) 1 Make a USB connection between the camera and a computer. When you connect the camera and your computer, [PMBPORTABLE] appears on the desktop. Click [×] to close any unnecessary drives. 2 Click [PMBP_Mac] in the [PMBPORTABLE] folder. The Region Selection screen appears. 3 Select the appropriate [Region] and [Country/Area], and then click [OK]. The User Agreement screen appears. 78GB Continued r
-
 1
1 -
2
-
3
-
4
-
5
-
6
-
7
-
8
-
9
-
10
-
11
-
12
-
13
-
14
-
15
-
16
-
17
-
18
-
19
-
20
-
21
-
22
-
23
-
24
-
25
-
26
-
27
-
28
-
29
-
30
-
31
-
32
-
33
-
34
-
35
-
36
-
37
-
38
-
39
-
40
-
41
-
42
-
43
-
44
-
45
-
46
-
47
-
48
-
49
-
50
-
51
-
52
-
53
-
54
-
55
-
56
-
57
-
58
-
59
-
60
-
61
-
62
-
63
-
64
-
65
-
66
-
67
-
68
-
69
-
70
-
71
-
72
-
 73
73 -
 74
74 -
 75
75 -
 76
76 -
 77
77 -
 78
78 -
 79
79 -
 80
80 -
 81
81 -
 82
82 -
 83
83 -
84
-
85
-
86
-
87
-
88
-
89
-
90
-
91
-
92
-
93
-
94
-
95
-
96
-
97
-
98
 |
 |
