Sony DVP-NW50 Utility for In-Wall Unit Software User Manual - Page 7
Installing Utility for In-Wall Unit, Setup 2: Connecting the Computer to the Unit - troubleshooting
 |
View all Sony DVP-NW50 manuals
Add to My Manuals
Save this manual to your list of manuals |
Page 7 highlights
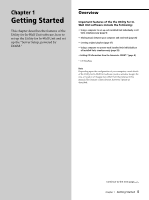
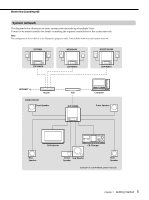
Setup 1: Installing the Utility for In-Wall Unit Software to Your Computer (continued) Installing Utility for In-Wall Unit Before installing Utility for In-Wall Unit software When the Utility for In-Wall Unit software is installed, the "Server Setup, powered by DiXiM" software is installed at the same time. Disable any virus protection software before installing the Utility for In-Wall Unit software. 1 Turn on your computer, and start up Windows. 2 Insert the supplied CD-ROM into your computer's CD or DVD drive. The setup program starts automatically, and then the installation window appears. 3 Follow the on-screen instructions. Read the instructions carefully. If any trouble occurs during the installation, see "Troubleshooting" (page 34). To uninstall the Utility for In-Wall Unit or the "Server Setup, powered by DiXiM" To uninstall the Utility for In-Wall Unit or the "Server Setup, powered by DiXiM," follow the steps below. To uninstall both software programs, perform the procedure twice, selecting a different program each time. 1 Click "Start" on the Windows taskbar to select "Control Panel." 2 Double-click "Add or Remove Programs." 3 Click "Utility for In-Wall Unit" or "Utility for In-Wall Unit-Server Setup, powered by DiXiM" in the "Currently installed programs" list. 4 Click "Change/Remove." Follow the on-screen instructions to uninstall the software. Setup 2: Connecting the Computer to the Unit For your computer to be able to communicate with your installed Units, the computer and the Units must be on a single 100BASE-TX network. Typically, this requires 100BASE-TX Ethernet cabling and a 100BASE-TX router, hub, or switch. For details on setting up such a network, refer to the instruction manual supplied with your router, hub, or switch, and consult with the local installer of your Units. If other network devices are connected to the same network as your Units and your computer, these devices may be able to "see" your Units on the network or may be "seen" by your Units or computer. This does not mean, however, that these other products will be able to use the network features of the Units and the Utility for In-Wall Units software, such as music streaming. Chapter 1 Getting Started 7
-
 1
1 -
 2
2 -
 3
3 -
 4
4 -
 5
5 -
 6
6 -
 7
7 -
 8
8 -
 9
9 -
 10
10 -
 11
11 -
 12
12 -
13
-
14
-
15
-
16
-
17
-
18
-
19
-
20
-
21
-
22
-
23
-
24
-
25
-
26
-
27
-
28
-
29
-
30
-
31
-
32
-
33
-
34
-
35
-
36
-
37
-
38
-
39
-
40
 |
 |
