Sony FWDS42H1 Operating Instructions - Page 82
PC Operation, Controlling the display, Setting items on respective screens
 |
UPC - 027242754423
View all Sony FWDS42H1 manuals
Add to My Manuals
Save this manual to your list of manuals |
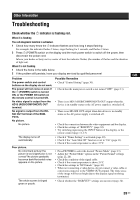
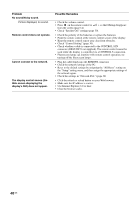
Page 82 highlights
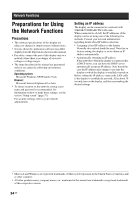
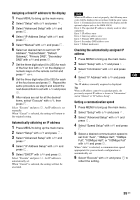
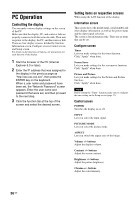
PC Operation Controlling the display You can make various display settings on the screen of the PC. Make sure that the display, PC, and router or hub are properly connected with the network cable. Then turn on power to the display, the PC, and the router or hub. There are four display screens, divided by function: Information screen, Configure screen, Control screen, and Setup screen. For details on the functions of buttons, see instructions for each function of the display. 1 Start the browser of the PC (Internet Explorer 6.0 or later). 2 Enter the IP address that was assigned to the display in the previous page as "http://xxx.xxx.xxx.xxx", then press the ENTER key on the keyboard. When a user name and password have been set, the "Network Password" screen appears. Enter the user name and password that were set, and then proceed to the next step. 3 Click the function tab at the top of the screen and select the desired screen. Setting items on respective screens When using the LAN function of the display Information screen This screen shows the model name, serial number and other display information, as well as the power status and the input signal selection. The screen is for information only. There are no items that can be set. Configure screen Timer Lets you make settings for the timer function. Click "Apply" when done. Screen Saver Lets you make settings for the screensaver function. Click "Apply" when done. Picture and Picture Lets you make settings for the Picture and Picture function. Click "Apply" when done. Note Before setting the "Timer" function, make sure to configure the time setting on the Setup screen (page 37). Control screen POWER Switches the display on or off. INPUT Lets you select the input signal. PICTURE MODE Lets you select the picture mode. ASPECT Lets you switch the aspect ratio of the image. Volume +/- buttons Adjust the display volume. Contrast +/- buttons Adjust the screen contrast. Brightness +/- buttons Adjust the picture brightness. Chroma +/- buttons Adjust the color intensity. 36 GB
-
 1
1 -
2
-
3
-
4
-
5
-
6
-
7
-
8
-
9
-
10
-
11
-
12
-
13
-
14
-
15
-
16
-
17
-
18
-
19
-
20
-
21
-
22
-
23
-
24
-
25
-
26
-
27
-
28
-
29
-
30
-
31
-
32
-
33
-
34
-
35
-
36
-
37
-
38
-
39
-
40
-
41
-
42
-
43
-
44
-
45
-
46
-
47
-
48
-
49
-
50
-
51
-
52
-
53
-
54
-
55
-
56
-
57
-
58
-
59
-
60
-
61
-
62
-
63
-
64
-
65
-
66
-
67
-
68
-
69
-
70
-
71
-
72
-
73
-
74
-
75
-
76
-
 77
77 -
 78
78 -
 79
79 -
 80
80 -
 81
81 -
 82
82 -
 83
83 -
 84
84 -
 85
85 -
 86
86 -
 87
87 -
88
-
89
-
90
-
91
-
92
-
93
-
94
-
95
-
96
-
97
-
98
-
99
-
100
-
101
-
102
-
103
-
104
-
105
-
106
-
107
-
108
-
109
-
110
-
111
-
112
-
113
-
114
-
115
-
116
-
117
-
118
-
119
-
120
-
121
-
122
-
123
-
124
-
125
-
126
-
127
-
128
-
129
-
130
-
131
-
132
-
133
-
134
-
135
-
136
-
137
-
138
-
139
-
140
-
141
-
142
-
143
-
144
-
145
-
146
-
147
-
148
-
149
-
150
-
151
-
152
-
153
-
154
-
155
-
156
-
157
-
158
-
159
-
160
-
161
-
162
-
163
-
164
-
165
-
166
-
167
-
168
-
169
-
170
-
171
-
172
-
173
-
174
-
175
-
176
-
177
-
178
-
179
-
180
-
181
-
182
-
183
-
184
-
185
-
186
-
187
-
188
-
189
-
190
-
191
-
192
-
193
-
194
-
195
-
196
-
197
-
198
-
199
-
200
-
201
-
202
-
203
-
204
-
205
-
206
-
207
-
208
-
209
-
210
-
211
-
212
-
213
-
214
-
215
-
216
-
217
-
218
-
219
-
220
-
221
-
222
-
223
-
224
-
225
-
226
-
227
-
228
-
229
-
230
-
231
-
232
-
233
-
234
-
235
-
236
-
237
-
238
-
239
-
240
-
241
-
242
-
243
-
244
-
245
-
246
-
247
-
248
-
249
-
250
-
251
-
252
-
253
-
254
-
255
-
256
-
257
-
258
-
259
-
260
-
261
-
262
-
263
-
264
-
265
-
266
-
267
-
268
-
269
-
270
-
271
-
272
-
273
-
274
-
275
-
276
-
277
-
278
-
279
-
280
-
281
-
282
-
283
-
284
-
285
-
286
-
287
-
288
-
289
-
290
-
291
-
292
-
293
-
294
-
295
-
296
-
297
-
298
-
299
-
300
-
301
-
302
-
303
 |
 |