Sony HCD-BX5BT Operating Instructions - Page 11
Setting the clock, Getting Started
 |
View all Sony HCD-BX5BT manuals
Add to My Manuals
Save this manual to your list of manuals |
Page 11 highlights
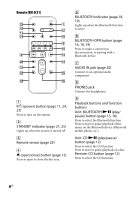
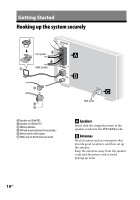
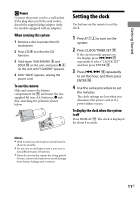
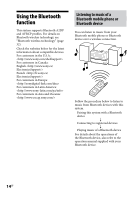
Getting Started Power Connect the power cord to a wall socket. If the plug does not fit the wall socket, detach the supplied plug adaptor (only for models equipped with an adaptor). When carrying this system 1 Remove a disc to protect the CD mechanism. 2 Press CD to select the CD function. 3 Hold down TUNER/BAND and DSGX on the unit, and press on the unit until "STANDBY" appears. 4 After "LOCK" appears, unplug the power cord. To use the remote Slide and remove the battery compartment lid , and insert the two supplied R6 (size AA) batteries, side first, matching the polarities shown below. Setting the clock Use buttons on the remote to set the clock. 1 Press to turn on the system. 2 Press CLOCK/TIMER SET . If the current mode appears on the display, press repeatedly to select "CLOCK SET" and then press ENTER . 3 Press repeatedly to set the hour, and then press ENTER . 4 Use the same procedure to set the minutes. The clock settings are lost when you disconnect the power cord or if a power failure occurs. To display the clock when the system is off Press DISPLAY . The clock is displayed for about 8 seconds. Notes With normal use, the batteries should last for about six months. Do not mix an old battery with a new one or mix different types of batteries. If you do not use the remote for a long period of time, remove the batteries to avoid damage from battery leakage and corrosion. 11GB
-
 1
1 -
2
-
3
-
4
-
5
-
 6
6 -
 7
7 -
 8
8 -
 9
9 -
 10
10 -
 11
11 -
 12
12 -
 13
13 -
 14
14 -
 15
15 -
 16
16 -
17
-
18
-
19
-
20
-
21
-
22
-
23
-
24
-
25
-
26
-
27
-
28
-
29
-
30
-
31
-
32
-
33
-
34
-
35
-
36
 |
 |
