Sony HCD-FR10W Operating Instructions - Page 21
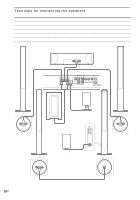
Step 2: Antenna (aerial) Hookups, Terminals for connecting the antennas (aerials)
 |
View all Sony HCD-FR10W manuals
Add to My Manuals
Save this manual to your list of manuals |
Page 21 highlights
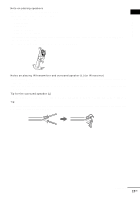
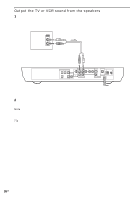
Getting Started Step 2: Antenna (aerial) Hookups Connect the supplied AM/FM antennas (aerials) for listening to the radio. Terminals for connecting the antennas (aerials) Connect the AM loop antenna (aerial) FM wire antenna (aerial) To the AM terminals FM 75Ω COAXIAL jack AM loop antenna (aerial) SPEAKER R FRONT R CENTER FRONT L DIR-T1 SURROUND BACK R WOOFER WOOFER VIDEO AUDIO IN AUDIO IN S AT Y L PB/CB PR/CR S VIDEO (DVD ONLY) OPTICAL DIGITAL IN COMPOMEMT VIDEO OUT S AT L VIDEO MONITOR OUT AM FM 75 COAXIAL FM wire antenna (aerial) Notes • To prevent noise pickup, keep the AM loop antenna (aerial) away from the system and other components. • Be sure to fully extend the FM wire antenna (aerial). • After connecting the FM wire antenna (aerial), keep it as horizontal as possible. Tip When you connect the supplied AM loop antenna (aerial), the cord (A) and the cord (B) can be connected in either terminal. AM A B continued 21US
-
 1
1 -
2
-
3
-
4
-
5
-
6
-
7
-
8
-
9
-
10
-
11
-
12
-
13
-
14
-
15
-
 16
16 -
 17
17 -
 18
18 -
 19
19 -
 20
20 -
 21
21 -
 22
22 -
 23
23 -
 24
24 -
 25
25 -
 26
26 -
27
-
28
-
29
-
30
-
31
-
32
-
33
-
34
-
35
-
36
-
37
-
38
-
39
-
40
-
41
-
42
-
43
-
44
-
45
-
46
-
47
-
48
-
49
-
50
-
51
-
52
-
53
-
54
-
55
-
56
-
57
-
58
-
59
-
60
-
61
-
62
-
63
-
64
-
65
-
66
-
67
-
68
-
69
-
70
-
71
-
72
-
73
-
74
-
75
-
76
-
77
-
78
-
79
-
80
-
81
-
82
-
83
-
84
-
85
-
86
-
87
-
88
-
89
-
90
-
91
-
92
-
93
-
94
-
95
-
96
-
97
-
98
-
99
-
100
-
101
-
102
-
103
-
104
-
105
-
106
-
107
-
108
-
109
-
110
-
111
-
112
-
113
-
114
-
115
-
116
-
117
-
118
-
119
-
120
-
121
-
122
-
123
-
124
-
125
-
126
-
127
-
128
-
129
-
130
-
131
-
132
-
133
-
134
-
135
-
136
-
137
-
138
-
139
-
140
-
141
-
142
-
143
-
144
-
145
-
146
-
147
-
148
-
149
-
150
-
151
-
152
-
153
-
154
-
155
-
156
-
157
-
158
-
159
-
160
-
161
-
162
-
163
-
164
-
165
-
166
-
167
-
168
-
169
-
170
-
171
-
172
-
173
-
174
-
175
-
176
-
177
-
178
-
179
-
180
-
181
-
182
-
183
-
184
-
185
-
186
-
187
-
188
-
189
-
190
-
191
-
192
-
193
-
194
-
195
-
196
-
197
-
198
-
199
-
200
-
201
-
202
-
203
-
204
-
205
-
206
-
207
-
208
-
209
-
210
-
211
-
212
-
213
-
214
-
215
-
216
-
217
-
218
-
219
-
220
-
221
-
222
-
223
-
224
-
225
-
226
-
227
-
228
-
229
-
230
-
231
-
232
-
233
-
234
-
235
-
236
 |
 |
