Sony HVR-DR60 Operating Instructions - Page 10
Using in VIDEO mode, Connecting this unit to a camcorder, Menu settings - camcorder accessories
 |
UPC - 027242706989
View all Sony HVR-DR60 manuals
Add to My Manuals
Save this manual to your list of manuals |
Page 10 highlights
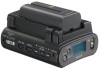
Using in VIDEO mode Connecting this unit to a camcorder As an example, the following steps and illustration show how to connect this unit to an HVR-V1U/V1N/V1E/V1P digital HD camcorder. 1 Attach the supplied shoe adaptor to this unit. 2 Attach this unit to the accessory shoe of the HVR-V1U/ V1N/V1E/V1P. 3 Connect the supplied i.LINK cable to the HDV/DV jack on this unit and the HDV/DV jack on the HVRV1U/V1N/V1E/V1P. 4 Attach an optional battery pack (NP-F570/F770/F970) to this unit. 3 4 1 2 3 Menu settings Check the individual settings and change them if necessary. For details, see page 11. 1 Display the menu screen on the LCD screen by pressing the MENU button. 2 Select the desired setting by pressing the PREVIOUS/ REW button or the NEXT/FF button and press the PLAY/EXEC button. 3 Select the desired item by pressing the PREVIOUS/REW button or the NEXT/FF button and press the PLAY/ EXEC button. 4 Return to the VIDEO mode screen by pressing the STOP button. Note You cannot record or play back movies while the menu screen is displayed on the LCD screen. Also, you cannot change to the menu screen on the LCD screen during recording or playback. 10
-
 1
1 -
2
-
3
-
4
-
 5
5 -
 6
6 -
 7
7 -
 8
8 -
 9
9 -
 10
10 -
 11
11 -
 12
12 -
 13
13 -
 14
14 -
 15
15 -
16
-
17
-
18
-
19
-
20
-
21
-
22
-
23
-
24
-
25
-
26
-
27
-
28
-
29
-
30
 |
 |
