Sony ICD-UX70RED Operating Instructions - Page 28
playback starts, To stop the alarm before
 |
View all Sony ICD-UX70RED manuals
Add to My Manuals
Save this manual to your list of manuals |
Page 28 highlights
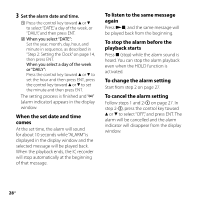
3 Set the alarm date and time. Press the control key toward or to select "DATE," a day of the week, or "DAILY," and then press ENT. When you select "DATE": Set the year, month, day, hour, and minute in sequence, as described in "Step 2: Setting the Clock" on page 14, then press ENT. When you select a day of the week or "DAILY": Press the control key toward or to set the hour and then press ENT, press the control key toward or to set the minute and then press ENT. The setting process is finished and "" (alarm indicator) appears in the display window. When the set date and time comes At the set time, the alarm will sound for about 10 seconds while "ALARM" is displayed in the display window and the selected message will be played back. When the playback ends, the IC recorder will stop automatically at the beginning of that message. To listen to the same message again Press , and the same message will be played back from the beginning. To stop the alarm before the playback starts Press (stop) while the alarm sound is heard. You can stop the alarm playback even when the HOLD function is activated. To change the alarm setting Start from step 2 on page 27. To cancel the alarm setting Follow steps 1 and 2- on page 27. In step 2-, press the control key toward or to select "OFF," and press ENT. The alarm will be cancelled and the alarm indicator will disappear from the display window. 28GB
-
 1
1 -
2
-
3
-
4
-
5
-
6
-
7
-
8
-
9
-
10
-
11
-
12
-
13
-
14
-
15
-
16
-
17
-
18
-
19
-
20
-
21
-
22
-
 23
23 -
 24
24 -
 25
25 -
 26
26 -
 27
27 -
 28
28 -
 29
29 -
 30
30 -
 31
31 -
 32
32 -
 33
33 -
34
-
35
-
36
-
37
-
38
-
39
-
40
-
41
-
42
-
43
-
44
-
45
-
46
-
47
-
48
-
49
-
50
-
51
-
52
-
53
-
54
-
55
-
56
-
57
-
58
-
59
-
60
-
61
-
62
-
63
-
64
 |
 |