Sony KLV-S20G10 Operating Instructions - Page 31
Setting Up the Channel List, Using Initial Setup
 |
View all Sony KLV-S20G10 manuals
Add to My Manuals
Save this manual to your list of manuals |
Page 31 highlights
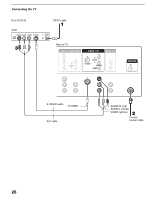
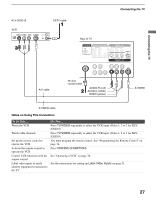
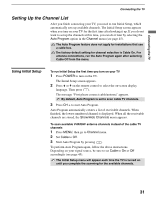
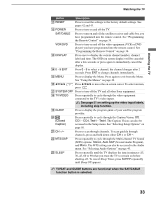
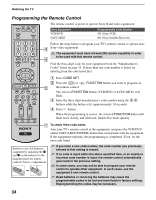
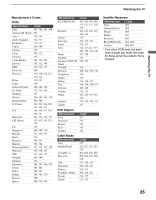
Connecting the TV Connecting the TV Setting Up the Channel List After you finish connecting your TV, you need to run Initial Setup, which automatically sets up available channels. The Initial Setup screen appears when you turn on your TV for the first time after hooking it up. If you do not want to set up the channels at this time, you can do it later by selecting the Auto Program option in the Channel menu (see page 45). The Auto Program feature does not apply for installations that use a cable box. The factory default setting for channel selection is Cable On. For antenna connections, run the Auto Program again after selecting Cable Off from the menu. Using Initial Setup To run Initial Setup the first time you turn on your TV 1 Press POWER to turn on the TV. The Initial Setup screen appears. 2 Press V or v on the remote control to select the on-screen display language. Then press . The message "First please connect cable/antenna" appears. By default, Auto Program is set to scan cable TV channels. 3 Press CH + to start Auto Program. Auto Program automatically creates a list of receivable channels. When finished, the lowest numbered channel is displayed. When all the receivable channels are stored, the Show/Hide Channels menu appears. To scan available VHF/UHF antenna channels instead of the cable TV channels 1 Press MENU, then go to Channel menu. 2 Set Cable to Off. 3 Start Auto Program by pressing . To perform Auto Program again, follow the above instructions. Depending on your signal source, be sure to set Cable to On or Off accordingly (see page 45). The Initial Setup menu will appear each time the TV is turned on until you complete the scanning for the available channels. 31
-
 1
1 -
2
-
3
-
4
-
5
-
6
-
7
-
8
-
9
-
10
-
11
-
12
-
13
-
14
-
15
-
16
-
17
-
18
-
19
-
20
-
21
-
22
-
23
-
24
-
25
-
 26
26 -
 27
27 -
 28
28 -
 29
29 -
 30
30 -
 31
31 -
 32
32 -
 33
33 -
 34
34 -
 35
35 -
 36
36 -
37
-
38
-
39
-
40
-
41
-
42
-
43
-
44
-
45
-
46
-
47
-
48
-
49
-
50
-
51
-
52
-
53
-
54
-
55
-
56
-
57
-
58
-
59
-
60
 |
 |