Sony KP-61V85 Operating Instructions - Page 24
Using the S-Link Function, Using the S-Link function without a Sony AV receiver, a Sony AV receiver
 |
View all Sony KP-61V85 manuals
Add to My Manuals
Save this manual to your list of manuals |
Page 24 highlights
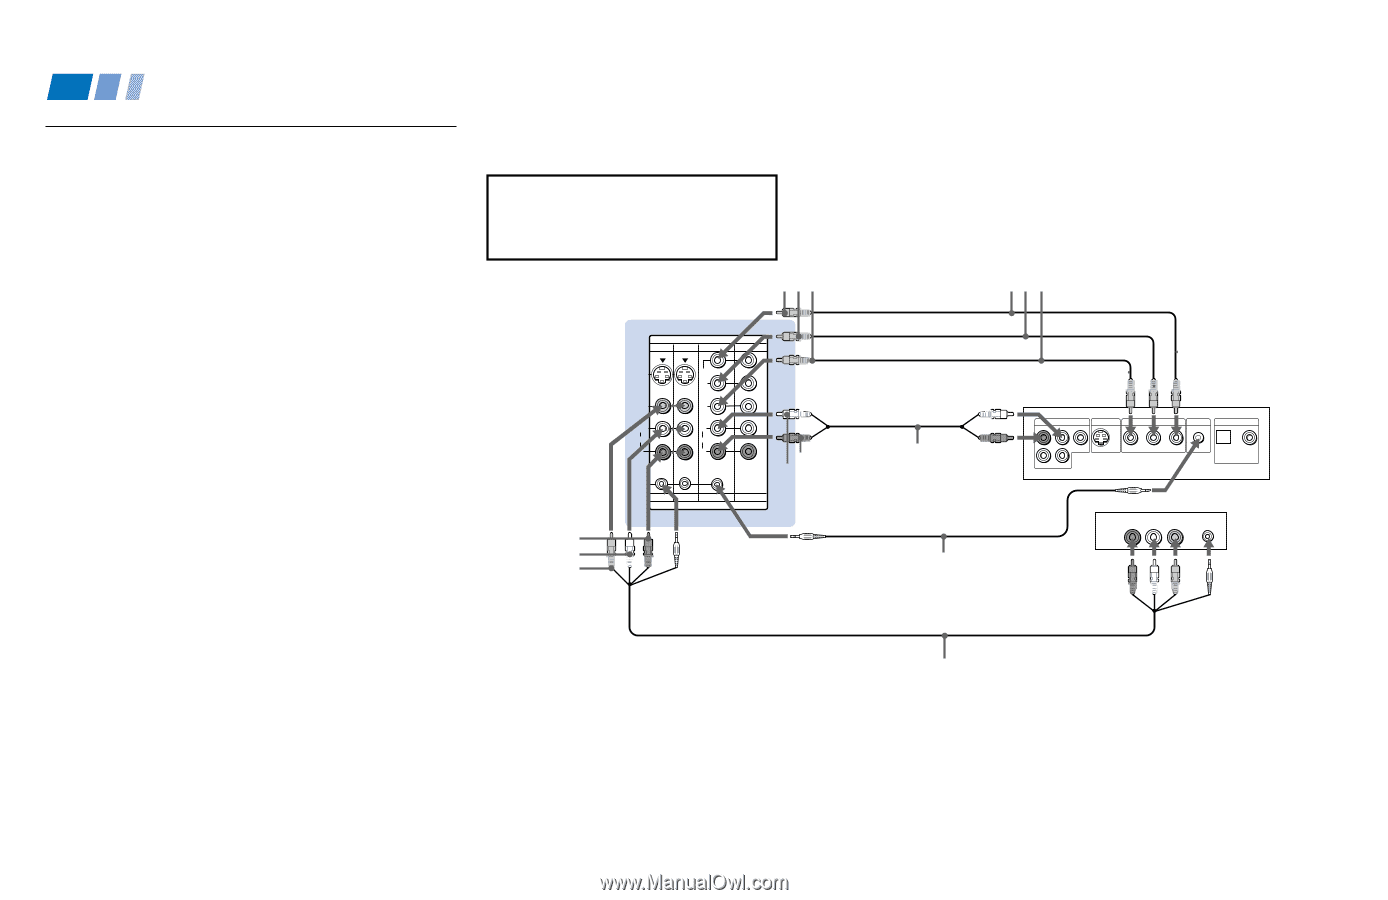
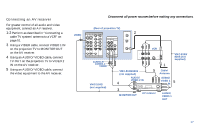
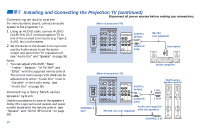
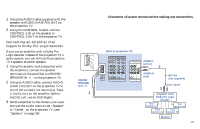
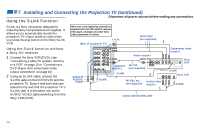
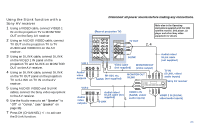
Installing and Connecting the Projection TV (continued) Disconnect all power sources before making any connections. Using the S-Link Function S-Link is a Sony innovation designed to make the Sony components work together. It allows you to automatically switch the projection TV's input mode to video when you press the play button on the Sony S-Link VCR. Using the S-Link function without a Sony AV receiver 1 Connect the Sony VCR (DVD). (see "Connecting a cable TV system/antenna to a VCR" on page 10 or "Connecting a DVD Player with component video output connectors" on page 16) 2 Using an S-LINK cable, connect the S-LINK jacks on the VCR (DVD) and the projection TV. Ensure that both ends are seated firmly and that the projection TV's S-LINK jack is in the same row as the AUDIO/VIDEO cable extending from the Sony VCR (DVD). Refer also to the Operating Instructions supplied with the VCR, satellite receiver, DVD player, LD player and other Sony video equipment for details. (Rear of projection TV) Y PB PR VMC-10HG (not supplied) 1 AUDIO-R AUDIO-L VIDEO IN VIDEO 1 VIDEO 3 VIDEO 4 VIDEO 5 S VIDEO VIDEO L (MONO) AUDIO R Y PB PR L AUDIO R S-LINK VIDEO 1 VIDEO 3 VIDEO 4 IN VIDEO 5 S-LINK Component video outputs Audio outputs AUDIO-R AUDIO-L S-LINK RK-74A (not supplied) LINE OUT S VIDEO OUT COMPONENT VIDEO OUT S-LINK DIGITAL OUT R-AUDIO 1-L VIDEO Y PB PR OPTICAL COAXIAL Sony DVD S-LINK 2 Sony VCR AUDIO R AUDIO L VIDEO S-LINK LINE OUT RK-G34, etc. (not supplied) Audio/video outputs 1 S-LINK Audio/video/S-LINK cable 20
-
 1
1 -
2
-
3
-
4
-
5
-
6
-
7
-
8
-
9
-
10
-
11
-
12
-
13
-
14
-
15
-
16
-
17
-
18
-
 19
19 -
 20
20 -
 21
21 -
 22
22 -
 23
23 -
 24
24 -
 25
25 -
 26
26 -
 27
27 -
 28
28 -
 29
29 -
30
-
31
-
32
-
33
-
34
-
35
-
36
-
37
-
38
-
39
-
40
-
41
-
42
-
43
-
44
-
45
-
46
-
47
-
48
-
49
-
50
-
51
-
52
-
53
-
54
-
55
-
56
-
57
-
58
-
59
-
60
-
61
-
62
-
63
-
64
-
65
-
66
 |
 |