Sony KP-61V85 Operating Instructions - Page 25
Using the S-Link function with a Sony AV receiver, TV to S-LINK on TV IN on the AV
 |
View all Sony KP-61V85 manuals
Add to My Manuals
Save this manual to your list of manuals |
Page 25 highlights
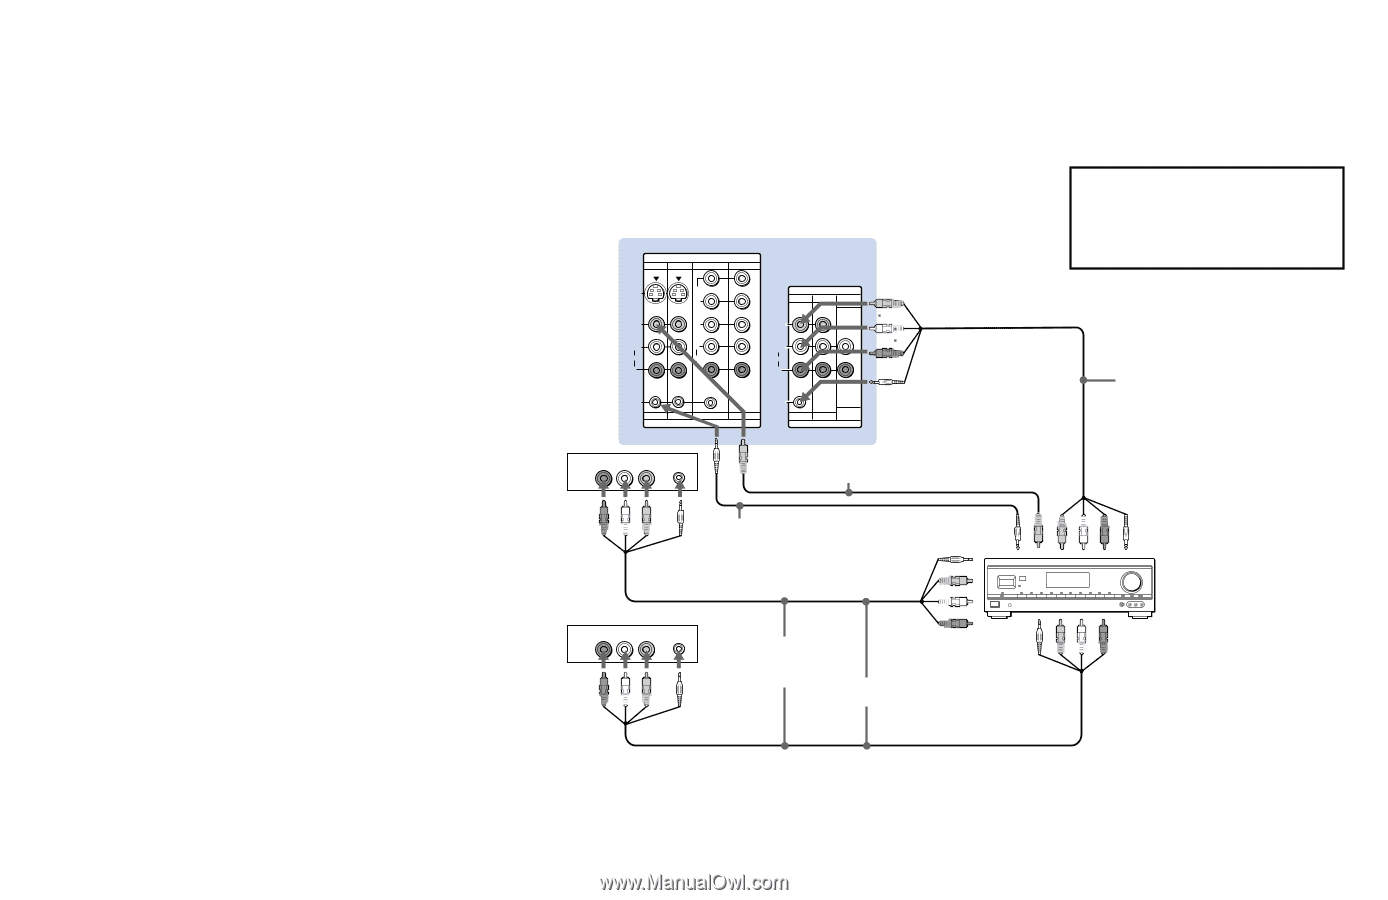
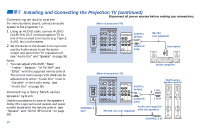
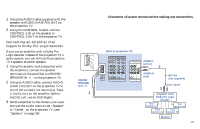
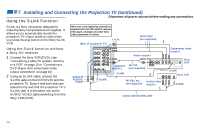
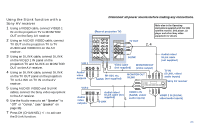
Using the S-Link function with a Sony AV receiver 1 Using a VIDEO cable, connect VIDEO 1 IN on the projection TV to MONITOR OUT on the Sony AV receiver. 2 Using an AUDIO/VIDEO cable, connect TV OUT on the projection TV to TV AUDIO and VIDEO IN on the AV receiver. 3 Using an S-LINK cable, connect S-LINK on the VIDEO 1 IN panel on the projection TV and S-LINK on MONITOR OUT on the AV receiver. 4 Using an S-LINK cable, connect S-LINK on the TV OUT panel on the projection TV to S-LINK on TV IN on the AV receiver. 5 Using AUDIO/VIDEO and S-LINK cables, connect the Sony video equipment to the AV receiver. 6 Use the Audio menu to set "Speaker" to "Off" or "Center." (see "Speaker" on page 36) 7 Press CH (CHANNEL) +/- to activate the S-Link function. Disconnect all power sources before making any connections. (Rear of projection TV) IN VIDEO 1 VIDEO 3 VIDEO 4 VIDEO 5 Refer also to the Operating Instructions supplied with the VCR, satellite receiver, DVD player, LD player and other Sony video equipment for details. S VIDEO Y PB VIDEO PR OUT TV MONITOR AUDIO (VAR/FIX) VIDEO TV OUT 2, 4 L (MONO) AUDIO R L AUDIO R L (MONO) AUDIO R S-LINK VIDEO 1 VIDEO 3 VIDEO 4 IN VIDEO 5 S-LINK AUDIO TV MONITOR (VAR/FIX) OUT S-LINK VCR 1 AUDIO R AUDIO L VIDEO LINE OUT S-LINK Video cable 3 1 (not supplied) MONITOR OUT (video output) Audio/ video outputs RK-G34, etc. S-LINK (not supplied) MONITOR OUT S-LINK Audio/video/ S-Link cable (not supplied) TV IN (S-LINK, video/ audio inputs) Sony AV receiver VCR 2 AUDIO R AUDIO L VIDEO LINE OUT Audio/ video outputs S-LINK Audio/video/ S-Link cable (not supplied) 5 S-LINK VIDEO 1 IN (S-LINK, video/ audio inputs) VIDEO 2 IN (S-LINK, video/audio inputs) 21
-
 1
1 -
2
-
3
-
4
-
5
-
6
-
7
-
8
-
9
-
10
-
11
-
12
-
13
-
14
-
15
-
16
-
17
-
18
-
19
-
 20
20 -
 21
21 -
 22
22 -
 23
23 -
 24
24 -
 25
25 -
 26
26 -
 27
27 -
 28
28 -
 29
29 -
 30
30 -
31
-
32
-
33
-
34
-
35
-
36
-
37
-
38
-
39
-
40
-
41
-
42
-
43
-
44
-
45
-
46
-
47
-
48
-
49
-
50
-
51
-
52
-
53
-
54
-
55
-
56
-
57
-
58
-
59
-
60
-
61
-
62
-
63
-
64
-
65
-
66
 |
 |